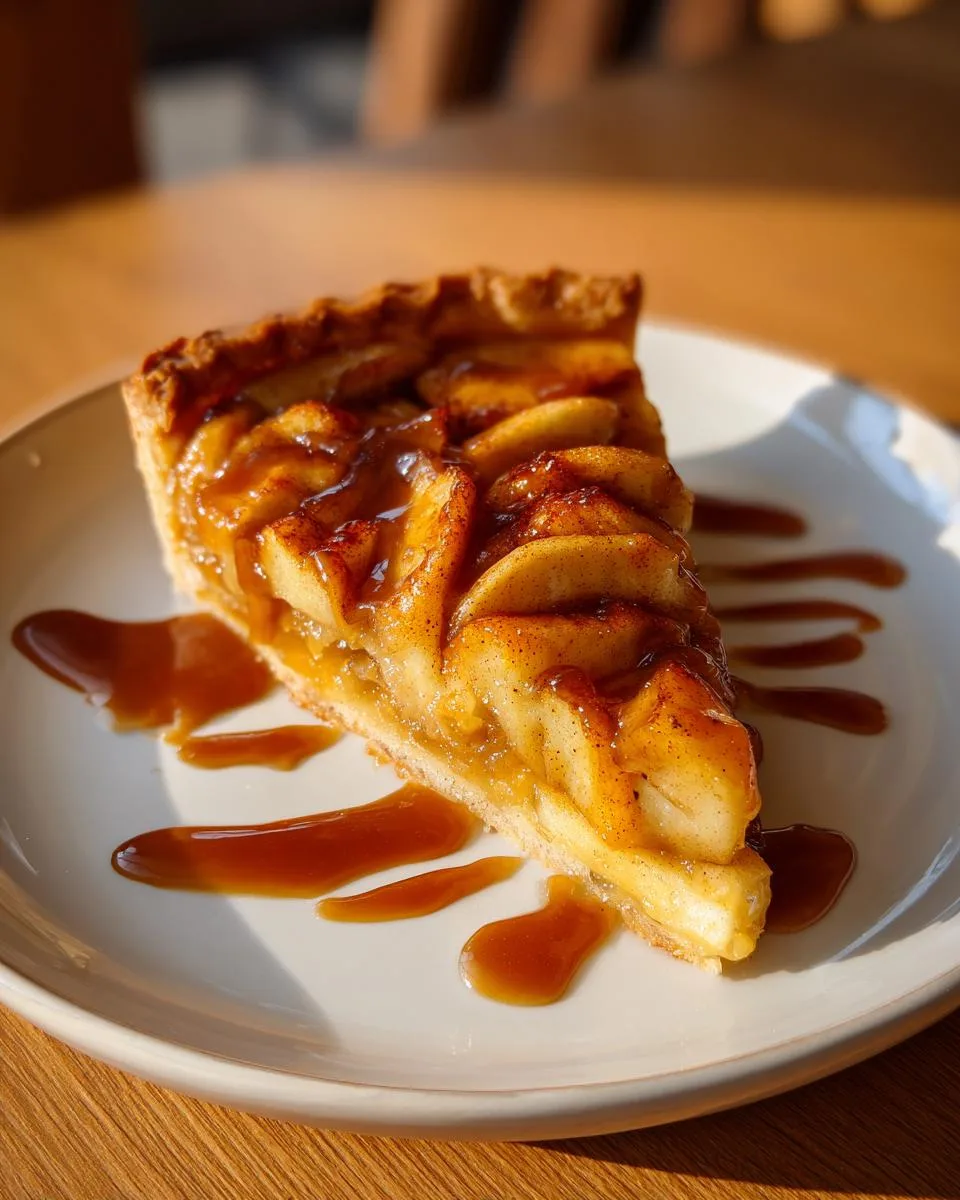
Oh, my caramel apple tart—it’s the dessert that makes my kitchen smell like pure autumn magic! There’s something about that buttery crust hugging caramel-kissed apples that just feels like a warm hug. I swear, every time I pull one out of the oven, my family materializes out of nowhere, forks at the ready.
This recipe? It’s my go-to when I want something fancy but secretly easy. The first time I made it, I was convinced it’d be a disaster—I mean, caramel and apples in a tart? But trust me, it’s foolproof. The crust stays crisp, the apples soften just right, and that caramel…oh, it bubbles into this golden perfection that’ll have you sneaking extra slices. It’s the kind of dessert that looks like you spent hours, but really, it’s mostly hands-off while the oven does the heavy lifting.
I’ve served this tart at everything from casual dinners to holiday gatherings, and without fail, someone always asks for the recipe. And now? It’s yours. Let’s bake something unforgettable.
Why You’ll Love This Caramel Apple Tart
Listen, I don’t just bake this tart—I crave it. And here’s why you will too:
- Effortless elegance: It looks like it took all day, but really? Just a little mixing, slicing, and letting the oven work its magic.
- That caramel-apple hug: Tart apples soften into sweetness, while the caramel wraps around them like a cozy blanket. Every bite is pure comfort.
- Versatile star power: Serve it warm with ice cream for dessert, or sneak a cold slice with coffee the next morning (no judgment).
- Crowd-pleaser magic: Kids adore it, guests think you’re a pastry chef, and honestly? You’ll feel like one too.
Trust me—once you try it, this tart will become your secret weapon. Just don’t blame me when everyone begs you to make it again!
Ingredients for Caramel Apple Tart
Okay, let’s talk ingredients—this tart is all about simple, quality stuff. Here’s what you’ll need:
- 2 cups all-purpose flour: The base of our buttery crust. Trust me, it’s worth measuring precisely for that perfect texture.
- 1/2 cup unsalted butter, chilled: Cold butter is key for a flaky crust. I like to cube it before adding it to the flour.
- 1/4 cup sugar: Just enough sweetness to balance the tart apples.
- 1/4 tsp salt: A pinch to enhance all the flavors.
- 4 medium apples, peeled and sliced: I swear by Granny Smith—they hold up beautifully and bring that tangy contrast to the caramel.
- 1/2 cup caramel sauce: Store-bought works, but homemade? Even better. Just don’t skimp—this is the star!
- 1 tsp cinnamon: A warm, cozy touch that ties it all together.
That’s it! Simple, right? Now, let’s turn these into something magical.
Equipment Needed for Caramel Apple Tart
Grab these basics—you probably already have most of them in your kitchen:
- 9-inch tart pan: The fluted edges make it look extra fancy, but any pie dish works in a pinch.
- Mixing bowl: For that dreamy, buttery crust.
- Pastry cutter or fork: To blend the dough until it’s just crumbly enough.
- Peeler and sharp knife: For prepping those apples—safety first!
- Oven: Set to 375°F (190°C) and ready to work its magic.
That’s it—no fancy gadgets required. Now, let’s get baking!
How to Make Caramel Apple Tart
Alright, let’s dive in! This is where the magic happens—trust me, it’s easier than you think. Just follow these steps, and you’ll have a showstopper tart in no time.
1. Prep the Crust
First, preheat your oven to 375°F (190°C). While it warms up, grab that mixing bowl and toss in the flour, sugar, and salt. Now, here’s the fun part: add your chilled, cubed butter. Use a pastry cutter (or a fork if you’re improvising) to work the butter into the flour until it looks like coarse crumbs. You want tiny butter flecks—those are your ticket to a flaky crust! Press this mixture firmly into your tart pan, making sure it’s even on the bottom and up the sides. Pop it in the oven for 15 minutes—just until it’s lightly golden. This par-baking step? Non-negotiable for a crisp base.
2. Layer the Apples
While the crust bakes, prep your apples. Peel and slice them thin—about 1/4-inch thick—so they soften perfectly. Toss them with cinnamon in a bowl, coating every slice. Once the crust is out of the oven, arrange the apples in concentric circles (or just pile them artfully—no stress!). The goal? Even layers so every bite gets caramel-apple goodness.
3. Drizzle and Bake
Here’s where things get dreamy: drizzle that caramel sauce all over the apples. Don’t hold back! The caramel will seep into the layers, creating pockets of gooey sweetness. Slide the tart back into the oven for 25–30 minutes. You’ll know it’s done when the apples are tender and the edges are a deep golden brown. Your kitchen will smell like a bakery—fair warning, neighbors might knock.

4. The Hardest Part: Waiting
Resist the urge to slice right in! Let the tart cool for at least 15 minutes. This lets the caramel set slightly so it doesn’t ooze everywhere (though a little oozing is part of the charm). Serve it warm with a scoop of vanilla ice cream, or let it cool completely for cleaner slices. Either way? Pure bliss.
See? Simple steps, unforgettable results. Now go enjoy your masterpiece—you’ve earned it!
Tips for the Perfect Caramel Apple Tart
Want to take your tart from good to unforgettable? Here are my tried-and-true secrets:
- Chill that dough: After pressing it into the pan, pop it in the fridge for 15 minutes before baking. Cold butter = flaky layers!
- Slice apples evenly: Too thick, and they won’t soften; too thin, and they’ll turn mushy. Aim for 1/4-inch slices—Goldilocks would approve.
- Go tart with apples: Granny Smith’s tang balances the caramel’s sweetness. No substitutions here—trust me on this one.
- Warm your caramel: Microwave store-bought sauce for 10 seconds to make it drizzle like liquid gold.
- Don’t skip the cooling time: Letting it rest means cleaner slices (and fewer caramel burns on your fingers!).
Follow these, and you’ll have a tart that’s practically perfect in every way. Happy baking!
Variations for Caramel Apple Tart
Guess what? This tart is like your favorite sweater—super cozy but easy to dress up! Here’s how I love to switch it up:
- Nutty crunch: Sprinkle chopped pecans or walnuts over the apples before baking. They toast up golden and add the best texture contrast.
- Spice it up: A pinch of nutmeg or cardamom mixed with the cinnamon gives it a warm, holiday vibe.
- Apple mixology: Try half Granny Smith, half Honeycrisp—you get tang and honeyed sweetness!
- Boozy twist: Brush the baked crust with apricot jam whisked with bourbon before adding apples. (Shhh…it’s our little secret.)
The beauty? You can tweak it endlessly and still end up with something delicious. Go wild—I promise it’s hard to mess up!
Serving Suggestions for Caramel Apple Tart
Oh, the possibilities! This tart shines on its own, but here’s how to take it over the top:
- À la mode magic: A scoop of vanilla ice cream melting into warm caramel? Yes, please.
- Extra drizzle: Warm more caramel sauce and zigzag it over slices for that bakery-worthy finish.
- Fluffy contrast: Dollop on fresh whipped cream with a sprinkle of cinnamon.
Serve it on a pretty plate—it deserves the spotlight!
Storing and Reheating Caramel Apple Tart
Okay, let’s talk leftovers—though I doubt you’ll have many! If you do, here’s how to keep that tart tasting fresh:
- Room temp for a day: Cover it loosely with foil and leave it on the counter. The crust stays crisp, and the caramel stays gooey.
- Fridge for longer: Pop it in an airtight container for up to 3 days. Just let slices come to room temp before eating—cold caramel is sad caramel.
- Reheat like a pro: Warm individual slices in a 300°F (150°C) oven for 10 minutes. The microwave works in a pinch, but the crust won’t stay as crisp.
Pro tip: Freeze unbaked slices wrapped in parchment for a future dessert emergency. Bake straight from frozen—just add 5 extra minutes. Genius, right?
Frequently Asked Questions About Caramel Apple Tart
I’ve gotten so many questions about this tart over the years—let me answer the ones that pop up most!
Can I use puff pastry instead of making the crust?
Sure thing! Store-bought puff pastry works in a pinch—just roll it out to fit your pan and prick it with a fork before par-baking. It’ll be flakier than the shortbread-style crust, but still delicious. My grandma would side-eye me for saying this, though!
My caramel sauce is too thick—help!
Easy fix! Warm it for 5-10 seconds in the microwave (or in a saucepan with a splash of cream) until it’s drizzle-able. Too thin? Let it cool a bit before pouring. And always taste-test… you know, for quality control.
How do I know when the tart is perfectly baked?
Look for golden edges and apples that yield gently to a knife—they should be tender but not mushy. The caramel will bubble fiercely at the edges. If the crust browns too fast, tent it with foil.
Can I make this ahead?
Absolutely! Prep the unbaked crust and sliced apples (tossed with lemon juice to prevent browning) up to a day ahead. Assemble and bake when ready. Leftovers? They rarely last, but they’ll keep for 3 days in the fridge.
Estimated Nutritional Information for Caramel Apple Tart
Okay, let’s talk numbers—because even desserts deserve a little transparency! Here’s the scoop per slice (based on 8 servings):
- Calories: ~320 (Worth every one!)
- Fat: 12g (Butter makes it better, right?)
- Carbs: 52g (Mostly from those sweet apples and caramel)
- Fiber: 3g (Thanks, apple skins!)
- Protein: 3g (It’s dessert—we’re here for joy, not gains)
Note: These are estimates—your tart might vary based on apple size, caramel brand, or whether you “accidentally” add extra drizzle (no judgment). For precise counts, plug your exact ingredients into a nutrition calculator. Now go enjoy that slice guilt-free—life’s too short to skip caramel!
PrintIrresistible Caramel Apple Tart Recipe in Just 5 Steps
A sweet and buttery tart with caramelized apples and a crisp crust.
- Prep Time: 20 mins
- Cook Time: 40 mins
- Total Time: 60 mins
- Yield: 8 servings 1x
- Category: Dessert
- Method: Baking
- Cuisine: American
- Diet: Vegetarian
Ingredients
- 2 cups all-purpose flour
- 1/2 cup unsalted butter, chilled
- 1/4 cup sugar
- 1/4 tsp salt
- 4 medium apples, peeled and sliced
- 1/2 cup caramel sauce
- 1 tsp cinnamon
Instructions
- Preheat oven to 375°F (190°C).
- Mix flour, butter, sugar, and salt until crumbly.
- Press dough into a tart pan and bake for 15 minutes.
- Toss apples with cinnamon and layer over the crust.
- Drizzle caramel sauce over the apples.
- Bake for 25-30 minutes until golden.
- Cool before serving.
Notes
- Use tart apples like Granny Smith for best results.
- Chill the dough before baking for a flakier crust.
Nutrition
- Serving Size: 1 slice
- Calories: 320
- Sugar: 18g
- Sodium: 120mg
- Fat: 12g
- Saturated Fat: 7g
- Unsaturated Fat: 4g
- Trans Fat: 0g
- Carbohydrates: 52g
- Fiber: 3g
- Protein: 3g
- Cholesterol: 30mg


