
The smell of baked apples and butter crust wafting through the kitchen, with that deep, rich caramel scent wrapping around everything—that’s how I know fall has truly arrived. This Caramel Apple Tart has become my signature dessert after I first made it for a family dinner back in October, and my sister immediately demanded it become a yearly tradition.
What makes this recipe so special isn’t complicated technique or fancy equipment. It’s a simple butter crust, spiced apples, and homemade caramel that come together in about an hour. Trust me, if you can stir and slice, you can absolutely handle this one. It’s approachable for beginners but impressive enough for any autumn gathering, from casual weeknights to holiday tables.
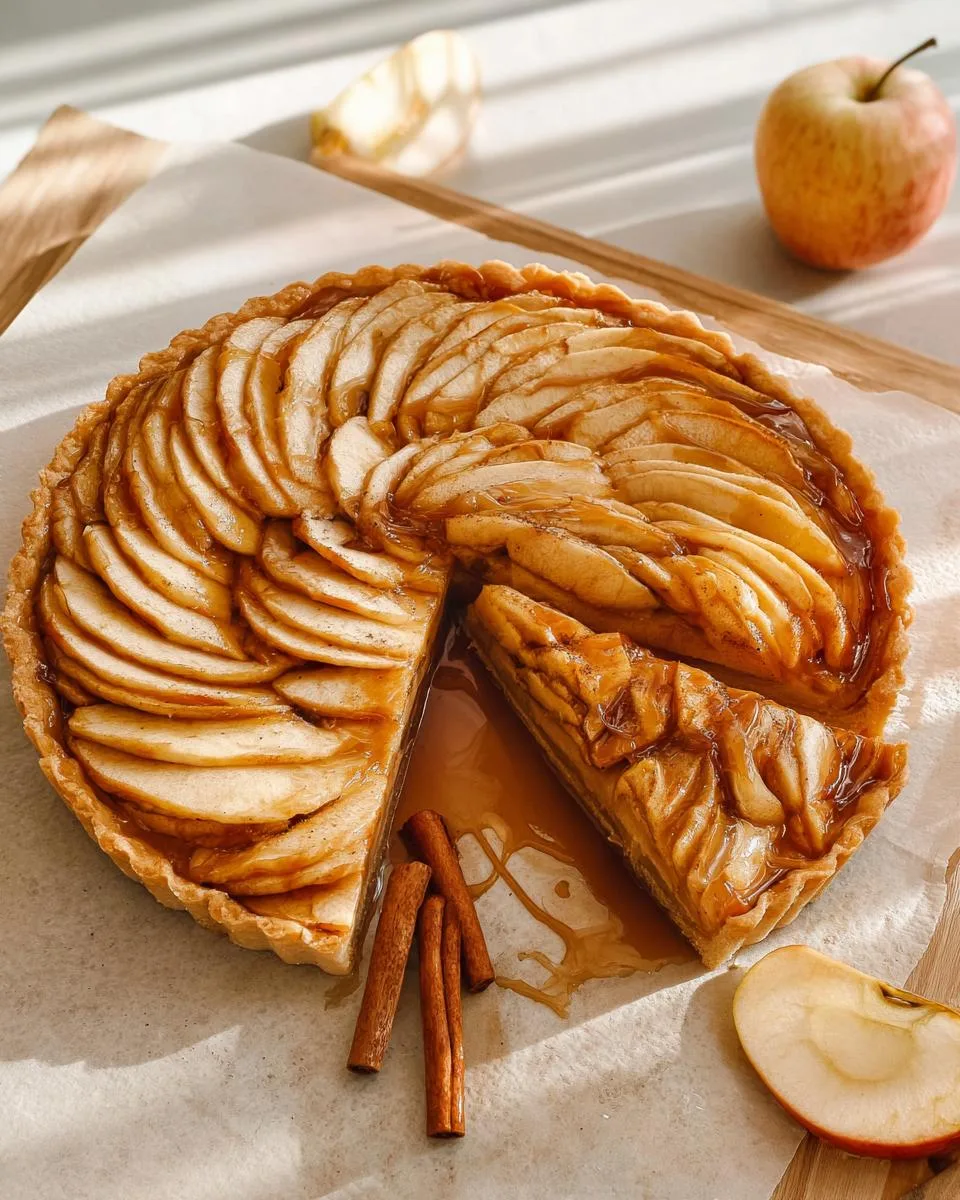
Why You’ll Love This Caramel Apple Tart
There are so many reasons this Caramel Apple Tart has a permanent spot in my recipe box. Honestly, it became my go-to dessert the first time I made it for a casual Sunday dinner, and now I bring it to every fall gathering friends invite me to. Here’s what keeps me coming back:
- Simple pantry ingredients. You probably already have flour, butter, sugar, and apples on hand. No exotic spices or specialty items needed—just real, everyday stuff.
- Impressive enough for guests, easy enough for a weeknight. This tart looks like it came from a fancy bakery, but it comes together in about an hour. I’ve served it for Thanksgiving dinner and also on a random Tuesday when I needed something sweet.
- No special equipment required. A bowl, a rolling pin, a tart pan (or even a pie dish), and a saucepan for the caramel are all you need. I’ve made it with just my hands and a wooden spoon countless times.
- The caramel-to-apple contrast is magic. The sticky, buttery caramel clings to every slice of tart apple, and that sweet-tangy balance is why I make this over and over. It’s not cloying—it’s just right.
- Firm apples make all the difference. I always use Granny Smith or Honeycrisp. They hold their shape during baking and cut through the caramel’s sweetness with their bright tartness. Trust me on this one.
Ingredients for Caramel Apple Tart
Let me walk you through exactly what you’ll need. I’ve organized everything into three simple groupings so you can grab what you need without hunting through the pantry twice.
For the crust: You’ll need 1 ½ cups all-purpose flour, spooned and leveled (don’t scoop straight from the bag—you’ll pack in too much). ¼ cup granulated sugar, ¼ teaspoon salt, and ½ cup cold butter, cut into small cubes. And here’s the thing: when I say cold butter, I mean straight from the refrigerator, still firm to the touch. You also need 2–3 tablespoons ice water—that’s literally water with ice cubes floating in it, so it’s as cold as possible.
For the apple filling: 4 medium apples (about 2 pounds), peeled and thinly sliced into ¼-inch wedges. I like Granny Smith best, but Honeycrisp works too. Toss them with ½ teaspoon ground cinnamon until every slice is evenly coated. Simple, but that cinnamon warmth makes the whole kitchen smell incredible.
For the caramel: ½ cup granulated sugar, ¼ cup butter (again, cold is fine here since it’ll melt anyway), ¼ cup heavy cream, and 1 teaspoon vanilla extract. That’s it—four ingredients that transform into liquid gold. Just make sure the heavy cream is at room temperature so it doesn’t seize the hot caramel.
Ingredient Substitutions for Caramel Apple Tart
I’ve tested a few swaps over the years, and they work beautifully if you need them. For the apples, pears or even firm peaches make a lovely substitute—just keep in mind the tartness and texture will shift a bit, so pick fruit that’s firm and not too watery. If you’re avoiding gluten, a good 1-to-1 gluten-free flour blend replaces the all-purpose flour seamlessly in the crust. For a dairy-free version, use coconut cream instead of heavy cream in the caramel, and swap the butter in both crust and caramel with a solid dairy-free butter alternative. Store-bought caramel sauce works in a pinch, I’ve done it when I’m short on time, but the homemade version thickens much better and doesn’t make the crust soggy. Just don’t use thin caramel ice cream topping—it’s too runny.
How to Make Caramel Apple Tart Step by Step
Alright, let’s get into the actual making of this tart. I’ve broken it down into three clear stages so you don’t feel overwhelmed. Trust me, if you follow the order exactly—crust first, then caramel, then assembly—you’ll have everything ready at the right time. The dough needs to chill for at least 30 minutes, so start there. Preheat your oven to 375°F (190°C) when you’re about 10 minutes into the caramel step. And here’s the thing: watch for the visual cues, not just the timer. The crust should be golden brown, and the apples should feel tender when you pierce them with a fork. The caramel will bubble fiercely when you add the cream, so use a long-handled spoon and keep your face away. If your dough cracks when you roll it out, just let it sit at room temperature for 5 minutes—it’ll soften just enough to cooperate. If the caramel seizes up into hard lumps, don’t panic. Return the pan to low heat and stir gently until it smooths out. I’ve done both of these things more times than I’d like to admit, and the tart always comes out beautiful.
Prepare the Caramel Apple Tart Crust
In a mixing bowl, whisk together 1½ cups flour, ¼ cup sugar, and ¼ teaspoon salt. Drop in the ½ cup cold cubed butter. Use a pastry blender or your fingertips to cut the butter into the flour until the mixture looks like coarse crumbs with pea-sized bits scattered throughout. That’s your goal—you want some butter chunks for flakiness. Add ice water, one tablespoon at a time, stirring gently with a fork after each addition. Stop when the dough holds together when you pinch it between your fingers. Gather it into a disk, wrap it in plastic wrap, and refrigerate for at least 30 minutes. You can use a food processor here if you want, but pulse only 4 or 5 times. Overprocessing warms the butter, and warm butter makes a tough crust. Once chilled, roll the dough on a floured counter into a 12-inch round. Press it carefully into a 9-inch tart pan, trimming the overhang flush with the rim. Prick the bottom with a fork, then stick the whole pan back in the fridge while you make the caramel. This extra chill prevents the dough from shrinking during baking.
Make the Caramel Apple Tart Caramel Sauce
Use a clean saucepan with a heavy bottom over medium heat. Add ½ cup granulated sugar and ¼ cup butter. Stir constantly with a wooden spoon—do not walk away, do not answer the phone. Keep stirring until the butter melts and the sugar turns a deep amber color, which takes about 5 minutes. The moment it reaches that rich golden shade, pull the pan off the heat. Now, carefully pour in ¼ cup heavy cream. Stand back because it’ll bubble up fiercely and steam. Stir briskly with your long-handled spoon until the mixture is smooth. Add 1 teaspoon vanilla extract and stir again. Let the caramel cool for about 5 minutes—it should thicken slightly but still be pourable. If you see lumps form, just return the pan to low heat and whisk until they dissolve. This homemade sauce is truly the heart of the tart, rich and gooey in a way store-bought never matches. For more on making caramel, check out this guide to making caramel.
Assemble and Bake Your Caramel Apple Tart
Take the chilled tart shell from the refrigerator. Arrange the sliced apples inside—you can do a neat circular pattern if you’re feeling fancy, or just scatter them evenly. Either way works. Pour the cooled caramel over the apples, gently coaxing it into all the gaps so every slice gets some sauce. Place the whole tart on a baking sheet to catch any drips. Bake at 375°F (190°C) for 35 to 40 minutes. The crust should be beautifully golden, and the apples should feel tender when you poke them with a knife. If the crust edges start browning too quickly, cover them with strips of foil. Let the tart cool on a wire rack for at least 10 minutes before slicing. Serve it warm or at room temperature. The caramel will set as it cools, so use a sharp knife and wipe it clean between each slice for neat pieces.
Pro Tips for the Perfect Caramel Apple Tart
Over the years I’ve made this tart more times than I can count, and I’ve learned a few things the hard way so you don’t have to. Here are the tips I swear by—they come straight from real kitchen experience, not theory.
- Use firm apples like Granny Smith or Honeycrisp. They hold their shape during baking and give you that bright, tart contrast to the sweet caramel. Avoid soft apples like McIntosh—they’ll turn into mush.
- Keep the butter and water ice-cold. Warm ingredients make a tough, dense crust. I actually pop my cubed butter back in the fridge for five minutes after cutting it, and I keep the ice water bowl nearby so it stays frigid.
- Don’t overwork the dough. The second it clumps together, stop. I know it’s tempting to keep kneading, but that develops gluten and you’ll end up with a crust that’s more cracker than pastry. A few pea-sized butter chunks are a good thing.
- Pour the caramel evenly over the apples. Dumping it all in one spot creates a soggy, caramel-packed center while the edges stay dry. I gently drizzle it around, then tilt the pan to spread it into every gap. Each slice deserves some sauce.
- Let the tart cool completely before removing the pan side. I learned this after a few messy slices. The caramel needs time to set, and a warm tart is fragile. I always use a non-stick tart pan, which makes release effortless—just push up the bottom and slide it onto a plate.
One more personal tip: I slice my apples exactly ¼ inch thick. They cook evenly, fan out beautifully in the crust, and every forkful has the perfect apple-to-caramel ratio. Trust me, that little detail makes a big difference.
Serving Suggestions for Caramel Apple Tart
I love serving this tart warm, when the caramel is still soft and the apples are tender. A scoop of vanilla ice cream melting into the crevices is my favorite way to enjoy it, but lightly sweetened whipped cream works beautifully too. For a fall twist, I dust the top with a pinch of cinnamon and drizzle on a little extra caramel right before serving. This tart makes a stunning Thanksgiving finale or a cozy Sunday afternoon treat. Personally, I serve it with a spoonful of crème fraîche—the tangy flavor contrasts so perfectly with the sweet caramel that I can’t go back to anything else.
Storing and Reheating Caramel Apple Tart
Got leftovers? Lucky you. This tart keeps beautifully in the fridge for up to 3 days—just cover it with foil or pop it in an airtight container. When you’re ready for round two, here’s the important part: skip the microwave. It turns that lovely crisp crust into a sad, soggy mess. Instead, place your slices on a baking sheet and warm them in a 350°F (180°C) oven for 8–10 minutes. That brings back the crispy crust and gets the caramel gooey again. If you’re in a hurry and want it cold, let it sit at room temperature for about 10 minutes first. Just know the caramel thickens into a chewy, taffy-like texture after refrigeration—reheating is really the way to go. And freezing? It’s possible, but the apples release moisture and the caramel can separate. Honestly, this tart’s best enjoyed fresh within two days. It never lasts that long in my house anyway!
Frequently Asked Questions about Caramel Apple Tart
Here are answers to the questions I hear most about this recipe. I’ve tested all of these scenarios myself, so you can trust the advice—even the failures taught me something!
Can I Use Store-Bought Crust for Caramel Apple Tart?
Yes, you absolutely can. A store-bought pie crust or pre-made tart shell works well in a pinch, and I’ve done it when I was short on time. Make sure to chill it before filling, and if you’re using a rolled crust, press it into your tart pan and trim the edges. Pre-bake the crust at 375°F for 10 minutes to avoid a soggy bottom, then fill and bake as directed. The flavor will be slightly different, but the caramel and apple filling still shine through beautifully. For a richer taste, brush the crust with a beaten egg before baking—that little step adds a lovely golden sheen.
How Do I Keep the Caramel Apple Tart Crust Crisp?
The best way to keep your crust crisp in this apple tart recipe is to avoid over-saturating it. Pour the caramel evenly over the apples rather than dumping it all in one spot—I know it’s tempting, but trust me on this one. Let the tart cool completely before cutting, because hot caramel seeps into the crust and makes it soggy. Chilling the dough thoroughly before baking also helps a ton. If your oven runs hot, bake the tart on the lower rack so the bottom gets extra heat and browns properly. And for extra insurance, you can blind-bake the crust with pie weights for 10 minutes before adding the filling. That homemade caramel apple dessert deserves a crisp foundation!
Can I Freeze Caramel Apple Tart?
Honestly, I don’t recommend freezing this tart. The apples release water as they thaw, and the caramel can turn grainy, which just isn’t worth it. If you still want to try, assemble the tart without baking it, wrap it tightly in plastic wrap and foil, and freeze for up to 2 months. You can bake it directly from frozen, just add 10–15 minutes to the baking time. But for the best texture and taste, bake this tart fresh. The recipe is simple enough to make the same day you plan to serve it, so I always go that route.
Nutritional Information for Caramel Apple Tart
If you’re curious about the numbers, here’s a general idea. Based on 8 servings, one slice of this Caramel Apple Tart has approximately 350 calories, 18g fat (10g saturated), 45g carbohydrates, 3g protein, and 3g fiber. Of course, these values are estimates and can shift depending on the specific brands and ingredient sizes you use—a different apple variety or a heavier hand with the butter changes things a bit. I like to give folks a rough picture without getting too nitpicky, so take this as a helpful guideline, not a strict prescription. If you use lighter butter or a reduced-sugar caramel alternative, the numbers will be lower, but honestly, this tart’s worth the treat just as it is.
I would love to hear how your Caramel Apple Tart turned out! Drop a comment below with any questions, rate the recipe with stars, and share a photo on social media using #CaramelAppleTart so we can all admire your beautiful autumn dessert. Happy baking!
PrintCaramel Apple Tart: Irresistible in 1 Hour
A caramel apple tart with a buttery crust and sweet apple filling.
- Prep Time: 30 minutes
- Cook Time: 40 minutes
- Total Time: 1 hour 10 minutes
- Yield: 8 servings 1x
- Category: Dessert
- Method: Baking
- Cuisine: American
- Diet: Vegetarian
Ingredients
- 1 1/2 cups all-purpose flour
- 1/2 cup cold butter, cubed
- 1/4 cup granulated sugar
- 1/4 teaspoon salt
- 2–3 tablespoons ice water
- 4 medium apples, peeled and sliced
- 1/2 cup granulated sugar (for caramel)
- 1/4 cup butter (for caramel)
- 1/4 cup heavy cream
- 1 teaspoon vanilla extract
- 1/2 teaspoon ground cinnamon
Instructions
- Make the crust: mix flour, 1/4 cup sugar, and salt. Cut in cold butter until crumbly. Add ice water, 1 tablespoon at a time, until dough holds together. Form into a disk, wrap, and chill for 30 minutes.
- Preheat oven to 375°F (190°C). Roll out dough on a floured surface to fit a 9-inch tart pan. Press into pan and trim edges. Prick bottom with fork. Chill while preparing filling.
- Peel and slice apples into thin wedges. Toss with cinnamon.
- Make caramel: in a saucepan over medium heat, melt 1/2 cup sugar and 1/4 cup butter, stirring constantly. Cook until golden, about 5 minutes. Remove from heat, carefully stir in heavy cream and vanilla. Let cool slightly.
- Arrange apple slices in the tart crust. Pour caramel evenly over apples.
- Bake for 35-40 minutes until crust is golden and apples are tender. Cool on a wire rack before serving.
Notes
- Use firm apples like Granny Smith for best texture.
- Chill the dough thoroughly to prevent shrinking during baking.
- Serve warm or at room temperature with whipped cream if desired.
Nutrition
- Serving Size: 1 slice (1/8 of tart)
- Calories: 350
- Sugar: 25g
- Sodium: 150mg
- Fat: 18g
- Saturated Fat: 10g
- Unsaturated Fat: 6g
- Trans Fat: 0g
- Carbohydrates: 45g
- Fiber: 3g
- Protein: 3g
- Cholesterol: 40mg
