
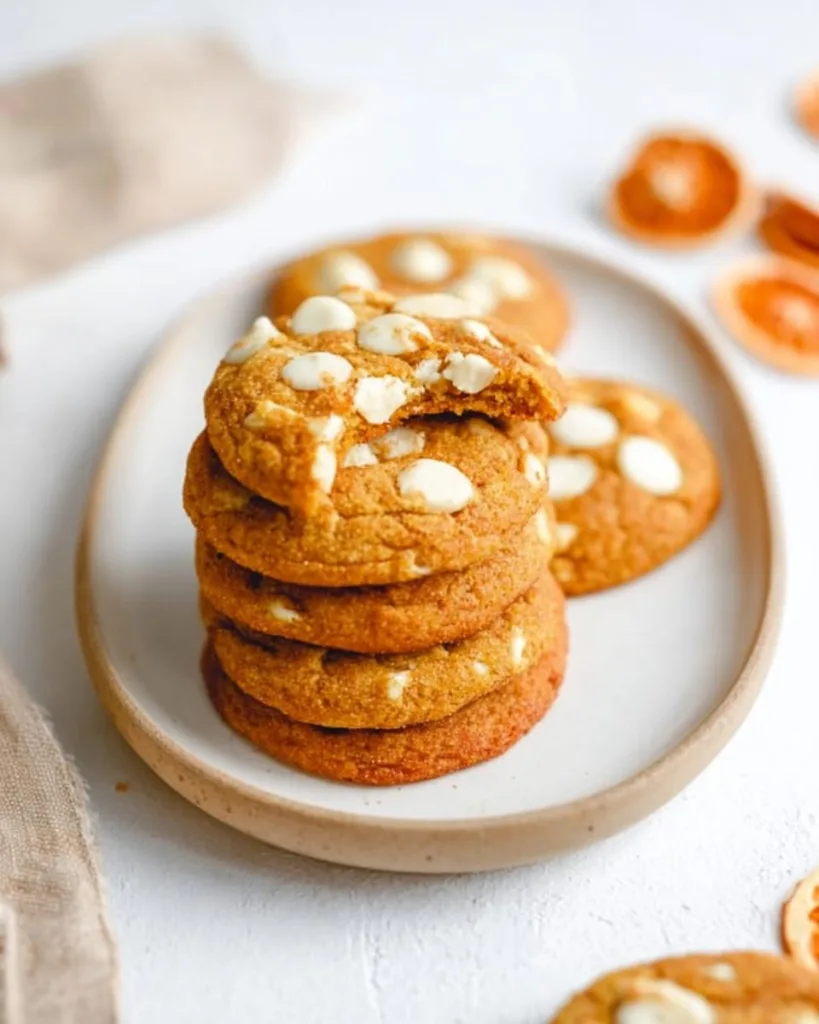
I’ll be honest with you—for years, I thought soft, chewy gluten-free cookies that actually taste like the real thing were a myth. Every batch I tried came out either dry as dust or weirdly gummy. But then I stumbled onto this recipe for Gluten-Free White Chocolate Pumpkin Snickerdoodles, and honestly, it changed everything. The secret? A perfect little dance between pumpkin puree and white chocolate chips, all wrapped up in that classic cinnamon-sugar coating we all love. The result is a cookie that’s genuinely soft, perfectly chewy, and so good you won’t believe it’s gluten-free. Trust me, this one’s a game-changer.
Why You Will Love These Gluten-Free White Chocolate Pumpkin Snickerdoodles
I’ve been there—standing in my kitchen, staring at another dry, crumbly gluten-free cookie, wondering if it was even worth the effort. This recipe finally broke that cycle. These cookies are everything I ever wanted: soft, chewy, packed with cozy fall flavor, and—most importantly—they don’t taste like a compromise. Here’s why you’ll fall for them too:
- Soft & chewy texture – No more hockey pucks! The pumpkin puree keeps these incredibly tender, and the white chocolate adds little pockets of sweetness.
- Super easy to make – One bowl, no complicated steps, and you probably already have most of the ingredients in your pantry.
- Unique fall flavor – That classic snickerdoodle cinnamon-sugar coating meets pumpkin and white chocolate? It’s a match made in heaven.
- No weird aftertaste – I promise, nobody will guess these are gluten-free. They just taste like real, homemade cookies.
Ingredients for Gluten-Free White Chocolate Pumpkin Snickerdoodles
Let me walk you through exactly what you’ll need for these Gluten-Free White Chocolate Pumpkin Snickerdoodles. I’ve tested this recipe a bunch of times, and each ingredient plays a specific role—no fluff, just what works. Here’s the lineup:
- 1 cup gluten-free all-purpose flour – Make sure you spoon it into the measuring cup and level it off with a knife. Scooping directly from the bag packs in too much flour and makes the cookies dry.
- 1/2 cup pumpkin puree – Grab the can labeled “100% pure pumpkin,” not pumpkin pie filling. The puree adds tons of moisture and a subtle earthy sweetness that keeps these cookies soft for days.
- 1/2 cup unsalted butter, softened to room temperature – Leave it out for about an hour until it’s soft enough to press with your finger. Creaming it properly with the sugars is what gives the cookies that tender crumb.
- 1/2 cup white sugar, plus 1/4 cup brown sugar – The brown sugar brings extra moisture and a hint of molasses flavor that pairs beautifully with the pumpkin.
- 1 large egg, at room temperature – A cold egg can seize the butter mixture, so let it sit out with the butter for a bit.
- 1 teaspoon vanilla extract – Just a splash to round out the flavors.
- 1 teaspoon baking powder + 1/2 teaspoon baking soda – These two work together to give the cookies just the right lift without making them puffy.
- 1/2 teaspoon ground cinnamon + 1/4 teaspoon salt – Cinnamon is the backbone of any snickerdoodle, and salt balances the sweetness.
- 1/2 cup white chocolate chips – They add little creamy pockets of sweetness that melt into the dough. Don’t skip them!
- For the coating: 1/4 cup white sugar mixed with 1 teaspoon cinnamon – This is what makes a snickerdoodle a snickerdoodle. Roll the dough balls generously so every bite has that crunchy, cinnamon-sugary shell.
See? Nothing too crazy. The pumpkin puree is the real MVP here—it keeps the cookies incredibly soft without making them cakey. And the white chocolate chips? They’re like little surprise treasures in every bite.
Ingredient Notes and Substitutions
I know not everyone’s pantry looks the same, so here are a few swaps that work perfectly:
- Flour – Use a gluten-free blend that already contains xanthan gum (like Bob’s Red Mill 1-to-1). If your blend doesn’t have it, add 1/2 teaspoon of xanthan gum yourself. It’s what holds the structure together and prevents crumbly cookies.
- White chocolate chips – Feel free to swap with butterscotch chips for a richer flavor, or dark chocolate chips if you want something less sweet. Both are delicious.
- Egg – For a vegan version, use a flax egg: mix 1 tablespoon of flaxseed meal with 3 tablespoons of water, let it sit for 5 minutes until it’s thick and gel-like. Works like a charm.
- Butter – Vegan butter sticks (like Earth Balance) can replace the unsalted butter one-for-one. Just make sure it’s softened.
Equipment You Will Need
You don’t need anything fancy—just a few basics you probably already have. Grab a couple of mixing bowls (one large, one medium), a hand mixer or stand mixer for creaming the butter and sugar, a baking sheet, and parchment paper. Oh, and a wire cooling rack is a must if you want the cookies to set properly without getting soggy bottoms. One thing I’ll say: a cookie scoop makes a world of difference. It’s not essential, but it gives you perfectly uniform dough balls, so every cookie bakes evenly. Totally worth it.
How to Prepare Gluten-Free White Chocolate Pumpkin Snickerdoodles
Alright, let’s get baking! I’m going to walk you through every step of making these Gluten-Free White Chocolate Pumpkin Snickerdoodles so you can nail it on your first try. The key is to follow the order and resist the urge to rush—trust me, a little patience here pays off big time in soft, chewy cookies.
Step 1: Mix the Wet Ingredients
Start by grabbing your largest mixing bowl—the one you’ll do all the creaming in. Toss in the softened butter, white sugar, and brown sugar. Now, here’s the important part: beat them together with a hand mixer or stand mixer for a full 2–3 minutes, until the mixture looks light and fluffy, almost like a pale caramel mousse. This step is non-negotiable because you’re literally beating air into the butter, which gives the cookies that tender texture. Once it’s nice and fluffy, crack in the egg, add the vanilla, and beat again until smooth. Then, scrape down the bowl and mix in the pumpkin puree until it’s fully combined. Don’t panic if the mixture looks a little curdled or separated—that’s totally normal when you add pumpkin to butter and sugar. It’ll come back together when you add the dry ingredients.
Step 2: Combine the Dry Ingredients
In a separate medium bowl, whisk together the gluten-free flour, baking powder, baking soda, cinnamon, and salt. I know it’s tempting to just dump them in, but whisking is crucial here. It breaks up any lumps in the flour and makes sure the baking powder and soda are evenly distributed so you don’t end up with one cookie that’s puffy and another that’s flat. Plus, it incorporates the cinnamon evenly so every bite tastes like a warm hug.
Step 3: Form the Cookie Dough
Now, with the mixer on low speed (or using a spatula), gradually add the dry ingredients to the wet mixture. I do it in about three additions, mixing just until the flour disappears. Don’t overmix—once you see no more streaks of flour, stop. Overmixing can make gluten-free cookies tough, and we want them soft and chewy. Gently fold in the white chocolate chips with a spatula. At this point, the dough will be pretty soft and maybe a little sticky. That’s fine. If it’s too sticky for you to handle, pop the bowl in the fridge for 30 minutes. I often do this just to make the next step easier.
Step 4: Shape and Coat the Cookies
In a small bowl, stir together the coating sugar and cinnamon. Now, scoop out the dough—I use a cookie scoop for uniform balls, but a tablespoon works too. Roll each portion into a 1-inch ball between your palms. Then roll each ball generously in the cinnamon-sugar mixture, pressing lightly so it sticks. Don’t be shy: you want a thick coating that’ll crackle as the cookies bake. Place the coated balls on a parchment-lined baking sheet, spacing them about 2 inches apart. They’ll spread a little, but not too much.
Step 5: Bake and Cool
Bake at 350°F (175°C) for 10–12 minutes. The edges should be set and lightly golden, but the centers will still look soft and a little puffy. That’s exactly what you want—they’ll continue to set as they cool. Let the cookies rest on the baking sheet for 5 minutes before moving them to a wire rack. This rest time is crucial because it lets the structure firm up; if you try to move them too soon, they might fall apart. After 5 minutes, transfer them to the rack to cool completely. Or, if you’re like me, eat one warm right off the sheet. No judgment here.
Tips for Perfect Gluten-Free White Chocolate Pumpkin Snickerdoodles
I’ve made these Gluten-Free White Chocolate Pumpkin Snickerdoodles more times than I can count, and I’ve picked up a few tricks along the way that make all the difference. Here’s what I’ve learned so you can nail them on your first try:
- Don’t overbake. This is the biggest one. Gluten-free cookies really benefit from a slightly underbaked center. Pull them out when the edges are set and lightly golden, but the centers still look soft and a little puffy. They’ll finish setting up as they cool on the sheet. Overbaking turns them dry, and nobody wants that.
- Use a kitchen scale for the flour. I know, I know—it sounds fussy, but gluten-free flours can be tricky. Scooping straight from the bag packs in way too much, and that leads to dry cookies. A scale gives you the most accurate measurement every time. If you don’t have one, just spoon the flour into your cup and level it off with a knife.
- If the dough feels too sticky to roll, chill it. Pumpkin puree adds a lot of moisture, so the dough can be a bit tacky. That’s totally normal. Just pop the bowl in the fridge for 20–30 minutes, and it’ll firm up nicely. Makes rolling into balls way easier.
- Want a stronger pumpkin flavor? Add 1/4 teaspoon of pumpkin pie spice to the dough along with the cinnamon. It gives that cozy fall taste an extra little boost without overpowering the white chocolate.
These little tweaks might seem small, but they’re the difference between good cookies and great ones. Trust me on this one!
Variations for This Recipe
I’ve tested this base recipe a bunch, and it’s so forgiving—you can easily dress it up or change the flavor profile without messing anything up. Here are a few of my favorite ways to switch it up:
First, if you want to lean into those cozy fall vibes even more, add a pinch of ground ginger and nutmeg to the dough. It gives the cookies a warm, almost chai-like kick that pairs beautifully with the white chocolate. I’m seriously obsessed with this version.
Looking for some crunch? Toss in a handful of chopped pecans or walnuts when you fold in the white chocolate chips. I love how the nutty flavor contrasts with the soft, pillowy cookie texture. It adds a little something special.
And here’s my secret indulgence: turn these into sandwich cookies. Just make a quick cream cheese frosting—cream cheese, butter, powdered sugar, and a splash of vanilla—and spread it between two cooled cookies. It’s over-the-top in the best way possible, and it’s always the first thing to disappear at parties.
Serving Suggestions
Let’s talk about the best ways to enjoy these cookies. A cold glass of milk is the classic choice, honestly. But my favorite way is to grab a warm cup of chai tea or a pumpkin spice latte right alongside one. It’s pure fall magic.
They’re perfect for fall parties and Thanksgiving dessert tables, too. Or, just as a simple afternoon treat when you need a little something special. You really can’t go wrong.
Storage and Reheating Instructions
Okay, so you’ve made a batch of these cookies—and maybe you even have a few left over (unlikely, but let’s pretend). Here’s how to keep them tasting just as good as the day you baked them. Store them in an airtight container at room temperature, and they’ll stay soft and delicious for up to 5 days. Want to keep them extra soft? I like to toss a slice of bread into the container—it absorbs any extra air and keeps the cookies from drying out. Works like a charm.
If you want to stash some for later, freeze them! Just place the baked and cooled cookies in a freezer-safe bag, and they’ll be good for up to 3 months. When a craving hits, grab one and pop it in the microwave for 10–15 seconds. It’ll come out warm and soft, almost like it just came out of the oven. Perfect for those late-night snack attacks.
Nutritional Information
I always get asked about the numbers, so here’s the honest truth: the nutritional info I’m about to share is an estimate. It’s based on the ingredients I use, but yours might be a little different depending on the brands you grab or if you swap things out. So please, don’t treat it like gospel—if you need precise data, plug everything into a nutrition calculator that works for you. That’s the best way to get accurate numbers for your batch. I just want you to enjoy the cookies, not stress over the details!
Frequently Asked Questions
I get a lot of questions about these cookies, so I figured I’d answer the most common ones here. If you’re wondering about something else, drop a comment below—I read every single one!
Can I use pumpkin pie filling instead of pumpkin puree?
No, please don’t. I know it’s tempting because they’re right next to each other on the shelf, but pumpkin pie filling is already sweetened and spiced with things like nutmeg and cloves. Swapping it in will mess up the sugar balance and the texture—your cookies will come out too sweet and maybe even a little gummy. Always reach for the can labeled 100% pure pumpkin puree. It’s unsweetened, unspiced, and exactly what you need for that soft, moist crumb.
Ah, I hear this one all the time, and it’s totally normal—especially with gluten-free dough and pumpkin puree. The pumpkin adds a lot of moisture, and gluten-free flours absorb liquid differently than wheat flour. So if your dough feels like it’s sticking to your hands, don’t panic. Just pop the bowl in the fridge for about 30 minutes. That little chill time firms up the butter and lets the flour hydrate, making the dough way easier to roll into balls. If it’s still a bit tacky after that, lightly wet your hands with water before rolling—works like a charm.
Absolutely! This is one of my favorite tricks. Go ahead and shape the dough into 1-inch balls, roll them in the cinnamon-sugar coating, and line them up on a baking sheet. Pop the sheet in the freezer until the balls are solid (about an hour), then transfer them to a freezer-safe bag or container. They’ll keep for up to 3 months. When you’re ready to bake, no need to thaw—just place them on a parchment-lined baking sheet and bake straight from frozen, adding 2–3 minutes to the baking time. Perfect for when a cookie craving hits out of nowhere.
This is the million-dollar question. Here’s what I look for: the edges will be set and just starting to turn a light golden color, but the centers will still look soft and slightly puffy—almost underdone. Trust me, that’s exactly what you want. They’ll continue to bake and set as they cool on the hot baking sheet. If you wait until the centers look fully baked, they’ll be too dry. So pull them out at 10–12 minutes, let them rest on the sheet for 5 minutes, and you’ll have perfectly soft, chewy cookies every time.
Leave a Review
If you try these Gluten-Free White Chocolate Pumpkin Snickerdoodles, I’d love to hear how they turned out! Please leave a star rating and a comment below—it means the world to me, and your feedback helps other readers find their new favorite cookie too. Happy baking!
PrintGluten-Free White Chocolate Pumpkin Snickerdoodles:24 Irresistible
Soft and chewy gluten-free cookies. White chocolate and pumpkin flavors blend with cinnamon sugar.
- Prep Time: 15 minutes
- Cook Time: 12 minutes
- Total Time: 27 minutes
- Yield: 24 cookies 1x
- Category: Dessert
- Method: Baking
- Cuisine: American
- Diet: Gluten Free
Ingredients
- 1 cup gluten-free all-purpose flour
- 1/2 cup pumpkin puree
- 1/2 cup unsalted butter, softened
- 1/2 cup white sugar
- 1/4 cup brown sugar
- 1 egg
- 1 teaspoon vanilla extract
- 1 teaspoon baking powder
- 1/2 teaspoon baking soda
- 1/2 teaspoon ground cinnamon
- 1/4 teaspoon salt
- 1/2 cup white chocolate chips
- For coating: 1/4 cup white sugar mixed with 1 teaspoon ground cinnamon
Instructions
- Preheat your oven to 350°F (175°C). Line a baking sheet with parchment paper.
- In a large bowl, cream together butter, white sugar, and brown sugar until light and fluffy.
- Beat in the egg and vanilla extract. Then mix in pumpkin puree until combined.
- In a separate bowl, whisk together gluten-free flour, baking powder, baking soda, cinnamon, and salt.
- Gradually add the dry ingredients to the wet mixture. Stir until just combined.
- Fold in white chocolate chips.
- In a small bowl, mix the coating sugar and cinnamon.
- Shape dough into 1-inch balls. Roll each ball in the cinnamon-sugar coating.
- Place balls on the prepared baking sheet, spacing them 2 inches apart.
- Bake for 10-12 minutes, until edges are set. Let cool on the sheet for 5 minutes, then transfer to a wire rack.
Notes
- Chill dough for 30 minutes if it feels too sticky to handle.
- Store cookies in an airtight container at room temperature for up to 5 days.
Nutrition
- Serving Size: 1 cookie
- Calories: 150
- Sugar: 12g
- Sodium: 90mg
- Fat: 8g
- Saturated Fat: 5g
- Unsaturated Fat: 2g
- Trans Fat: 0g
- Carbohydrates: 18g
- Fiber: 1g
- Protein: 2g
- Cholesterol: 20mg
