
I still remember the first time I made Italian pizzelle with my grandmother—the way the iron hissed as it pressed the batter into those delicate, snowflake-like patterns. That first bite, warm and crisp with just a whisper of anise, hooked me forever. These traditional Italian waffle cookies are so much more than a simple treat; they’re a little piece of family history you can make in your own kitchen.
What I love most about Italian pizzelle is how incredibly quick and easy they are. With just a handful of simple ingredients—flour, eggs, butter, sugar, and a little vanilla—you can have a batch of these crispy, golden cookies ready in about 30 minutes. No complicated techniques, no fuss. Just pure, nostalgic goodness that tastes like it came from a nonna’s kitchen. Whether you dust them with powdered sugar, dip them in chocolate, or enjoy them plain, they’re the kind of cookie that disappears before you know it.
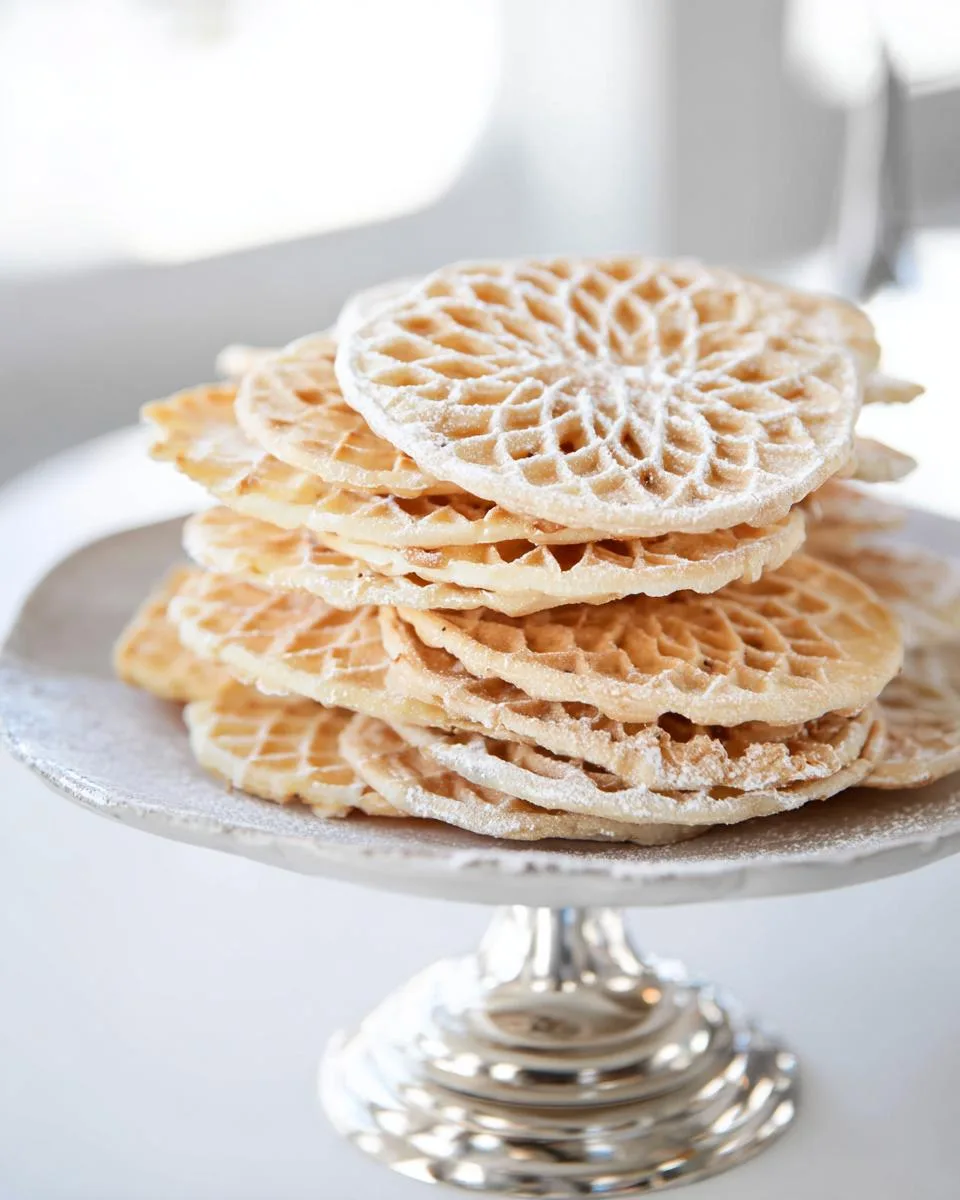
Why You’ll Love These Italian Pizzelle
You’re going to adore these Italian pizzelle for so many reasons. First, they’re ridiculously fast—just 30 minutes from start to finish. Plus, they come out perfectly crisp every time, with that delicate, buttery snap. And the best part? They’re incredibly versatile. Dust them with powdered sugar, dip them in chocolate, or sandwich them with a scoop of gelato. Trust me, you’ll find yourself making them for every occasion.
Ingredients for Italian Pizzelle
Alright, let’s talk about what you’ll need to make these gorgeous Italian pizzelle. The ingredient list is short and sweet, which is part of the magic. You’ll want 1 3/4 cups all-purpose flour (make sure you spoon it into your measuring cup and level it off—don’t scoop directly, or you’ll pack in too much). Then grab 1 1/2 teaspoons baking powder, 3 large eggs (room temperature works best), 3/4 cup granulated sugar, 1/2 cup unsalted butter (melted and then cooled so it’s not hot), 1 teaspoon vanilla extract, and 1 tablespoon anise seed if you’re a fan of that classic licorice-like flavor. It’s totally optional, so don’t stress if you want to leave it out.
Ingredient Notes and Substitutions for Italian Pizzelle
Each ingredient plays a role here. The flour gives structure, the eggs add richness, and the butter brings that tender, crisp texture. But here’s the thing—that butter must be cooled before you mix it in, or you’ll end up with scrambled eggs in your batter. Not a good look! If anise isn’t your thing, try swapping it with 1 tablespoon lemon zest for a bright, citrusy twist, or 1 teaspoon almond extract for a nutty, sweet aroma. Both work beautifully in Italian pizzelle.
How to Prepare Italian Pizzelle
Making Italian pizzelle is one of those kitchen rituals that feels almost meditative once you get the hang of it. The key is getting everything ready before you even turn on that pizzelle iron. Trust me, once the batter hits the hot plates, things move fast! Start by preheating your iron according to the manufacturer’s instructions—this usually takes about 5 to 10 minutes, so do it first.
While the iron heats up, get your dry ingredients together. Whisk the flour and baking powder in a small bowl and set it aside. Then, in a larger bowl, beat the eggs and sugar together for a full 3 minutes. I know it feels like forever, but don’t cheat here. You want the mixture to turn thick and pale, almost like a light ribbon falling off the whisk. This is where the air gets incorporated, giving your pizzelle that delicate structure.
Once that’s done, stir in the melted (and cooled!) butter and vanilla. If you’re using anise seed, toss it in now. Then gradually add the flour mixture, stirring just until combined—no more than that, or you’ll develop too much gluten and end up with tough cookies. The batter should be thick but still spoonable, like a slightly loose cookie dough. If it seems too stiff, don’t panic; just let it rest for a few minutes. Now for the fun part: drop spoonfuls onto the hot iron, close the lid, and cook for about 30 to 60 seconds. Your first one is always a test cookie, so don’t worry if it’s not perfect. Adjust the timing based on your iron—every machine has its own personality!
Step-by-Step Instructions for Italian Pizzelle
- Preheat your pizzelle iron according to the manufacturer’s instructions. Give it a good 5 to 10 minutes to get nice and hot.
- In a small bowl, whisk together the flour and baking powder. Set aside.
- In a large bowl, beat the eggs and sugar with an electric mixer or whisk until thick and pale, about 3 minutes. You’ll see the color lighten and the texture become creamy.
- Mix in the melted (and cooled!) butter and vanilla extract. If you’re using anise seed, add it now and stir to combine.
- Gradually add the flour mixture to the egg mixture, stirring gently with a spatula or wooden spoon. Mix just until no streaks of flour remain—don’t overmix, or your Italian pizzelle will be tough.
- Drop a rounded tablespoon of batter onto the center of the hot pizzelle iron. Close the lid firmly but don’t press down too hard.
- Cook for 30 to 60 seconds, depending on your iron. Lift the lid to check—they should be golden brown with a nice lace pattern. If they’re too pale, give them a few more seconds.
- Carefully remove the pizzelle with a fork or small spatula. They’ll be hot and delicate, so work gently. Transfer to a wire rack to cool completely. They’ll crisp up as they cool.
Tips for Perfect Italian Pizzelle
Getting these Italian pizzelle just right took me a few tries, I’ll be honest. The first batch I ever made came out pale and soft—total disaster. But here’s what I’ve learned: the key is a hot iron. Don’t rush it. Let your pizzelle iron heat up fully, or your cookies will be sad and floppy. I always let it sit at least 10 minutes before the first scoop.
Another thing—use a cookie scoop for consistent size. I use a small one, about a tablespoon, and it makes every pizzelle the same shape, so they cook evenly. And don’t crowd the batter; one scoop per round is plenty. Oh, and that first one? It’s almost always a test. Don’t sweat it. I’ve learned to cook that first one a little longer, check the color, and adjust from there. It’s just part of the process.
Essential Tips for Italian Pizzelle
Here’s a quick trick: if your batter gets too thick while sitting, let it rest for 5 minutes. The flour absorbs the liquid, and it relaxes, making it easier to spoon. Also, adjust your cooking time based on your iron’s heat. Some irons run hot, some run cool. Mine needs about 45 seconds, but yours might be different. Keep an eye on that first test pizzelle—it’ll tell you everything.
Variations of Italian Pizzelle
One of the best things about these Italian pizzelle is how easy they are to twist into something completely new. I love playing around with flavors—it’s like having a whole new cookie without buying extra ingredients. Want a chocolate version? Just add 2 tablespoons cocoa powder to the flour. Swap the vanilla for almond extract and you get this lovely nutty, sweet aroma. A little lemon zest makes them bright and citrusy, perfect for spring. Or add a pinch of cinnamon for a cozy kick. And here’s a fun idea: sandwich two pizzelle with a scoop of gelato—trust me, it’s life-changing.
Creative Variations of Italian Pizzelle
- Chocolate Pizzelle: Add 2 tablespoons cocoa powder along with the flour. They come out rich and not too sweet—almost like a thin chocolate wafer.
- Lemon Pizzelle: Stir in 1 tablespoon lemon zest and swap the vanilla for lemon extract. Bright, fresh, and perfect with tea.
- Almond Pizzelle: Replace the vanilla with 1 teaspoon almond extract. The flavor is subtle but so elegant.
- Spiced Pizzelle: Add 1 teaspoon cinnamon and ¼ teaspoon nutmeg. Great for the holidays, and they smell amazing while cooking.
Serving Suggestions for Italian Pizzelle
I love serving these Italian pizzelle in so many different ways—it’s like having a whole new treat every time. A simple dusting of powdered sugar is always a classic, and they’re perfect alongside a hot cup of coffee or tea. But honestly, my favorite thing is to use them as a base for cannoli filling, or dip them in melted chocolate and let them set. You can also top them with fresh berries and a dollop of whipped cream for a quick, elegant dessert. They’re so versatile!
How to Serve Italian Pizzelle
For something extra special, try serving your Italian pizzelle with a scoop of vanilla gelato. You can also crumble them over a bowl of ice cream for a little crunch, or layer them with mascarpone and berries for a no-bake dessert. Trust me, once you start experimenting, you’ll never run out of ideas.
Storing and Reheating Italian Pizzelle
Let me be real with you—these Italian pizzelle rarely last long enough in my house to even worry about storing. But if you somehow have leftovers (or you’re smart enough to make a double batch), they keep beautifully. Just pop them in an airtight container at room temperature, and they’ll stay crisp for up to 2 weeks. I’ve also thrown them in the freezer for up to 3 months, and they come out just as good. When you want that fresh-from-the-iron warmth again, pop them in a 300°F oven for 3 to 5 minutes, or give them a quick 10-second press back in the pizzelle iron. Just watch them closely—they crisp up fast!
Storing Italian Pizzelle Properly
Here’s the trick I learned the hard way: always separate layers with a sheet of wax paper. Otherwise, they’ll stick together and you’ll end up with a pile of broken cookies. Trust me, it’s worth the extra step. I stack mine in a tin with wax paper between each layer, and they stay perfectly crisp and ready to enjoy.
Frequently Asked Questions About Italian Pizzelle
I get so many questions about these cookies, and honestly, I love talking about them. Here are the ones I hear most often—hopefully they’ll answer whatever’s on your mind too.
Can I use a regular waffle iron for Italian pizzelle?
I wouldn’t recommend it. Regular waffle irons make thick, fluffy waffles, not the thin, crisp cookies you’re after. You really need a dedicated pizzelle iron to get that delicate, lacy texture. Trust me, it’s worth the investment.
How do I make Italian pizzelle gluten-free?
Easy! Just swap the all-purpose flour with a good 1:1 gluten-free flour blend. You might need to add 1 to 2 tablespoons of extra milk or water to get the right consistency. I’ve done it, and they come out just as crisp and delicious.
Why are my Italian pizzelle soft instead of crisp?
That usually happens for one of three reasons: you’re undercooking them, the weather is humid, or you’re storing them while they’re still warm. Make sure you cook them until they’re golden brown, and let them cool completely before sealing them in a container.
Can I freeze Italian pizzelle?
Absolutely! I do it all the time. Just stack them in an airtight container with wax paper between the layers to prevent sticking. When you’re ready to enjoy them, let them thaw at room temperature for about 10 minutes. They’ll taste just like fresh-baked.
Nutritional Information for Italian Pizzelle
If you’re keeping an eye on things, here’s the breakdown for one of these Italian pizzelle. Each cookie comes in at about 90 calories, with 4g of fat, 12g of carbs, 2g of protein, 7g of sugar, and 35mg of sodium. Just keep in mind these numbers are rough estimates—they’ll change a bit depending on the exact brands and ingredients you use. But hey, they’re still a pretty light treat for all that crispy, buttery goodness!
I’d love to hear how yours turn out! Did you try a fun variation? Or maybe you’ve got a secret trick for getting them extra crisp? Drop a comment below or give the recipe a rating—it honestly makes my day to hear from you. Happy baking!
PrintItalian pizzelle: 30-Minute Crispy Perfection
Italian pizzelle are thin, crisp waffle cookies. They are a traditional treat from Italy. You can enjoy them plain or dusted with powdered sugar.
- Prep Time: 10 minutes
- Cook Time: 20 minutes
- Total Time: 30 minutes
- Yield: 24 pizzelle 1x
- Category: Cookie
- Method: Baking
- Cuisine: Italian
- Diet: Vegetarian
Ingredients
- 1 3/4 cups all-purpose flour
- 1 1/2 teaspoons baking powder
- 3 large eggs
- 3/4 cup granulated sugar
- 1/2 cup unsalted butter, melted and cooled
- 1 teaspoon vanilla extract
- 1 tablespoon anise seed (optional)
Instructions
- Preheat your pizzelle iron according to manufacturer instructions.
- In a small bowl, whisk flour and baking powder. Set aside.
- In a large bowl, beat eggs and sugar until thick and pale, about 3 minutes.
- Mix in melted butter and vanilla extract. If using anise seed, add it now.
- Gradually add flour mixture to egg mixture. Stir until just combined.
- Drop spoonfuls of batter onto the hot pizzelle iron. Close the lid.
- Cook for 30 to 60 seconds, until golden brown. Time varies by iron.
- Carefully remove pizzelle with a fork. Cool on a wire rack.
Notes
- You can substitute anise seed with lemon zest or almond extract.
- Store pizzelle in an airtight container for up to 2 weeks.
- Pizzelle freeze well for up to 3 months.
Nutrition
- Serving Size: 1 pizzelle
- Calories: 90
- Sugar: 7g
- Sodium: 35mg
- Fat: 4g
- Saturated Fat: 2.5g
- Unsaturated Fat: 1g
- Trans Fat: 0g
- Carbohydrates: 12g
- Fiber: 0.3g
- Protein: 2g
- Cholesterol: 25mg
