
I still remember the first time I attempted an old-fashioned Dutch apple pie. I was all set to make a classic double-crust apple pie, but the thought of rolling out a perfect top lattice had me sweating. Then I discovered this beauty – a buttery crust, warm spiced apples, and a glorious crumbly streusel topping that’s way easier than any lattice. It was love at first bite.
What really hooked me was perfecting that streusel ratio. Too much butter and it turns into a greasy mess; too little and it’s just dry crumbs. After a few trial-and-error batches (and some very happy neighbors), I found the sweet spot: equal parts flour and brown sugar, with just enough cold butter to create those clumps that bake into golden, buttery nuggets. No heading needs to be written for the introduction.
Why You’ll Love This Old-Fashioned Dutch Apple Pie
Let me be honest with you – I used to dread making pie. The rolling, the crimping, the panic when the dough tears. Then I found this old-fashioned Dutch apple pie, and everything changed. Instead of fussing over a perfect top crust, you just sprinkle on that glorious streusel and let the oven do the magic.
- No rolling out a top crust – the streusel comes together in minutes with just your fingertips. Seriously, it’s that easy.
- The tartness of Granny Smith apples balances perfectly with the sweet, buttery crumb topping. Every bite has that warm, spiced apple flavor with a crunchy, caramelized finish.
- It tastes just like the ones from a fancy bakery, but you get that warm, homemade pride knowing you made it yourself. Plus, it fills your whole kitchen with the coziest cinnamon-nutmeg aroma.
Honestly, I think this is the pie that finally made me feel like a real baker. And I bet it’ll do the same for you.
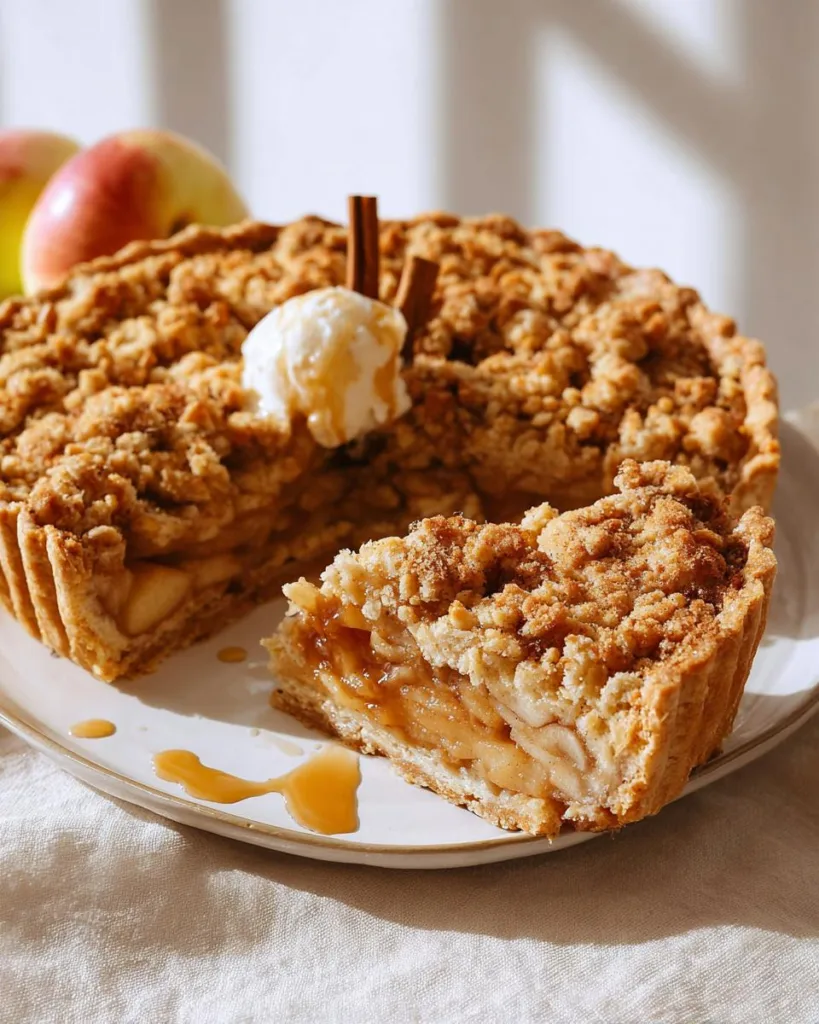
Ingredients for Old-Fashioned Dutch Apple Pie
Let’s talk ingredients, folks! One of the things I love most about this old-fashioned Dutch apple pie is that it doesn’t need anything fancy. No exotic spices, no specialty flours – just good, honest pantry staples that come together into something truly magical. Here’s everything you’ll need to make 8 glorious servings:
For the crust:
- All-purpose flour, divided – you’ll need 1 1/4 cups for the crust, 2 tablespoons for the filling, and 1/2 cup for the streusel. See? I told you it was simple.
- 1/2 tsp salt – just a pinch to balance all that sweetness.
- Cold unsalted butter, cubed – 1/2 cup for the crust and 1/4 cup for the streusel. Keep it in the fridge until the very last minute; cold butter is non-negotiable for that flaky texture.
- 3-4 tablespoons ice water – and I mean ice cold. Pop a few cubes in the water before you start, it makes all the difference.
For the apple filling:
- Peeled and sliced Granny Smith apples (about 6 cups) – that’s roughly 6 medium apples. Their tartness is the perfect partner for that sweet, buttery streusel.
- 3/4 cup granulated sugar – just enough to sweeten things up without masking that apple flavor.
- 1 tsp ground cinnamon and 1/4 tsp ground nutmeg – the classic cozy spice combo that makes your whole house smell like heaven.
- 1 tbsp fresh lemon juice – a little splash of brightness that makes the apples really sing.
For the streusel topping:
- 1/2 cup all-purpose flour
- 1/2 cup packed light brown sugar – dark brown works in a pinch, but light lets the other flavors shine through a bit more.
- 1/4 cup cold unsalted butter, cubed – the key to that crumbly, clumpy topping we all love.
That’s the whole lineup! Nothing complicated, right? Now let’s get to the fun part – actually baking this old-fashioned Dutch apple pie.
How to Make Old-Fashioned Dutch Apple Pie Step by Step
Alright, let’s get our hands a little floury! I’m going to walk you through every single step of this old-fashioned Dutch apple pie, just like I wish someone had done for me that first time. The key things to remember? Keep that butter cold, don’t rush the chill time, and give the pie plenty of space to cool. Trust me, follow these steps and you’ll be amazed at what comes out of your oven.
Prepare the Pie Crust for Old-Fashioned Dutch Apple Pie
This is where it all begins, and honestly, it’s simpler than you think. Start by whisking your 1 1/4 cups of flour and salt together in a medium bowl. Now, grab your cold butter cubes – and I mean cold, straight from the fridge. Drop them into the flour mixture.
Here’s the part that used to confuse me: cutting in the butter. You want to work it into the flour until it looks like coarse crumbs, with some pea-sized butter pieces still visible. If you have a pastry blender, that’s your best friend here. No pastry blender? No problem. Just use your fingertips, working quickly so the butter doesn’t warm up. The little chunks of butter are what create those flaky layers, so don’t overdo it.
Once you’ve got that crumbly texture, start adding the ice water, one tablespoon at a time. Toss it gently with a fork after each addition. You’ll know it’s ready when you can pinch a bit of the dough and it holds together without crumbling apart. Don’t worry if it seems a little shaggy – that’s perfect. Shape it into a thick disk, wrap it tightly in plastic wrap, and pop it in the fridge for at least 30 minutes. I know it’s tempting to skip this, but that chill time is what gives you a tender, flaky crust. Do it!
Make the Apple Filling for Old-Fashioned Dutch Apple Pie
While the dough is relaxing in the fridge, let’s get the filling ready. Grab a large bowl and toss in your sliced Granny Smith apples. I love the smell right at this moment – it’s so fresh and promising. Add the granulated sugar, 2 tablespoons of flour, the cinnamon, nutmeg, and that splash of lemon juice.
Now, gently toss everything together with a big spoon or your hands until every apple slice is nicely coated. Don’t be shy – make sure that spiced sugar gets into all the nooks and crannies. Then, just let it sit while you make the streusel. This little rest is a secret trick; it draws out a touch of juice from the apples, which helps create that perfect, syrupy filling as it bakes. The apples will look all glossy and gorgeous – exactly what you want.
Prepare the Streusel Topping for Old-Fashioned Dutch Apple Pie
This is my favorite part, and it’s almost too easy. In a small bowl, mix together the 1/2 cup of flour and the packed light brown sugar. Give it a quick stir with a fork to break up any sugar lumps. Now, add your cold butter cubes – again, straight from the fridge.
Using the same pastry blender or your fingertips, cut the butter into the flour-sugar mixture. You want it to look like coarse crumbs, with some slightly larger clumps. Here’s the golden rule: don’t overmix! You want those little clumps of buttery, sugary goodness. They’ll bake into those golden, crunchy nuggets that make this old-fashioned Dutch apple pie so special. If you mix it too much, you’ll end up with a sandy paste instead of a crumbly streusel. Set it aside and resist the urge to snack on it raw (I always lose that battle, but I’ll never tell).
Assemble and Bake the Old-Fashioned Dutch Apple Pie
Okay, it’s go time! First, preheat your oven to 375°F (190°C). This is important – make sure it’s fully preheated before the pie goes in so the crust starts baking right away.
Lightly flour your countertop and roll out your chilled dough into a circle about 12 inches across. Don’t stress about making it perfect; rustic is charming! Gently transfer it to your 9-inch pie plate. I like to fold it in half, then in quarters, to lift it without tearing. Press it into the bottom and up the sides, then trim the excess dough hanging over the edge. Crimp the edges however you like – a simple fork press or a classic pinched edge both work great.
Now, pour that beautiful apple filling into the crust. Don’t pack it down too hard, just let it settle naturally. Then, sprinkle the streusel topping evenly over the apples. Make sure you cover every bit of fruit – those apples like to peek out and bubble up, but the streusel is the star of the show.
Pop the pie into the oven and bake for 45 to 50 minutes. You’ll know it’s done when the apples are tender when pierced with a knife, and the streusel is a gorgeous golden brown. If you notice the top getting too dark too quickly, tent it loosely with a piece of foil. One last tip: to help avoid a soggy bottom crust, bake the pie on the lower oven rack. That direct heat crisps up the bottom beautifully.
Once it’s out, let the pie cool on a wire rack for at least 2 hours. I know, I know – the smell is intoxicating and you want to dig in right now. But if you slice it too soon, the filling will be runny and won’t hold its shape. Patience, my friend. It’s worth the wait.
Tips for the Best Old-Fashioned Dutch Apple Pie
Over the years, I’ve baked this old-fashioned Dutch apple pie more times than I can count, and I’ve learned a few things the hard way. Let me save you some trouble with my best tips. These little tricks are what separate a good pie from a great one. Trust me, you’ll thank yourself later.
Keep everything cold. I can’t say this enough. Cold butter, cold water, and a chilled dough are non‑negotiable for that flaky, tender crust. If your kitchen is warm, pop the mixing bowl in the fridge for a few minutes between steps. When the butter melts before it even hits the oven, you lose those beautiful flaky layers.
Pick firm, tart apples like Granny Smith. I’ve tried sweeter varieties, and they turn into mush. Granny Smiths hold their shape and provide that bright, tangy contrast to the sweet, buttery streusel. If you want a slightly sweeter filling, mix in a Honeycrisp or two, but keep the tart ones as the base.
Bake on the lower oven rack. This is a game‑changer for avoiding a soggy bottom. The direct heat from the bottom of the oven crisps up the crust beautifully while the top bakes evenly. I switch my oven rack to the lowest position before preheating.
Tent with foil if the streusel browns too fast. Every oven is a little different, and sometimes that gorgeous crumb topping gets too dark before the apples are done. Don’t panic – just loosely lay a piece of aluminum foil over the pie for the last 10–15 minutes. It’ll protect the topping while the filling finishes.
Let the pie cool completely. I know, I know – the smell is irresistible. But if you slice into it while it’s still warm, the filling will run everywhere and won’t hold its shape. Give it at least 2 hours on a wire rack. I’ve learned this lesson the messy way, and now I always set a timer. Your patience will be rewarded with clean, beautiful slices.
Ingredient Substitutions for Old-Fashioned Dutch Apple Pie
Look, I’m a firm believer that the classic version of this old-fashioned Dutch apple pie is pure perfection. But I also know that sometimes you’re baking for someone with dietary restrictions, or maybe your pantry is missing something, or perhaps you just want to experiment a little. I’ve tested quite a few swaps over the years, so let me share what actually works and what’s not worth the trouble.
Going Gluten-Free Without Losing the Magic
If you’re baking for someone who can’t do gluten, don’t panic! I’ve had great success using a 1-to-1 gluten-free flour blend in both the crust and the streusel. Cup for cup swaps like King Arthur or Bob’s Red Mill work beautifully. Just keep in mind that gluten-free dough can be a bit more fragile and sticky, so you might need to chill it a little longer and roll it between two sheets of parchment paper. For the streusel, the texture comes out surprisingly similar – maybe just a touch more delicate, but honestly, nobody will know unless you tell them.
One thing to watch: some gluten-free blends have a slightly different starch content, so if your crust seems too dry when you’re adding the ice water, just add an extra tablespoon. Conversely, if it feels too sticky, a light dusting of extra flour on your work surface will sort it out. This old-fashioned Dutch apple pie is forgiving, even gluten-free!
Making It Dairy-Free (Yes, It Works!)
For a dairy-free version, you’ve got a couple of options. I’ve tested both vegan butter and coconut oil, and honestly, I was pleasantly surprised. Vegan butter – the stick kind, not the spreadable tub kind – is your best bet for both the crust and the streusel. It behaves very similarly to regular butter, especially when it’s cold. Just cube it and use it exactly how you would the real thing. The flavor is a touch different, but the texture stays remarkably close.
Coconut oil is a little trickier but definitely doable. The key is to use it solid and cold, almost like you would butter. If your kitchen is warm, you might want to pop the cubed coconut oil in the freezer for a few minutes before cutting it into the flour. In the crust, it gives a slightly different, almost tropical undertone that I actually enjoy. In the streusel, it creates a wonderfully crunchy topping. Now, here’s my honest opinion: if you’re serving this to a mix of dairy and non-dairy eaters, vegan butter is the way to go. But if the whole pie needs to be dairy-free, coconut oil works beautifully too.
Swapping Fruits and Adjusting Sweetness
Now, let’s talk apples. First, the disclaimer: I’ll always recommend Granny Smith for that perfect tart-sweet balance. But if you’re out or want to mix things up, you’ve got options. One of my favorite variations is swapping half the apples with firm pears. The pears add a delicate, almost floral sweetness that pairs beautifully with the cinnamon and nutmeg. Just make sure you use pears that are still on the firm side – ripe but not mushy – so they hold their shape during baking. The result is a kind of apple-pear hybrid that tastes incredibly sophisticated, even though it’s just as easy as the original.
If you prefer a sweeter pie, you can use a mix of Honeycrisp, Fuji, or Pink Lady apples. They’re naturally higher in sugar, so here’s an important tip: reduce the granulated sugar in the filling when you make this swap. I usually cut it down to about 1/2 cup instead of 3/4 cup. Otherwise, the filling can become cloyingly sweet, especially with all that sugary streusel on top. And honestly, sweet apples can get a bit mushier too, so I stick with Granny Smith whenever I want that classic old-fashioned Dutch apple pie texture with a nice bite to it.
Last little thought: if you’re using extra-sweet apples, you might also want to add an extra squeeze of lemon juice to brighten things up. It keeps the filling from tasting flat and one-dimensional. Baking is all about balancing flavors, and these little tweaks make it feel like you’re creating your own version of a classic. That’s exactly what makes this recipe so special – it’s built on tradition, but it’s made for adapting.
Frequently Asked Questions About Old-Fashioned Dutch Apple Pie
Over the years, I’ve gotten more questions about this old-fashioned Dutch apple pie than just about any other recipe on my blog. It’s one of those desserts that seems so simple, but a few little things can trip you up and leave you staring at a runny filling or a pale streusel. So let me answer the most common ones. Consider this your troubleshooting guide, straight from my kitchen.
Can I use a store-bought crust?
Look, I get it. Sometimes the thought of making pie dough from scratch feels like a whole extra chore. And yes, you can absolutely use a refrigerated or frozen pie crust for this pie. I won’t judge you one bit, and honestly, the streusel topping is so forgiving that the pie will still be delicious. But here’s the truth: homemade gives you a much better texture. It’s flakier, more buttery, and it creates a sturdier base that actually holds up to all that heavy apple filling. If you do go the store-bought route, my best tip is to pre-bake the crust for about 10 minutes before adding the filling. That little step helps prevent a soggy bottom, which is the most common problem I hear about with pre-made crusts.
Why is my streusel soggy?
Oh, I’ve been there, and it’s so disappointing. You pull the pie out of the oven expecting those gorgeous golden clumps, and instead you’ve got a greasy, sandy paste sitting on top of your apples. The culprit is almost always one of two things: too much butter, or not enough baking time. The streusel needs just enough butter to clump together, but if you go overboard, the butter melts out before the structure sets and everything turns into a mess. Stick to the ratio in this recipe – 1/2 cup flour, 1/2 cup brown sugar, and 1/4 cup cold butter. And make sure your oven is fully preheated to 375°F. A cooler oven will melt that butter slowly instead of setting it quickly. Trust me, once you nail that balance, you’ll never go back.
Can I freeze the pie?
Yes, and this is actually one of the best things about this old-fashioned Dutch apple pie. It freezes like a dream, which is why I often make two at once – one for now, one for a rainy day. Here’s exactly how to do it: bake the pie completely, then let it cool on a wire rack until it’s room temperature. Don’t you dare skip that cooling step, or you’ll trap steam inside and end up with a mushy mess. Once it’s fully cool, wrap it tightly in a couple layers of plastic wrap, then a layer of aluminum foil. Pop it in the freezer for up to 3 months. When you’re ready to enjoy it, you can thaw it overnight in the fridge or reheat slices directly in the oven at 350°F for about 15 minutes. I love knowing there’s a frozen apple pie waiting for me when unexpected company shows up.
How do I keep the bottom crust from getting soggy?
This is the million-dollar question, isn’t it? A soggy bottom crust is the arch-nemesis of every pie baker, especially with a wet, juicy filling like this one. But I’ve learned a few tricks over the years that really work. First, bake your pie on the lower rack of the oven. That direct heat blasts the bottom crust and helps it crisp up before the apple juice can soak in. Second, use a glass pie plate if you have one. Glass conducts heat better than metal or ceramic, so the bottom gets hotter, faster. And my favorite trick? If I know I’m using particularly juicy apples, I give the crust a quick blind bake. Just prick the bottom with a fork, line it with foil, fill with pie weights or dried beans, and bake for 10 minutes at 375°F before adding the filling. It takes a little extra time, but the guarantee of a crispy, flaky bottom crust is absolutely worth it.
Serving Suggestions for Old-Fashioned Dutch Apple Pie
Alright, the pie is finally cool, you’ve admired your beautiful creation, and now comes the best part – actually eating it! I have some very strong opinions about how to serve this old-fashioned Dutch apple pie, and I’m about to share every single one of them with you.
First things first: serve it warm. Not piping hot straight from the oven (remember, we let it cool for 2 hours!), but gently warmed so the filling is still soft and the streusel has that perfect crunch. I like to pop individual slices in a 350°F oven for about 5 minutes, or you can microwave them for 20 seconds if you’re impatient like me.
Now, for the toppings. The classic, non-negotiable, absolute best partner for this pie is a generous scoop of vanilla ice cream. That cold, creamy, melting sweetness against the warm spiced apples and buttery streusel? Pure magic. I always use a good quality vanilla bean ice cream, but honestly, any vanilla will do. If you want to get fancy, a drizzle of caramel sauce over the top takes it to a whole other level. And don’t forget a dollop of whipped cream – homemade is best, but I won’t tell if you use the stuff from a can.
But here’s a little secret: a slice of this old-fashioned Dutch apple pie is also incredible with a hot cup of coffee in the morning. Yes, I said morning. Pie for breakfast is a thing, and it’s a beautiful thing. The bitter coffee cuts through the sweetness perfectly. Or, if you’re serving it on a cozy fall evening, pair it with a mug of hot apple cider. Something about that double-apple experience just feels right when the leaves are changing and there’s a chill in the air.
So go ahead, pile on that ice cream, drizzle that caramel, and pour yourself a cup of something warm. This pie deserves to be celebrated, and these little extras make it feel like an occasion every single time.
Storage and Reheating Instructions
Alright, let’s talk about what happens after you’ve marveled at your beautiful pie and maybe had a slice (or two). Because let’s be real, unless you’re feeding a crowd, there’s probably going to be some left. And trust me, that’s a good thing – this pie actually gets better after a day or two when the flavors have had time to really meld together.
First up, storing it. If you’re planning to finish it within a couple of days, you can keep it right on your countertop. Just cover it loosely with foil or plastic wrap, or stash it under a cake dome. It’ll stay perfectly happy at room temperature for up to 2 days. I’ve made the mistake of wrapping it too tightly while it was still slightly warm, and the trapped steam made that gorgeous streusel topping go soft. So make sure it’s completely cooled before you cover it up, okay?
If you need it to last a little longer, pop it in the fridge. It’ll keep for up to 4 days refrigerated. Just be aware that the streusel might lose a bit of its crunch once it’s been chilled – that’s normal, and we’ll fix it in a minute with a quick reheat. Honestly, I often prefer the pie after a day in the fridge because the filling sets up beautifully and slices like a dream.
Now, reheating. This is where the magic happens. My absolute favorite way to bring a slice back to life is in the oven. Just preheat to 350°F, pop a slice on a baking sheet, and warm it for about 10 minutes. The streusel gets all crunchy again, the filling gets warm and gooey, and it’s like you just baked it all over again. If you’re in a hurry, the microwave works too – about 30 seconds on high does the trick. But I’ll warn you, the streusel won’t be as crispy. Sometimes I do a combo: microwave for 15 seconds to take the chill off, then finish it in the toaster oven for a few minutes. Best of both worlds!
One thing I’ve learned the hard way: don’t reheat the whole pie. Only warm up the slices you’re planning to eat. The pie actually keeps better when it’s stored whole and cold, and reheating it over and over just dries it out. So slice as you go, and save the rest for another day. If you have any left after that, that is!
Nutritional Information for Old-Fashioned Dutch Apple Pie
Okay, let’s get real for a second. I don’t bake this old-fashioned Dutch apple pie because I’m worried about the numbers. I bake it because it tastes like a hug on a plate. But I know some of you like to track things, or maybe you’re just curious, and I respect that. So I sat down and crunched the numbers for you based on the exact ingredients I used here.
Here’s what one slice – that’s 1/8 of the whole pie – looks like: roughly 350 calories, 15 grams of fat (7 of those are saturated), 50 grams of carbohydrates, 25 grams of sugar, 3 grams of fiber, and 4 grams of protein. You’re also getting about 200mg of sodium and 30mg of cholesterol per slice. I always chuckle at the 4 grams of protein – like, “Oh good, it’s practically health food!” Not really, but it’s pie, and it’s worth every single gram.
Now, take these numbers with a pinch of salt – literally, there’s salt in the crust. These values are estimates and depend on the exact brands and sizes of your ingredients. If you swap in a different apple variety, use a different butter, or adjust the sugar, the numbers will shift a little. I just wanted to give you a helpful ballpark so you know what you’re getting into. And honestly? This old-fashioned Dutch apple pie is absolutely worth every single calorie. Just maybe have a salad for lunch first, okay?
Okay, I’ve poured my heart into this recipe, I’ve shared my grandmother’s secrets, and I’ve even confessed to my own soggy-bottom disasters. Now it’s your turn! I genuinely can’t wait to see how your old-fashioned Dutch apple pie turns out. Seriously, nothing makes my day like a photo of a golden, crumbly, gorgeous pie that someone made from something I wrote.
So here’s what I’d love: when you bake this, come back and leave a comment. Tell me how it went – did your kitchen smell like heaven? Did the streusel come out perfectly clumpy? Did you convince yourself it’s okay to have a slice for breakfast? (Spoiler: it absolutely is.) And if you ran into any questions or made a little substitution that worked wonders, share that too. That’s how we all get better together.
Oh, and if you’re on social media, I’d be over the moon if you’d tag me in your pie photos. Use #DutchApplePieLove or just tag me directly – I want to see that first slice with the ice cream melting down the side. I’ll cheer for every single one of you like we’re old friends. Because honestly, if you’re baking a pie from scratch, you’re exactly the kind of person I want in my kitchen. Now go make that pie, and don’t forget to let me know how it goes!
PrintOld-Fashioned Dutch Apple Pie 5 Easy Steps
A classic Dutch apple pie with a buttery crust, spiced apple filling, and a crumbly streusel topping.
- Prep Time: 30 minutes
- Cook Time: 50 minutes
- Total Time: 1 hour 20 minutes
- Yield: 8 servings 1x
- Category: Dessert
- Method: Baking
- Cuisine: Dutch
- Diet: Vegetarian
Ingredients
- 1 1/4 cups all-purpose flour
- 1/2 tsp salt
- 1/2 cup cold butter, cubed
- 3–4 tbsp ice water
- 6 cups peeled and sliced apples (Granny Smith recommended)
- 3/4 cup granulated sugar
- 2 tbsp all-purpose flour
- 1 tsp ground cinnamon
- 1/4 tsp ground nutmeg
- 1 tbsp lemon juice
- 1/2 cup all-purpose flour (for streusel)
- 1/2 cup packed brown sugar
- 1/4 cup cold butter, cubed (for streusel)
Instructions
- Prepare the crust: Mix 1 1/4 cups flour and salt. Cut in 1/2 cup cold butter until coarse crumbs form. Add ice water, 1 tablespoon at a time, until dough holds together. Shape into a disk, wrap, and refrigerate for 30 minutes.
- Preheat oven to 375°F (190°C).
- Roll out dough on a floured surface to fit a 9-inch pie plate. Transfer dough to plate, trim and crimp edges.
- Prepare filling: In a large bowl, combine sliced apples, 3/4 cup sugar, 2 tbsp flour, cinnamon, nutmeg, and lemon juice. Toss to coat.
- Prepare streusel: In a small bowl, mix 1/2 cup flour and brown sugar. Cut in 1/4 cup cold butter until mixture resembles coarse crumbs.
- Pour apple filling into crust. Sprinkle streusel evenly over apples.
- Bake for 45-50 minutes, until apples are tender and topping is golden brown. Cool on a wire rack.
Notes
- Use Granny Smith apples for a tart flavor that balances the sweet streusel.
- Serve warm with vanilla ice cream or whipped cream.
- Store leftovers covered at room temperature for up to 2 days.
Nutrition
- Serving Size: 1 slice (1/8 pie)
- Calories: 350
- Sugar: 25g
- Sodium: 200mg
- Fat: 15g
- Saturated Fat: 7g
- Unsaturated Fat: 6g
- Trans Fat: 0g
- Carbohydrates: 50g
- Fiber: 3g
- Protein: 4g
- Cholesterol: 30mg
