
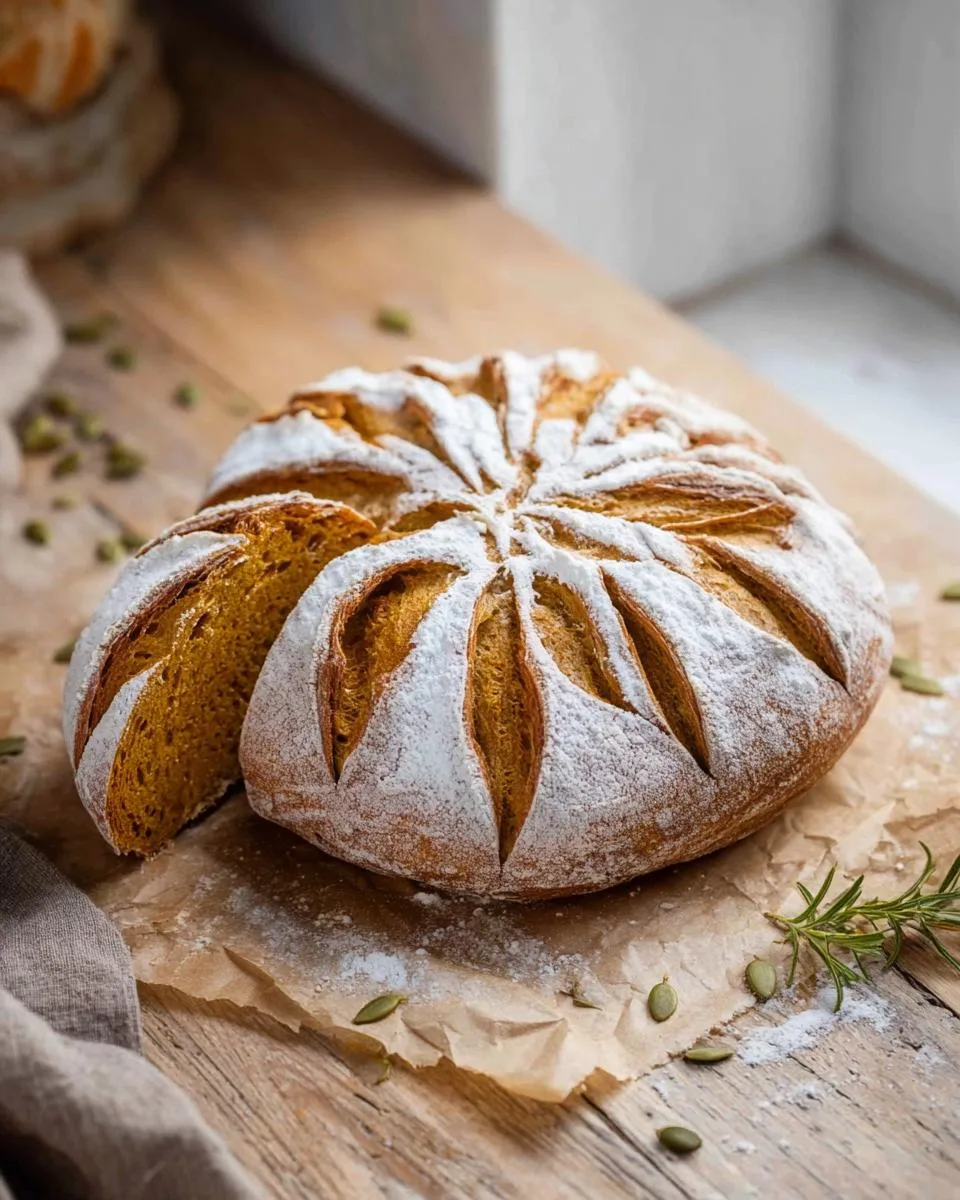
I still remember the first time I baked this pumpkin sourdough bread. It was a crisp October morning, the kind where you can see your breath in the air, and my kitchen smelled like a cozy sweater. I had my trusty, bubbly starter on the counter and a can of pumpkin puree I’d bought on a whim. Honestly, I wasn’t sure if the tangy sourdough and sweet pumpkin would get along. But the moment I pulled that golden, aromatic loaf from the Dutch oven, I knew I’d stumbled onto something magical. This isn’t just another fall bread; it’s the perfect balance of tangy and sweet, with a soft, moist crumb that’s surprisingly easy to achieve. It’s become my absolute go-to for autumn baking, and I’m so excited to share it with you.
Why You Will Love This Pumpkin Sourdough Bread
Trust me, this pumpkin sourdough bread is about to become your new fall obsession. Here’s why it’s so special:
- The flavor combo is unreal. You get that classic sourdough tang, but it’s softened and sweetened by the pumpkin. It’s the best of both worlds.
- The texture is pure perfection. It’s soft, moist, and tender on the inside, with a beautifully crisp, crackly crust on the outside. You won’t find a dry crumb here.
- No commercial yeast needed. This loaf does all its heavy lifting with your active sourdough starter. It feels so rewarding to bake with just flour, water, and time.
- It’s a total showstopper. Imagine slicing into this gorgeous, golden loaf at your next fall gathering. Everyone will be so impressed, and they’ll never guess how simple it was to make.
Ingredients for Pumpkin Sourdough Bread
I’ve tested this pumpkin sourdough bread a dozen times, and here’s exactly what you need to get it right. Precise measurements aren’t just fussy—they’re the difference between a gorgeous loaf and a sad, flat one. So grab your scale or measuring cups and let’s get organized.
- 1 cup active sourdough starter – fed and bubbly, at its peak. Trust me, a sleepy starter won’t give you that beautiful rise.
- 1 cup pumpkin puree – make sure it’s 100% pure pumpkin, not pumpkin pie filling. The pre-sweetened stuff will mess with the texture and flavor.
- 2 1/2 cups bread flour – spoon it into your measuring cup and level it off. No scooping straight from the bag, okay?
- 1/2 cup whole wheat flour – adds a lovely nuttiness and a bit of structure.
- 1 teaspoon salt – fine sea salt dissolves evenly. Table salt works too, just skip the coarse stuff.
- 1 tablespoon sugar – granulated, to give the yeast a little nudge and balance the tang.
- 1/2 teaspoon cinnamon – ground, but feel free to be generous if you love warm spices.
- 1/4 teaspoon nutmeg – freshly grated if you can; the flavor is worlds better.
- 1/4 cup water – lukewarm, added only if the dough feels too dry. Humidity matters, so keep it handy.
Ingredient Notes and Substitutions
Every ingredient here plays a role. Your active starter is what gives the bread its lift and that signature tang—don’t try this with a discard that’s been sitting in the fridge for a week. The pumpkin puree isn’t just for color; it adds moisture and a subtle sweetness that makes the crumb incredibly soft. Bread flour is my go-to for structure because its higher protein content creates a chewy, satisfying crumb. If you want a lighter loaf, swap the whole wheat flour with all-purpose flour. That’s the only substitution I’d recommend without changing the whole recipe. Stick with the rest as written, and you’ll be golden.
Equipment You Will Need
You don’t need a ton of fancy gadgets for this bread, but a few key tools really make the process smoother. Here’s what I keep handy:
- A large mixing bowl – big enough to let the dough double without climbing out.
- A Dutch oven – this creates the steam that gives the crust that perfect crackly finish. No Dutch oven? A heavy pot with a lid works too.
- A banneton or a floured bowl – for the second rise. I use a banneton, but a regular bowl lined with a floured kitchen towel does the trick.
- A bench scraper – great for shaping the dough and cleaning up sticky messes.
- A lame or a sharp knife – for scoring the top before baking. A razor blade works in a pinch.
How to Prepare Pumpkin Sourdough Bread
Alright, let’s get our hands dirty! Making this pumpkin sourdough bread is a labor of love, but I promise each step is totally doable. I remember the first time I made it, I was so nervous about the timing, but now it’s just part of my cozy fall rhythm. Here’s exactly how I do it, broken down into simple steps so you can follow along without any stress.
Step 1: Mix and Knead the Dough
Start by grabbing your biggest mixing bowl. Toss in your bubbly sourdough starter and the pumpkin puree, and give them a quick stir to combine. Then, add your bread flour, whole wheat flour, salt, sugar, cinnamon, and nutmeg. I usually just mix it all with a sturdy spatula until it comes together into a shaggy, messy-looking dough. Now for the kneading: turn it out onto a clean surface and get to work. Fold the dough over itself, then press it down with the heel of your hand. Keep going for about 10 minutes. It’ll be a little sticky at first, which is totally normal. If it feels like it’s glued to the counter, add a tablespoon of flour at a time, but don’t go overboard. You want it smooth and slightly tacky, not dry.
Step 2: First Rise (Bulk Fermentation)
Once your dough is smooth and elastic, place it back in the bowl, cover it with a clean kitchen towel or plastic wrap, and let it do its thing. This is the longest wait, but it’s so worth it. Let it rise at room temperature—around 70°F is perfect—for about 8 hours. You’re looking for the dough to roughly double in size and have a few small bubbles on the surface. If your kitchen is warmer, it might be ready sooner; if it’s cooler, it might take a bit longer. Don’t rush it. The patience here builds all that lovely flavor and structure.
Step 3: Shape and Second Rise
After the first rise, gently turn the dough out onto a lightly floured surface. Be careful not to deflate it too much. Now, shape it into a tight round loaf. I do this by pulling the edges up and into the center, then flipping it over and using my hands to create tension on the surface. Place the dough seam-side up into a well-floured banneton or a bowl lined with a floured kitchen towel. Cover it up and let it rise for another 2 hours. It should look puffy and pillowy, but not so big that it’s starting to collapse. That’s the sweet spot.
Step 4: Bake and Cool
About 30 minutes before your second rise is done, place your Dutch oven inside the oven and preheat it to 450°F. This gets it screaming hot, which is key for that amazing crust. When the dough is ready, carefully remove the hot Dutch oven. Gently turn the dough out onto a piece of parchment paper, then use a lame or a sharp knife to score a simple cross or a single slash on top. This lets the bread expand as it bakes. Drop the dough into the hot pot, cover it, and bake for 30 minutes. Then, remove the lid and bake for another 15 minutes until the crust is deep golden brown. The hardest part? Letting it cool completely on a wire rack before slicing. I know, I know, it smells incredible. But trust me, this pumpkin sourdough bread needs that time to set its crumb, or you’ll end up with a gummy mess. Wait it out—your patience will be rewarded with perfect, clean slices.
Tips for Perfect Pumpkin Sourdough Bread
After baking this pumpkin sourdough bread more times than I can count, I’ve picked up a few little tricks that make a big difference. First, use fresh pumpkin puree if you can. I know canned is convenient, but fresh puree has a brighter, cleaner flavor and less water, so your dough behaves better. Second, adjust the water based on your kitchen’s humidity. On a dry day, you might need that full ¼ cup; on a rainy one, start with just 2 tablespoons. The dough should feel soft but not sticky.
When it’s time to score, cut deep and at a slight angle—about ½ inch deep. That’s what gives you that gorgeous “ear” on the side. And after it’s baked and you’ve somehow resisted eating the whole thing, store it in a cloth bag. It’ll stay fresh for up to 3 days without getting soggy. Trust me, these little tweaks turn a good loaf into a great one.
Variations to Try
Once you’ve nailed the basic loaf, it’s fun to play around a bit. I love experimenting with different add-ins to keep things exciting. Here are a few of my favorite twists:
- Add toasted pumpkin seeds. Fold in about ½ cup right before shaping. They add a lovely crunch and make the bread feel extra rustic.
- Swap the spices. Instead of cinnamon and nutmeg, use 1 teaspoon of pumpkin pie spice. It’s a shortcut, but it works like a charm when you’re in a hurry.
- Toss in dried cranberries. A handful of these little gems—about ½ cup—adds pops of sweet-tart flavor that pair beautifully with the pumpkin. So good!
Serving Suggestions
Honestly, this bread is so versatile I find myself reaching for it morning, noon, and night. My absolute favorite way to enjoy it is toasted until golden, then slathered with a generous pat of butter and a drizzle of honey. The warmth brings out the pumpkin and spice, and the butter melts into every nook. It’s also amazing alongside a steaming bowl of soup or stew—perfect for dipping. And don’t sleep on using it as a base for fall sandwiches. Slice it thick, layer on some roasted turkey and cranberry sauce, and you’ve got a lunch that tastes like Thanksgiving.
Storage and Reheating Instructions
This bread stays beautiful for a few days if you treat it right. I just wrap it in a clean cloth bag and leave it on the counter—it’ll stay fresh for up to 3 days. The cloth lets the crust breathe so it doesn’t get soggy. If you want to save it longer, wrap the whole loaf tightly in plastic wrap and toss it in the freezer. It’ll be perfect for up to a month. When you’re ready to eat, just pop a slice in the toaster or warm it in the oven at 350°F for about 5 minutes. It comes back to life like magic, with that crisp crust and soft, warm center.
Nutritional Information for Pumpkin Sourdough Bread
Okay, for all you label-lovers out there, here’s the basic breakdown per slice (that’s 1/12 of the loaf). You’re looking at about 180 calories, 37g carbs, 6g protein, just 1g fat, 4g sugar, and 3g of fiber. Keep in mind, this is just an estimate—it’ll shift a little depending on the exact brands you use. But it’s a solid guide!
Frequently Asked Questions About Pumpkin Sourdough Bread
Over the years, I’ve gotten a ton of questions about this pumpkin sourdough bread. People always seem to run into the same hiccups I did the first few times, so I thought I’d answer the most common ones right here. Hopefully, this saves you a little frustration!
Can I use all-purpose flour instead of bread flour?
You can, but the crumb won’t be quite as chewy. Bread flour’s higher protein content gives the loaf more structure and that satisfying springy texture. If you only have all-purpose, it’ll still taste great—just expect a slightly softer, more tender bite.
How long does this bread stay fresh?
Stored in a cloth bag at room temperature, it’ll stay fresh for up to 3 days. The cloth lets the crust breathe so it doesn’t get soggy. If you want to keep it longer, wrap it tightly in plastic wrap and freeze it for up to a month. It toasts back up beautifully!
Can I use canned pumpkin puree?
Yes, absolutely! Just make sure it’s 100% pure pumpkin, not pumpkin pie filling. The pie filling has added sugar and spices that’ll throw off the balance of the recipe. I’ve used canned plenty of times with great results, so don’t stress.
Why is my dough not rising?
This is the most common issue, and it usually comes down to two things: your starter might not be active enough, or your kitchen is too cold. Make sure your starter is bubbly and doubled in size before you start. If your room is chilly (below 70°F), find a warm spot—like on top of the fridge or in the oven with the light on. Patience helps too; sometimes it just needs an extra hour or two.
How do I know when it’s done?
The best way is to check the internal temperature with an instant-read thermometer. It should reach about 200°F in the center. If you don’t have a thermometer, tap the bottom of the loaf—it should sound hollow. A golden-brown crust is also a good sign!
I’d absolutely love to see how your loaf turns out! Snap a picture and tag me, or just leave a comment below telling me how it went. It makes my day to hear from you.
PrintPumpkin Sourdough Bread: 3 Secrets for Perfect Crumb
This pumpkin sourdough bread combines the tangy flavor of sourdough with the sweetness of pumpkin. It is soft, moist, and perfect for fall baking.
- Prep Time: 20 minutes
- Cook Time: 45 minutes
- Total Time: 10 hours 5 minutes
- Yield: 1 loaf 1x
- Category: Bread
- Method: Baking
- Cuisine: American
- Diet: Low Fat
Ingredients
- 1 cup active sourdough starter
- 1 cup pumpkin puree
- 2 1/2 cups bread flour
- 1/2 cup whole wheat flour
- 1 teaspoon salt
- 1 tablespoon sugar
- 1/2 teaspoon cinnamon
- 1/4 teaspoon nutmeg
- 1/4 cup water (as needed)
Instructions
- Mix starter, pumpkin puree, flours, salt, sugar, and spices in a bowl.
- Knead dough for 10 minutes until smooth. Add water if too dry.
- Let dough rise in a covered bowl for 8 hours at room temperature.
- Shape dough into a round loaf and place in a floured banneton.
- Cover and let rise for 2 more hours.
- Preheat oven to 450°F (230°C) with a Dutch oven inside.
- Place dough into hot Dutch oven, score top, and cover.
- Bake for 30 minutes covered, then 15 minutes uncovered.
- Cool on a wire rack before slicing.
Notes
- Use fresh pumpkin puree for best flavor.
- Adjust water based on humidity.
- Store bread in a cloth bag for up to 3 days.
Nutrition
- Serving Size: 1 slice (1/12 loaf)
- Calories: 180
- Sugar: 4 g
- Sodium: 210 mg
- Fat: 1 g
- Saturated Fat: 0.2 g
- Unsaturated Fat: 0.6 g
- Trans Fat: 0 g
- Carbohydrates: 37 g
- Fiber: 3 g
- Protein: 6 g
- Cholesterol: 0 mg
