
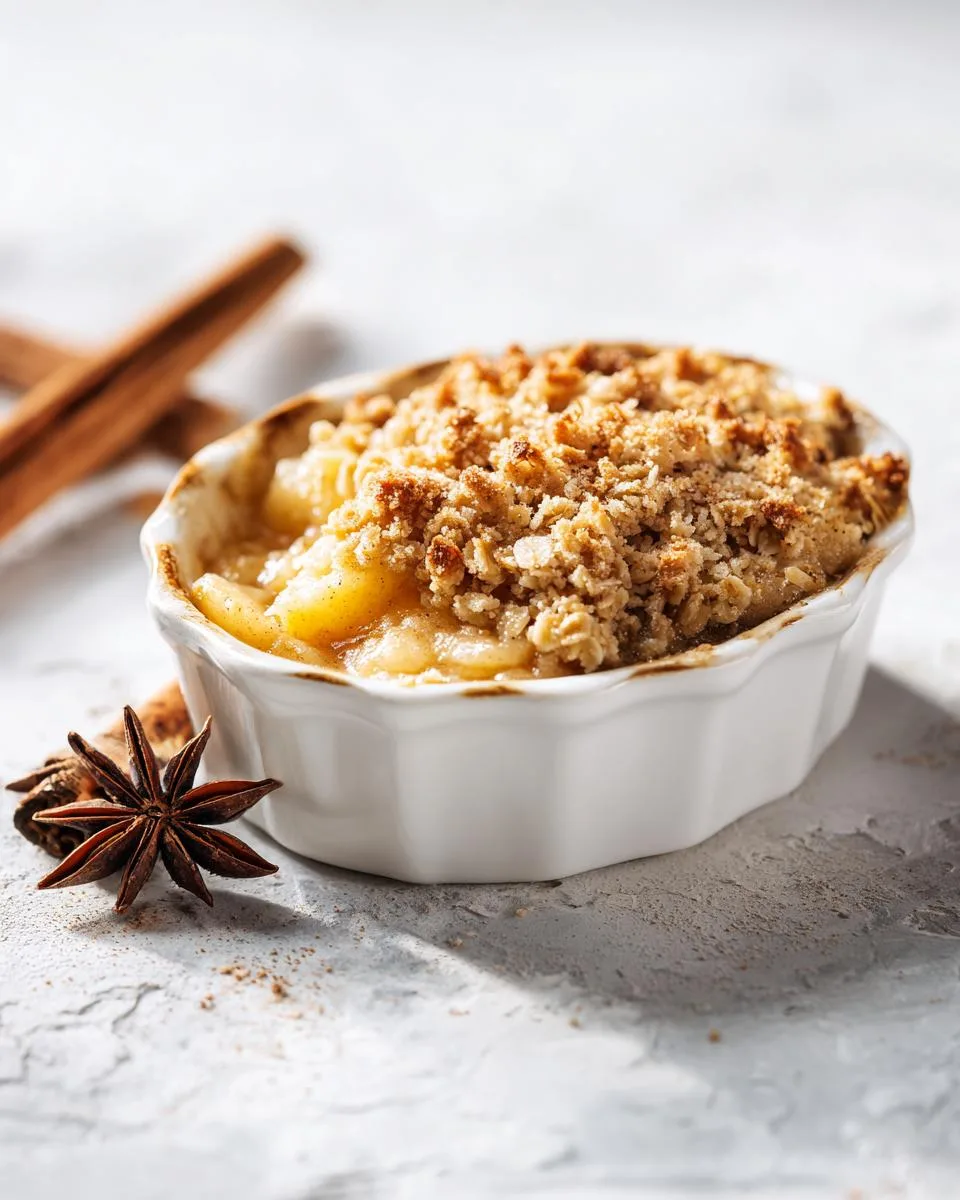
There’s nothing quite like the scent of an Apple Crisp baking in the oven. That warm, spicy perfume of cinnamon and bubbling apples just wrapped up in buttery, toasted oats—it’s the smell of fall, of comfort, of coming home. Honestly, it’s the dessert I turn to again and again because it’s so beautifully simple. No fussy crusts, no complicated layers. Just tender, sweet-tart apples hiding under that crunchy, golden oat topping that shatters a little when you dig your spoon in. I’ve been making this for family gatherings for years, and it never fails to disappear in minutes. There’s something about pulling a rustic dish out of the oven, the contrast between the soft fruit and that crumbly, buttery lid, that just feels like a hug on a plate. Trust me, this is the one you’ll want to make every apple season.
Why This Apple Crisp Recipe Works
This is the kind of recipe that feels like a secret weapon. It’s simple enough for a random Tuesday night, but impressive enough to bring to a holiday potluck. Here’s why I keep coming back to it:
- Incredibly easy prep. No rolling pins, no fancy equipment, no stress. We’re just tossing apples in a dish and stirring together a crumble with our hands. If you can chop an apple, you can nail this dessert.
- Uses simple pantry ingredients. You probably have almost everything you need sitting in your kitchen right now. It’s the perfect last-minute dessert when you need something warm and wonderful without a special trip to the store.
- That amazing texture contrast. The real magic here is that gorgeous, crunchy oat topping against the soft, jammy apples beneath. Every single spoonful gives you that satisfying mix, and the flavor of the fruit really gets to shine through.
Ingredients for the Perfect Apple Crisp
Alright, let’s talk ingredients. The beauty of this recipe is that it’s delightfully straightforward, but a few specifics make all the difference. For the apples, you’ll want 6 medium apples (about 2.5 pounds), peeled, cored, and sliced about 1/4-inch thick. I like to use a mix of Granny Smith for that tart kick and Honeycrisp for natural sweetness—trust me on that one.
For the topping, the star is 1/2 cup packed light brown sugar—it gives that deep, caramel-like flavor that pairs so perfectly with the fruit. And please, please use 1/2 cup cold unsalted butter, cut into small cubes. Cold butter is non-negotiable here; it’s what creates those gorgeous, crumbly bits. That little bit of all-purpose flour in the filling? It’s not just for structure—it actually helps thicken the apple juices as they bubble, so you end up with a luscious, jammy syrup instead of a watery mess. The rest is simple: oats, cinnamon, a bit of granulated sugar for the apples. That’s it! Simple, honest ingredients doing their best work.
Step-by-Step Instructions for Your Apple Crisp
Okay, let’s get to the fun part! Making an Apple Crisp is one of those wonderfully forgiving kitchen projects—it almost feels like cheating, it’s so simple. But a few specific steps make all the difference between a good crisp and a *great* one. Here’s exactly how I do it.
- Preheat and prep. First, crank that oven to 350°F (175°C). Give a 9×9 inch baking dish a good greasing with butter or non-stick spray. I like using a glass dish so I can peek at the juices bubbling later.
- Get the apples cozy. In a large bowl, toss your sliced apples with the granulated sugar and ground cinnamon. I always use my hands here—it’s the best way to make sure every single slice is evenly coated in that sweet, spicy goodness.
- Layer the fruit. Spread the apple mixture evenly into your prepared baking dish. Give it a little shake to settle everything into a nice, even layer.
- Mix the crunchy topping. In a separate medium bowl, whisk together the all-purpose flour, rolled oats, and packed brown sugar. Make sure there are no clumps of brown sugar hiding at the bottom!
- Cut in the cold butter. This is the most important step. Using a pastry blender or just your fingertips, work the cold butter into the oat mixture until it looks like coarse crumbs with some pea-sized butter pieces still visible. Don’t overmix it! Those little pockets of butter are what melt into the topping and create that amazing, crumbly texture.
- Top it off. Sprinkle the oat mixture evenly over the apples. Don’t press it down—just let it fall naturally into a craggly, rustic layer.
- Bake until golden and bubbly. Place the dish in the oven and bake for 35 to 40 minutes. You’ll know it’s ready when the topping is a beautiful golden brown and the apple filling is bubbling up around the edges. Your kitchen will smell absolutely incredible at this point.
- Cool (if you can wait!). Let the crisp cool on a wire rack for at least 10 minutes before serving. I know, the temptation is real, but this step is crucial. It allows the juices to thicken into a luscious syrup instead of running all over your plate. Trust the process!
Tips for the Best Apple Crisp
After making this dessert about a hundred times (give or take), I’ve picked up a few little tricks that really make a difference. First off, use a mix of apple varieties. I love Granny Smith for that sharp tang and Honeycrisp for sweetness—they balance each other perfectly and give you a more complex flavor. Second, whatever you do, don’t overmix the topping. Seriously! You want those cold butter chunks to stay visible; that’s what creates a crumbly, tender topping instead of a dense, pasty one. Cold butter is your best friend here. And one last tip: if you notice the top is browning too quickly before the apples are fully tender, just loosely tent the dish with a piece of aluminum foil for the last 10 minutes of baking. It’ll save your crisp from burning while letting those apples get perfectly soft underneath.
Ingredient Substitutions for This Apple Crisp
Life throws curveballs, and sometimes your pantry doesn’t quite match the recipe. No worries! I’ve tested a couple of swaps that work surprisingly well. For a gluten-free version, just swap in a good gluten-free all-purpose flour blend and make sure you grab certified gluten-free rolled oats. The topping will be a tiny bit more delicate, but it still gets that lovely, crunchy texture. If you need it dairy-free, I’ve had great luck using a solid vegan butter stick (the kind that comes in a block, not a tub) or even refined coconut oil. Just keep everything really cold before cutting it in. The topping won’t be quite as buttery-rich, but honestly, it’s still pretty irresistible.
Frequently Asked Questions About Apple Crisp
Q1. Can I use pre-sliced apples? Sure, you can! I’ve done it in a pinch. Just keep in mind that frozen pre-sliced apples tend to release a lot more water as they bake. If you’re using frozen, let them thaw a bit and drain off any excess liquid before tossing them with the sugar and cinnamon. Otherwise, you might end up with a slightly soupier filling.
Q2. Can I make this Apple Crisp ahead of time? Absolutely. This is one of my favorite tricks for busy holidays. You can assemble the whole thing—apples and topping—in the baking dish, cover it tightly with plastic wrap, and pop it in the fridge for up to 24 hours. When you’re ready to bake, just add about 5 to 10 extra minutes to the oven time since you’re starting from cold. Easy peasy.
Q3. Can I freeze Apple Crisp? Yes, and it freezes beautifully! I’d recommend baking it first, then letting it cool completely. Wrap the dish tightly in a couple layers of plastic wrap and then foil, and freeze for up to 3 months. When you want it, just thaw it in the fridge overnight and reheat in a 350°F oven until warmed through. The topping stays surprisingly crunchy.
Q4. Why is my apple crisp runny? Oh, I’ve been there! It usually happens when your apples are super juicy (some varieties are just thirstier) or if you pull it out of the oven a little too early. The good news is you can fix it next time by letting the crisp cool for at least 10 minutes after baking—that gives the juices time to thicken into a lovely syrup. And if it’s still runny, just serve it in a bowl and call it a feature, not a bug!
Serving Suggestions for Apple Crisp
Now for the best part—serving this beauty! I’m a firm believer that Apple Crisp should be enjoyed warm, straight from the dish, with a generous scoop of vanilla ice cream melting into all those nooks and crannies. The cold, creamy ice cream against the warm, spiced apples and crunchy topping? Absolute perfection. If you’re out of ice cream, a big dollop of freshly whipped cream works wonders too, or even a drizzle of good quality caramel sauce for extra indulgence. Honestly though, this crisp is so good it doesn’t need a thing. On those nights when I’m craving something cozy but lighter, I’ve been known to eat it completely plain, just savoring the contrast of textures. There’s really no wrong way to enjoy it!
How to Store and Reheat Apple Crisp
Got leftovers? Lucky you! Just cover the dish tightly with plastic wrap or foil and pop it in the fridge—it’ll stay good for up to 3 days. When you’re craving another warm bowl, you’ve got options. For a quick fix, microwave individual portions for 30 to 45 seconds. The topping won’t be quite as crunchy, but it still hits the spot. If you want that crispiness back, reheat the whole dish in a 350°F oven for 10 to 15 minutes. I’ve learned the hard way that the oven method is worth the extra few minutes—it really revives that golden, buttery topping.
Nutritional Information for This Apple Crisp
I know some of you like to keep track, so here’s the deal—these numbers are just an estimate and will vary based on what you use. For a ballpark on 8 servings, peek at the recipe card.
PrintThe Perfect Apple Crisp in 3 Easy Steps
A warm and comforting dessert made with tender apples and a crunchy oat topping. Perfect for fall.
- Prep Time: 15 minutes
- Cook Time: 40 minutes
- Total Time: 55 minutes
- Yield: 8 servings 1x
- Category: Dessert
- Method: Baking
- Cuisine: American
- Diet: Vegetarian
Ingredients
- 6 medium apples, peeled and sliced
- 1/2 cup granulated sugar
- 1 teaspoon ground cinnamon
- 1/4 cup all-purpose flour
- 1 cup rolled oats
- 1/2 cup packed brown sugar
- 1/2 cup cold butter, cut into pieces
Instructions
- Preheat oven to 350°F (175°C).
- In a large bowl, toss apple slices with granulated sugar and cinnamon.
- Spread apple mixture evenly in a 9×9 inch baking dish.
- In a separate bowl, combine flour, oats, and brown sugar.
- Cut in cold butter using a pastry blender until mixture resembles coarse crumbs.
- Sprinkle oat topping over apples.
- Bake for 35 to 40 minutes, until topping is golden and apples are tender.
- Let cool for 10 minutes before serving.
Notes
- You can use a mix of sweet and tart apples like Granny Smith and Honeycrisp.
- Serve warm with vanilla ice cream or whipped cream.
- Store leftovers in the refrigerator for up to 3 days.
Nutrition
- Serving Size: 1 serving (1/8 of recipe)
- Calories: 300
- Sugar: 25g
- Sodium: 150mg
- Fat: 12g
- Saturated Fat: 6g
- Unsaturated Fat: 5g
- Trans Fat: 0g
- Carbohydrates: 45g
- Fiber: 3g
- Protein: 3g
- Cholesterol: 30mg
