
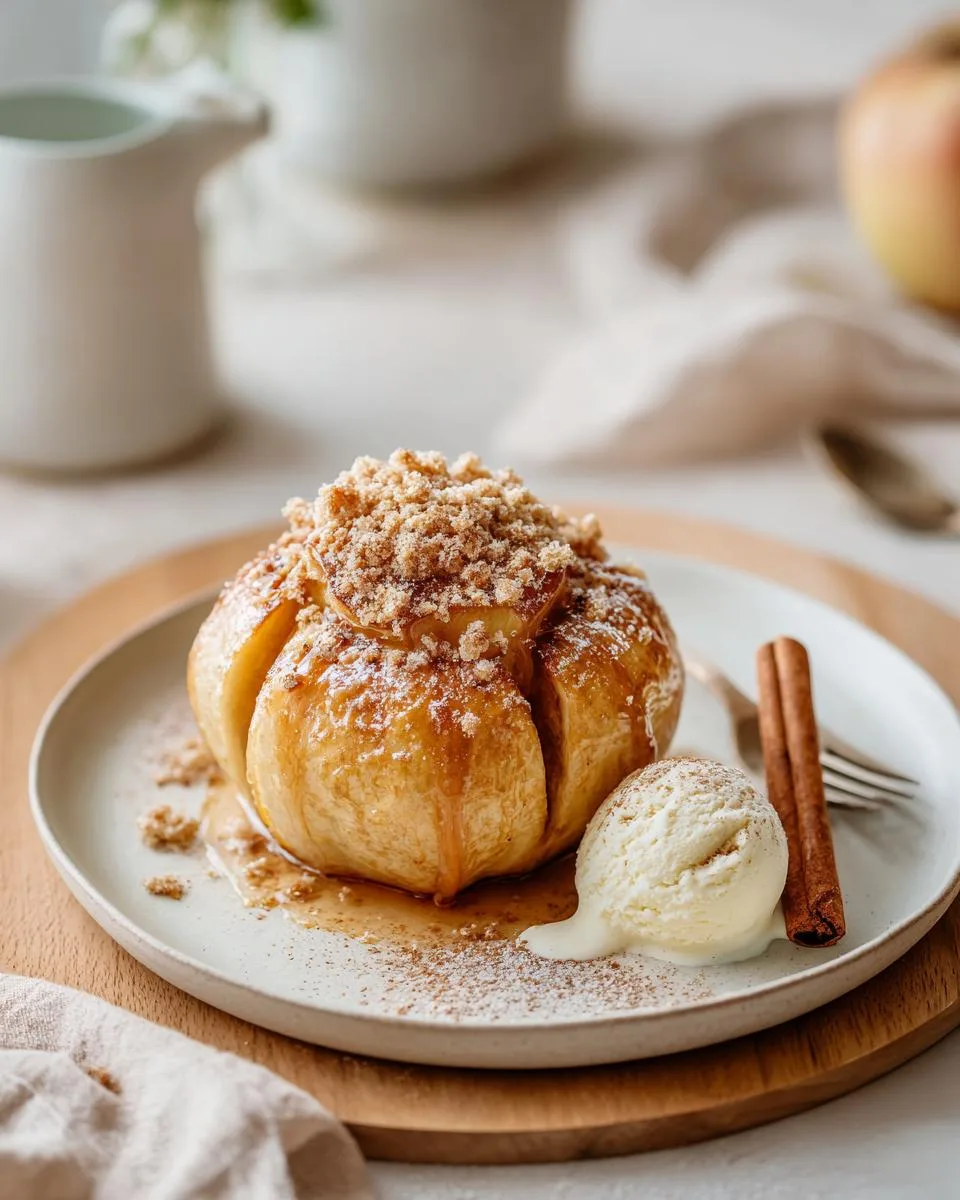
I still remember the first time I saw a Bloomin’ Onion at a restaurant and thought, “Why hasn’t anyone done this with apples?” Well, someone finally did, and let me tell you—these Bloomin’ Apples are absolutely magical. A whole baked apple, sliced and fanned out just like that famous onion, with a buttery, crisp, cinnamon-sugar coating that shatters when you bite into it. I first made these for a fall dinner party, and everyone just stopped and stared when I brought the baking dish to the table. After years of experimenting with baked apple desserts, this one’s become my absolute showstopper—it’s impressive, but secretly so easy.
Why You’ll Love This Bloomin’ Apples Recipe
Trust me, you’re going to fall head-over-heels for these Bloomin’ Apples. Here’s why they’re about to become your new favorite dessert:
- Easy to make, looks like a million bucks. Honestly, the hardest part is coring the apples—and even that’s a breeze. Everyone will think you slaved away for hours.
- Warm, cozy, and totally comforting. The soft, tender apple with that crunchy, buttery cinnamon coating? It’s like a hug in a bowl.
- Completely customizable. You can switch up the coating, add nuts, or drizzle caramel—make it your own!
The Ingredients You’ll Need for Bloomin’ Apples
Let’s talk ingredients, because getting these right makes all the difference. You’ll need 4 large Granny Smith or Fuji apples – make sure they’re firm, not mealy, so they hold their shape. Then grab 1/2 cup unsalted butter, melted, 1/2 cup packed brown sugar, 1 teaspoon ground cinnamon, and 1/2 teaspoon ground nutmeg. For the coating, you’ll mix 1/2 cup all-purpose flour with 1/4 cup granulated sugar and 1/2 cup crushed graham crackers or crispy cereal flakes (like corn flakes). Crush those graham crackers finely – you want crumbs, not dust. All measurements are standard US, by the way.
Key Ingredient Substitutions
Need to switch things up? No problem. For a gluten-free option, just use gluten-free graham crackers or skip them entirely – the coating will still be delicious. You can substitute coconut sugar for the brown sugar if you prefer, and any firm apple variety like Honeycrisp or Pink Lady works beautifully.
How to Make Bloomin’ Apples
Alright, let’s get to the fun part—actually making these beauties! I’ll walk you through every step, and I promise, it’s way easier than it looks. The whole thing comes together in under an hour, and the smell in your kitchen? Absolutely divine.
Step-by-Step Instructions
- Preheat and prep. First thing, crank your oven to 375°F (190°C). Line a baking dish with parchment paper—trust me, cleanup is so much easier this way.
- Core the apples carefully. Grab a melon baller or a small spoon and core each apple from the top, leaving the bottom completely intact. You want a little well in the center, but don’t go all the way through—the bottom needs to hold everything in.
- Slice and fan. Now, take a sharp knife and slice the top part of each apple into thin wedges, maybe 8-10 slices. Here’s the trick: gently fan those wedges out like you’re opening a flower. Don’t worry if they’re not perfect—just separate them a bit so the coating can get in between. And go slow, you don’t want to break them off!
- Make the butter mixture. In a shallow bowl, whisk together the melted butter, brown sugar, cinnamon, and nutmeg until it’s all smooth and gorgeous.
- Make the dry mixture. In another bowl, stir together the flour, granulated sugar, and crushed graham crackers.
- Dip and coat. Here’s where it gets messy in the best way. Dip each apple into the butter mixture, making sure to spoon some of that buttery goodness into all the nooks and crannies between the wedges. Then roll it in the dry mixture, pressing firmly so the coating sticks. Use your fingers or a small spoon to really work it into those cracks.
- Top and bake. Place the coated apples in your prepared dish. Spoon any remaining butter mixture right over the tops—don’t waste a drop! Bake for 30-35 minutes, until the apples are tender when you poke them with a fork and the coating is golden and crisp.
- Let them rest. Pull them out of the oven and let them cool for about 5 minutes. This helps the coating set a bit and keeps you from burning your mouth. I know it’s hard to wait, but it’s worth it!
My personal tip? Check doneness with a fork about 5 minutes early. You want the apples tender but not mushy—they should still hold their shape when you serve them.
Tips for Perfectly Baked Bloomin’ Apples
Here are a few tricks I’ve learned the hard way. First, always use firm apples—Granny Smith or Fuji are my go-tos because they hold up so well. Don’t overbake or they’ll collapse! And please, let them rest before serving—it makes a world of difference. Oh, and that parchment paper lining I mentioned? It makes cleanup a total breeze. These little tips will make your Bloomin’ Apples absolutely perfect every single time.
Variations of Bloomin’ Apples
One of the best things about this recipe is how easy it is to tweak. Here are a few of my favorite ways to mix up these Bloomin’ Apples:
- Nutty crunch: Add about 1/4 cup of finely chopped pecans or walnuts to the dry coating mixture. It adds such a lovely texture and toasty flavor.
- Caramel dream: Before baking, drizzle about a tablespoon of caramel sauce over each apple right into the center well. It gets all gooey and amazing as it bakes.
- Extra crunchy top: Swap half the brown sugar for an equal amount of granulated sugar in the butter mixture. You’ll get a shatteringly crisp, candy-like coating that’s totally irresistible.
Serving Suggestions for Bloomin’ Apples
You absolutely have to serve these Bloomin’ Apples warm—that’s non-negotiable! A scoop of vanilla ice cream melting into all those buttery, cinnamon-coated crevices is pure magic. Or go with a dollop of whipped cream and a drizzle of honey if you’re feeling fancy. I served these at a fall dinner last year, and honestly, the way everyone went quiet after the first bite? That’s when I knew this recipe was a keeper. Oh, and they’re incredible with a hot cup of coffee or tea on the side—perfect for a cozy autumn evening.
Storage and Reheating for Bloomin’ Apples
Got leftovers? Lucky you! Just cover those Bloomin’ Apples and pop them in the fridge—they’ll stay good for up to 3 days. When you’re ready for round two, reheat them in a 350°F oven for about 10 minutes to bring back some of that crispness, or zap them in the microwave for 30 seconds if you’re in a hurry. Just a heads-up, the coating will soften up a bit, but the flavor? Still absolutely amazing.
Frequently Asked Questions About Bloomin’ Apples
I’ve been making these for years, and folks always have a few questions before diving in. Here are the answers to the most common ones I get—hopefully they’ll save you a little trial and error!
Can I Use Red Delicious Apples?
Honestly, I’d steer clear of Red Delicious here—they get way too soft and mushy when baked. Stick with Granny Smith or Fuji for that perfect texture that holds its shape.
How Do I Keep the Coating Crisp?
The secret to perfectly crisp Bloomin’ Apples is not overcoating them. Press the coating on firmly, but not too thick. Bake until golden and serve right away—that crunchy exterior waits for no one!
Can I make this baked apple dessert gluten-free? Absolutely! Just use gluten-free graham crackers or skip them entirely. I’ve done it both ways, and the apples still turn out beautifully tender and delicious.
How do I prevent the coating from falling off? This was my biggest struggle at first! The trick is to press the dry mixture on firmly, especially between those fanned wedges. I use my fingers or a small spoon to really work it in there. And don’t skip the butter mixture—it acts like glue for the coating.
Can I prepare these ahead of time? You can core and slice the apples a few hours ahead, just keep them in a bowl of lemon water so they don’t brown. But for the best texture, I really recommend dipping, coating, and baking them right before serving.
Nutritional Information for Bloomin’ Apples
Here’s the breakdown if you’re curious—per serving (one apple), you’re looking at about 320 calories, 14g fat, 48g carbs, and 28g sugar. Keep in mind these are just estimates and can shift a bit depending on your exact ingredients and brands. But hey, it’s dessert—worth every bite!
We’d Love to Hear From You
I’d absolutely love to know how these turned out for you! Drop a comment and a star rating below, or tag me in your photos on social media—I always get so excited seeing your creations. And if you’re not already subscribed, what are you waiting for? More cozy recipes are coming your way!
PrintBloomin’ Apples 4 Irresistible Baked Delights
A baked apple dessert with a crisp coating and sweet center, similar to bloomin’ onion style.
- Prep Time: 15 minutes
- Cook Time: 35 minutes
- Total Time: 50 minutes
- Yield: 4 servings 1x
- Category: Dessert
- Method: Baking
- Cuisine: American
- Diet: Vegetarian
Ingredients
- 4 large apples (Granny Smith or Fuji)
- 1/2 cup unsalted butter, melted
- 1/2 cup brown sugar
- 1 teaspoon cinnamon
- 1/2 teaspoon nutmeg
- 1/2 cup all-purpose flour
- 1/4 cup granulated sugar
- 1/2 cup crushed graham crackers or cereal flakes
Instructions
- Preheat your oven to 375°F (190°C).
- Core each apple from the top, leaving the bottom intact. Slice the top part into thin wedges, fanning them out slightly.
- Mix melted butter, brown sugar, cinnamon, and nutmeg in a bowl.
- In another bowl, combine flour, granulated sugar, and crushed graham crackers.
- Dip each apple in the butter mixture, then roll in the dry mixture, pressing to coat.
- Place apples in a baking dish. Spoon remaining butter mixture over the tops.
- Bake for 30-35 minutes until apples are tender and coating is golden.
- Let cool for 5 minutes before serving.
Notes
- Use firm apples to hold shape.
- You can skip the graham crackers for a gluten-free option.
- Serve with vanilla ice cream or whipped cream.
Nutrition
- Serving Size: 1 apple
- Calories: 320
- Sugar: 28g
- Sodium: 120mg
- Fat: 14g
- Saturated Fat: 8g
- Unsaturated Fat: 5g
- Trans Fat: 0g
- Carbohydrates: 48g
- Fiber: 4g
- Protein: 2g
- Cholesterol: 35mg
