
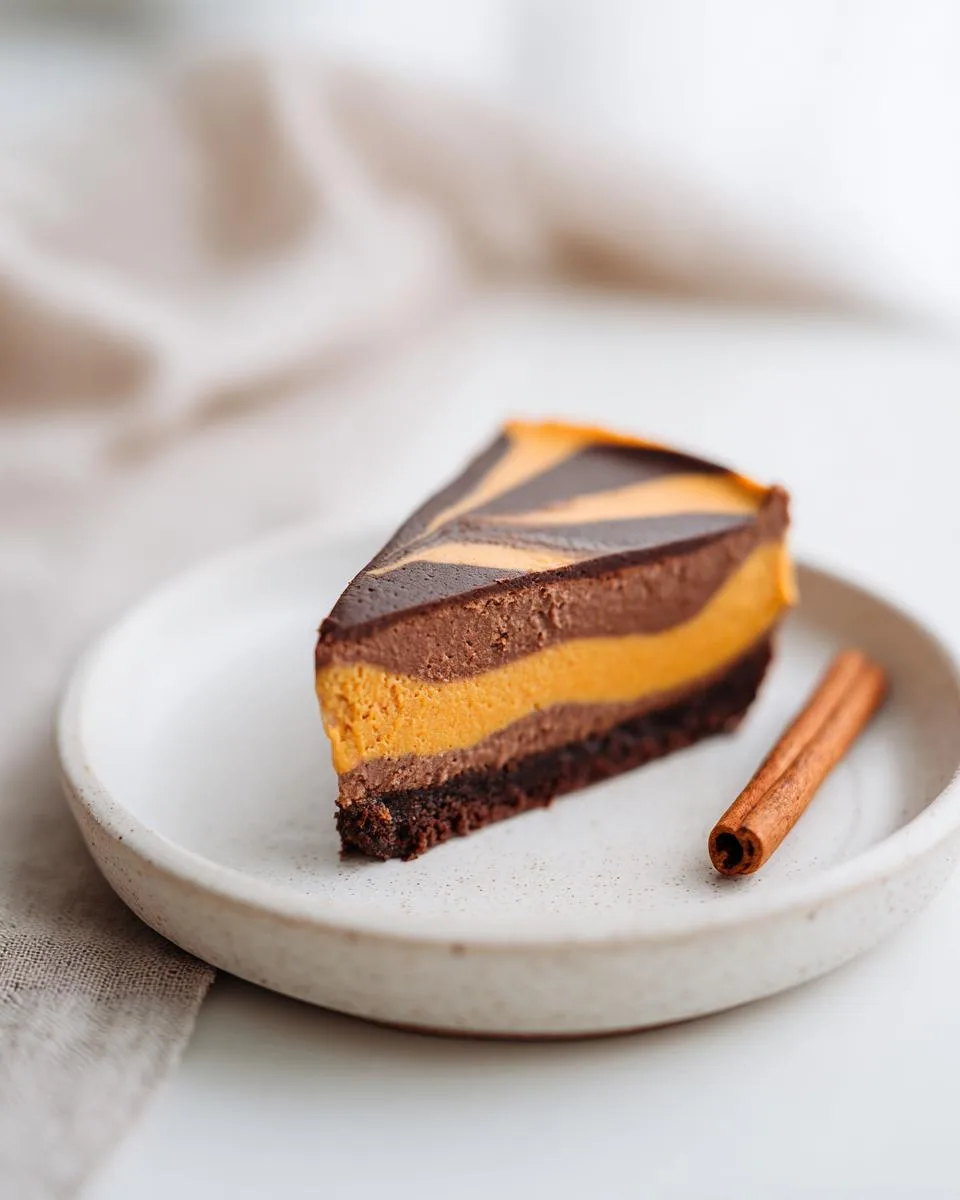
There’s just something about that first crisp fall day, isn’t there? The cool air, the cozy kitchen, the smell of warm spices drifting through the house. That’s exactly when I start dreaming about this Chocolate Pumpkin Cheesecake. It’s the best of both worlds – a rich, fudgy chocolate base swirled with creamy, spiced pumpkin, all nestled in a buttery graham cracker crust. I brought one to our family’s Thanksgiving dinner last year, and honestly, it vanished before the pumpkin pie even got a look-in. The best part? It looks like you spent hours on it, but the steps are totally doable. Trust me, you’re going to want to make this one this weekend.
Why You'll Love This Chocolate Pumpkin Cheesecake
I’m not kidding when I say this recipe is a total game-changer. Here’s why it’s going to become your new go-to fall dessert:
- No water bath required. Seriously! No fussing with foil or worrying about leaks. This method gives you a perfectly creamy cheesecake without the hassle.
- Make it ahead of time. This cheesecake actually gets better after a day in the fridge. Perfect for holiday prep or busy weekends.
- That gorgeous marbled look. The chocolate and pumpkin swirl together into a show-stopping pattern that looks way harder than it is. Your guests will be impressed!
- Balanced, not overpowering. The pumpkin spice is warm and cozy, but the rich chocolate keeps everything from being too sweet or one-note. It’s a match made in heaven.
- Smooth and crack-resistant. The gradual cooling method in the oven is like a secret weapon against those ugly cracks. You get a beautiful, silky top every time.
- Beginner-friendly. I promise, if you can stir and pour, you can make this. The step-by-step baking process takes the guesswork out, so even first-timers get a bakery-worthy result.
Ingredients for Chocolate Pumpkin Cheesecake
Let’s talk ingredients. I’m a stickler about this, because using the right stuff makes all the difference. Here’s exactly what you’ll need, no shortcuts allowed (trust me on this one).
For the crust: You’ll need 1 1/2 cups graham cracker crumbs – that’s about 12 full sheets, crushed fine. Mix them with 1/4 cup granulated sugar and 1/2 cup unsalted butter, melted and slightly cooled. Make sure the butter isn’t piping hot, or it’ll make the crumbs greasy instead of sandy.
For the filling: Grab 2 packages (8 oz each) full-fat cream cheese. And I mean full-fat. Low-fat or reduced-fat versions have extra water and stabilizers, which can make your cheesecake grainy or soft. Let the cream cheese sit on the counter for 30 to 60 minutes before you start – that’s what “softened” really means. Cold cream cheese = lumpy cheesecake. You’ll also need 1/2 cup granulated sugar for the filling, plus 2 large eggs at room temperature. If you forgot to take them out, just place them in a bowl of warm water for 5 minutes.
Now for the stars of the show. You’ll use 1/2 cup pure pumpkin puree – this is not pumpkin pie filling. That stuff already has sugar and spices added, and it’ll throw off the whole balance. Look for the can that says “100% pumpkin.” Then add 1 teaspoon pure vanilla extract and 1 teaspoon pumpkin pie spice. Don’t have that? Mix 1/2 teaspoon cinnamon, 1/4 teaspoon nutmeg, 1/4 teaspoon ginger, and a tiny pinch of cloves.
Finally, 1/2 cup semisweet chocolate chips, melted and cooled for about 5 minutes. I like to melt them in the microwave in 30-second bursts, stirring each time. Let them sit a bit so they don’t seize up when you stir them into the batter. That’s it – simple, honest ingredients that work together like a charm.
Equipment You'll Need
Alright, let’s talk tools. Nothing fancy here – just a few basics that’ll make this whole process smooth and easy. Here’s what I use every time:
- 9-inch springform pan – the star of the show. Make sure the latch is tight so no batter escapes.
- Medium mixing bowl for the crust – just big enough to stir crumbs and butter together.
- Large mixing bowl for the filling – you’ll need room to beat the cream cheese without splattering everywhere.
- Two smaller bowls – one for the pumpkin batter, one for the chocolate batter after you divide things up.
- Electric hand mixer or stand mixer – a whisk and elbow grease won’t get you that silky smooth texture. I prefer my hand mixer, but a stand mixer works great too.
- Rubber spatula – for scraping every last bit of batter and gently folding in the melted chocolate.
- Measuring cups and spoons – because eyeballing ingredients is a gamble I don’t recommend with cheesecake.
- Butter knife – the perfect tool for creating those beautiful swirls. A regular dinner knife works fine.
- Flat-bottomed measuring cup – use it to press the crust firmly and evenly into the pan. Much easier than using your fingers!
Oh, and if you want to crush graham crackers quickly, a food processor does the job in seconds. But honestly? A zip-top bag and a rolling pin (or even a heavy skillet) work just as well and let you work out a little frustration. Your call!
How to Make Chocolate Pumpkin Cheesecake
Alright, let’s get baking! I’m going to walk you through this step by step, and I promise it’s easier than it looks. The key is to take your time and trust the process – especially that sneaky oven-off cooling trick at the end. Don’t skip it, okay? Here we go!
Prepare the Crust
First things first – preheat your oven to 350°F (175°C). Now, grab your graham cracker crumbs, the 1/4 cup sugar, and the melted butter. Stir them together in a medium bowl until the mixture looks like wet sand. You want every crumb coated, but not soggy. Press that mixture firmly into the bottom of your 9-inch springform pan. I like to use the bottom of a flat measuring cup to really compress it evenly – no loose spots! Pop it in the oven for 10 minutes. When it comes out, let it cool completely on a wire rack. This step is crucial: a fully cooled crust stays crisp and doesn’t get soggy when you add the filling. Patience, friend!
Make the Cheesecake Batter
In your large mixing bowl, beat the softened cream cheese and 1/2 cup sugar together on medium speed. Give it about 2 minutes, until it’s smooth and creamy – no lumps allowed. Scrape down the sides of the bowl with your spatula. Now add the eggs, one at a time, beating just until each one is incorporated. Don’t go crazy here; overmixing after the eggs go in can make the cheesecake puff up and crack later. Divide the batter evenly between your two smaller bowls. Into one bowl, stir in the pumpkin puree, vanilla, and pumpkin pie spice until it’s all one smooth, gorgeous orange. Into the other bowl, gently fold in the melted chocolate with your spatula. Keep both mixtures at room temperature – cold batter is harder to swirl, and we want that marbled magic to come out beautifully.
Swirl and Bake the Cheesecake
Pour the chocolate batter into your cooled crust and spread it into an even layer. Now, spoon dollops of the pumpkin batter all over the top – don’t worry about being neat. Take a butter knife and gently drag it through the two batters in a figure-eight motion. Just three or four passes is plenty; you want those distinct ribbons of chocolate and pumpkin, not a muddy mess. Bake for 45 minutes. The edges should look set, but the center will still have a slight jiggle – that’s exactly what you want. Now, here’s the magic part: turn off the oven, close the door, and let the cheesecake rest inside for exactly 1 hour. Do not open that oven door, no matter how curious you are! This gradual cooling is what prevents cracks. After the hour, take it out and let it cool to room temperature on the counter. Then cover the pan with plastic wrap and refrigerate for at least 4 hours – overnight is even better. Serve it cold, straight from the fridge. Perfection.
Tips for Success
I’ve made this cheesecake more times than I can count, and these little tricks are what keep it coming out perfect every single time. Trust me on these!
- Use room-temperature ingredients. I know, I know, it’s tempting to use cold cream cheese straight from the fridge. But lumps are real, and they don’t go away. Let your cream cheese, eggs, and even the pumpkin sit out for about 30 minutes before you start. Your mixer will thank you.
- Beat the cream cheese and sugar just until smooth. About 2 minutes on medium speed is all you need. Overbeating whips too much air into the batter, which can cause cracks during baking. Smooth and creamy is the goal – not fluffy.
- Melt chocolate in short bursts. Pop those chocolate chips in the microwave for 30 seconds, stir, then repeat in 15-second intervals until smooth. Chocolate scorches in a heartbeat, so go slow. Let it cool for 5 minutes before folding it into the batter – hot chocolate will mess up the texture.
- Do not open the oven door during baking or the 1-hour rest. Seriously. Not even a peek. That sudden rush of cold air is the number one cause of cheesecake cracks. Set a timer and walk away. I usually go fold laundry or something to keep busy.
- For clean slices, use a hot knife. Dip a sharp knife in hot water, wipe it dry, then slice. Wipe the blade clean between each cut. It takes a little extra time, but you’ll get those gorgeous, bakery-style pieces.
- If the top cracks, don’t panic. It still tastes amazing, and no one will know once you add a dollop of whipped cream. Seriously, a little whipped cream fixes everything. I’ve done it more times than I’ll admit.
Ingredient Substitutions and Variations
I’m a big believer in making a recipe your own, and this cheesecake is super forgiving. Here are some swaps I’ve tried and loved – just know that each change tweaks the flavor and texture just a little, so don’t expect it to be exactly the same. That’s part of the fun!
First, the chocolate. You can absolutely use dark chocolate chips for a richer, less sweet kick, or milk chocolate if you want it sweeter and creamier. I’ve done both, and they’re delicious. For a tangier, slightly lighter filling, replace half the cream cheese with full-fat sour cream or Greek yogurt. It gives the cheesecake a lovely tang and a bit less density. Make your own pumpkin pie spice if you don’t have it: mix 1/2 teaspoon cinnamon, 1/4 teaspoon nutmeg, 1/4 teaspoon ginger, and a pinch of cloves. Easy.
Now for variations. Swap the graham cracker crust for a chocolate wafer crust – it doubles down on the chocolate flavor, and I’m totally here for it. Drizzle caramel sauce over the finished cheesecake for a salted caramel twist. Or fold 1/2 cup toasted pecans into the pumpkin batter for a little crunch. Want mini cheesecakes? Press the crust into a greased muffin tin, fill with batter, and bake for 20-25 minutes. They’re perfect for parties. Just remember: any change will shift things a bit, but that’s the beauty of baking – you get to experiment!
Frequently Asked Questions
I get asked these questions all the time, so let me save you some head-scratching. Here are the answers to the most common things people wonder about this pumpkin cheesecake recipe.
Can I make this Chocolate Pumpkin Cheesecake in advance?
Absolutely, and honestly, it tastes even better on day two. The flavors get all cozy and meld together overnight. You can make it up to 2 days ahead – just keep it covered in the fridge. Perfect for when you want to cross something off your holiday to-do list early.
Can I freeze the cheesecake?
Yep, it freezes like a dream. You can freeze the whole cheesecake or individual slices. Just wrap it tightly in plastic wrap, then a layer of foil, and pop it in the freezer for up to 2 months. When you’re ready, thaw it overnight in the refrigerator. The texture stays creamy, though it might soften just a tad – still delicious.
Do I really need to leave the cheesecake in the oven after baking?
Yes, yes, yes! I know it’s tempting to crack the door open or pull it out early, but please don’t. That gradual cooling is the single best trick for preventing cracks. The cheesecake finishes setting gently, so you get a smooth, beautiful top every time. Set a timer and walk away – I usually go tidy the kitchen or pour myself a cup of tea.
Why did my cheesecake crack?
Don’t worry, it happens to the best of us. The most common culprits are overbaking, using cold ingredients, or a sudden temperature change – like opening the oven door too soon. This recipe’s resting method is designed to avoid all that, but if a crack does appear, just cover it with whipped cream. No one will ever know, and it still tastes incredible.
Can I use fresh pumpkin puree?
Sure, you can! If you’re using homemade pumpkin puree, just make sure to drain it first. Wrap it in a few layers of cheesecloth and let it sit over a bowl for at least 2 hours. Fresh pumpkin has a lot of extra water, and if you don’t drain it, your cheesecake could end up too soft or even watery. Canned puree is perfectly fine and super convenient, though.
Storage and Reheating Instructions
Got leftovers? Lucky you! Store them in an airtight container in the fridge, and they’ll stay perfect for up to 5 days. Serve it cold – no reheating needed, that’s part of the magic.
Freezing works great, too. I like to slice it first, then freeze the slices on a baking sheet until solid. Wrap each one tightly in plastic wrap, pop them in a freezer bag, and they’ll keep for up to 2 months. Thaw overnight in the fridge. The texture stays wonderfully creamy, though it might soften just a tad. Still absolutely delicious.
Nutritional Information
I always like to include this for folks who are keeping track, but please remember these numbers are just estimates. They’re based on the exact ingredients I listed, and if you swap anything out (like using dark chocolate or low-fat cream cheese), the values will shift. For a slice (that’s 1/12 of the cheesecake), here’s what you’re looking at: 380 calories, 24g total fat (14g saturated, 8g unsaturated, 0g trans), 85mg cholesterol, 320mg sodium, 36g carbs (2g fiber, 28g sugar), and 7g protein. If you make substitutions, I’d recommend plugging your specific ingredients into a nutrition calculator to get accurate numbers. But honestly? This cheesecake is worth every single bite.
I’d love to hear how yours turned out! Drop a comment below with a rating – it really helps other readers. And hey, if you snap a photo, tag me on social media so I can see your beautiful creation. Which fall dessert should we tackle next? I’m already dreaming of ideas!
PrintChocolate Pumpkin Cheesecake: 1-Hour Perfect Rest
A rich and creamy cheesecake with layers of chocolate and pumpkin. Perfect for fall gatherings.
- Prep Time: 20 minutes
- Cook Time: 45 minutes
- Total Time: 6 hours 5 minutes (includes cooling and chilling)
- Yield: 12 servings 1x
- Category: Dessert
- Method: Baking
- Cuisine: American
- Diet: Vegetarian
Ingredients
- 1 1/2 cups graham cracker crumbs
- 1/4 cup granulated sugar
- 1/2 cup melted butter
- 2 packages (8 oz each) cream cheese, softened
- 1/2 cup granulated sugar
- 2 large eggs
- 1/2 cup pumpkin puree
- 1 teaspoon vanilla extract
- 1 teaspoon pumpkin pie spice
- 1/2 cup semisweet chocolate chips, melted
Instructions
- Preheat oven to 350°F (175°C).
- Mix graham cracker crumbs, 1/4 cup sugar, and melted butter. Press into a 9-inch springform pan.
- Bake crust for 10 minutes. Let cool.
- Beat cream cheese and 1/2 cup sugar until smooth.
- Add eggs one at a time, beating well after each.
- Divide batter into two bowls. Stir pumpkin puree, vanilla, and pumpkin pie spice into one bowl.
- Stir melted chocolate into the other bowl.
- Pour chocolate batter over crust. Top with pumpkin batter. Swirl with a knife.
- Bake for 45 minutes. Turn off oven and leave cheesecake inside for 1 hour.
- Cool completely. Refrigerate for 4 hours before serving.
Notes
- Use room temperature cream cheese for a smooth texture.
- You can substitute dark chocolate for semisweet.
- Store leftovers in the refrigerator for up to 5 days.
Nutrition
- Serving Size: 1 slice (1/12 of cake)
- Calories: 380
- Sugar: 28g
- Sodium: 320mg
- Fat: 24g
- Saturated Fat: 14g
- Unsaturated Fat: 8g
- Trans Fat: 0g
- Carbohydrates: 36g
- Fiber: 2g
- Protein: 7g
- Cholesterol: 85mg
