
Deviled eggs are one of those dishes that just scream “party” to me. You know the ones—they’re always the first platter to disappear at every potluck, barbecue, and holiday gathering. I’ve been making my fair share of deviled eggs for years, and I’ve learned that the secret to a truly great batch isn’t some fancy ingredient or complicated technique. It’s about getting the basics right: perfectly cooked eggs, a creamy, tangy filling, and just the right amount of seasoning. This recipe is my go-to because it’s incredibly simple and delivers that classic, crowd-pleasing flavor every single time. Trust me, once you try this method, you’ll never look back.
Why You Will Love This Deviled Eggs Recipe
Let me tell you why this recipe has become my absolute go-to. It’s not just because it’s easy—though it definitely is!
- Simple, straightforward ingredients. You probably already have everything in your fridge. No hunting for obscure stuff.
- The creamiest, dreamiest texture. The secret is mashing those yolks until they’re absolutely silky smooth. It makes all the difference between a good deviled egg and a great one.
- Incredibly easy to customize. Once you’ve got the base down, you can add your own twist—a pinch of curry powder, some fresh dill, whatever your heart desires.
- Totally reliable, every single time. I’ve made these for dozens of parties, and they never let me down. No guessing, no fussing—just perfect deviled eggs.
Ingredients for Deviled Eggs
The beauty of this recipe is that you likely have everything you need right now. For the base, you’ll want 6 large eggs—they’re the star of the show, so use good ones. Then, you need 3 tablespoons of your favorite mayonnaise (real mayo, not salad dressing, for that creamy richness). A teaspoon of yellow mustard gives it that classic tang, plus 1/4 teaspoon fine salt and 1/8 teaspoon freshly ground black pepper. Finally, a dusting of paprika for garnish adds that beautiful pop of color. See? All pantry staples!
How to Make Deviled Eggs
Alright, let’s get to the fun part—actually making these little beauties! I promise, once you get the hang of this method, you’ll be cranking out perfect deviled eggs without even thinking. The whole process breaks down into four simple steps, and the key is just paying attention to the details, especially with those eggs.
Boil and Cool the Eggs
This is where it all starts, and getting it right is crucial. First, place your eggs in a single layer in a saucepan—don’t crowd them. Cover them with cold water by about an inch, then bring that water to a full, rolling boil over high heat. The second it starts boiling hard, slap a lid on the pan and immediately pull it off the heat. Now, here’s the magic part: let the eggs sit in that hot water, covered, for exactly 10 minutes. Don’t skimp on this time! While they’re resting, fill a bowl with ice water. When the timer goes off, transfer the eggs straight into that ice bath. Let them cool completely—this stops the cooking and makes peeling a million times easier.
Peel and Halve the Eggs
Once those eggs are good and cold, it’s time to peel. I find the easiest way is to do it right under a gentle stream of cool running water. The water gets under the shell and helps it slip right off. Start by gently cracking the shell all over, then roll the egg between your palms to loosen it. After you’ve got a clean, smooth egg, grab a sharp knife and cut it in half lengthwise. A sharp knife gives you those clean, beautiful halves that look so nice on the plate.
Make the Deviled Eggs Filling
Now for the best part—the filling! Gently pop the yolks out of the whites and into a medium bowl. Take a fork and mash them up really well. I mean, really mash them until there are no big lumps left. This is the secret to that silky, creamy texture. Then, add your mayonnaise, yellow mustard, salt, and pepper. Stir it all together until it’s completely smooth and uniform. Give it a taste—this is your moment! Need a little more tang? Add a tiny bit more mustard. A touch more creaminess? A smidge more mayo. Adjust it until it tastes perfect to you.
Fill and Garnish the Deviled Eggs
You’ve got two great options here. For a rustic, homey look, just grab a small spoon and carefully fill each egg white half with the yolk mixture, mounding it up a little. For a fancier presentation—and honestly, it’s what I usually do for parties—spoon the filling into a piping bag fitted with a star tip and pipe it in. It looks so impressive! Either way, finish them off with a light, even sprinkle of paprika over the top. That little pop of red is the classic finishing touch.
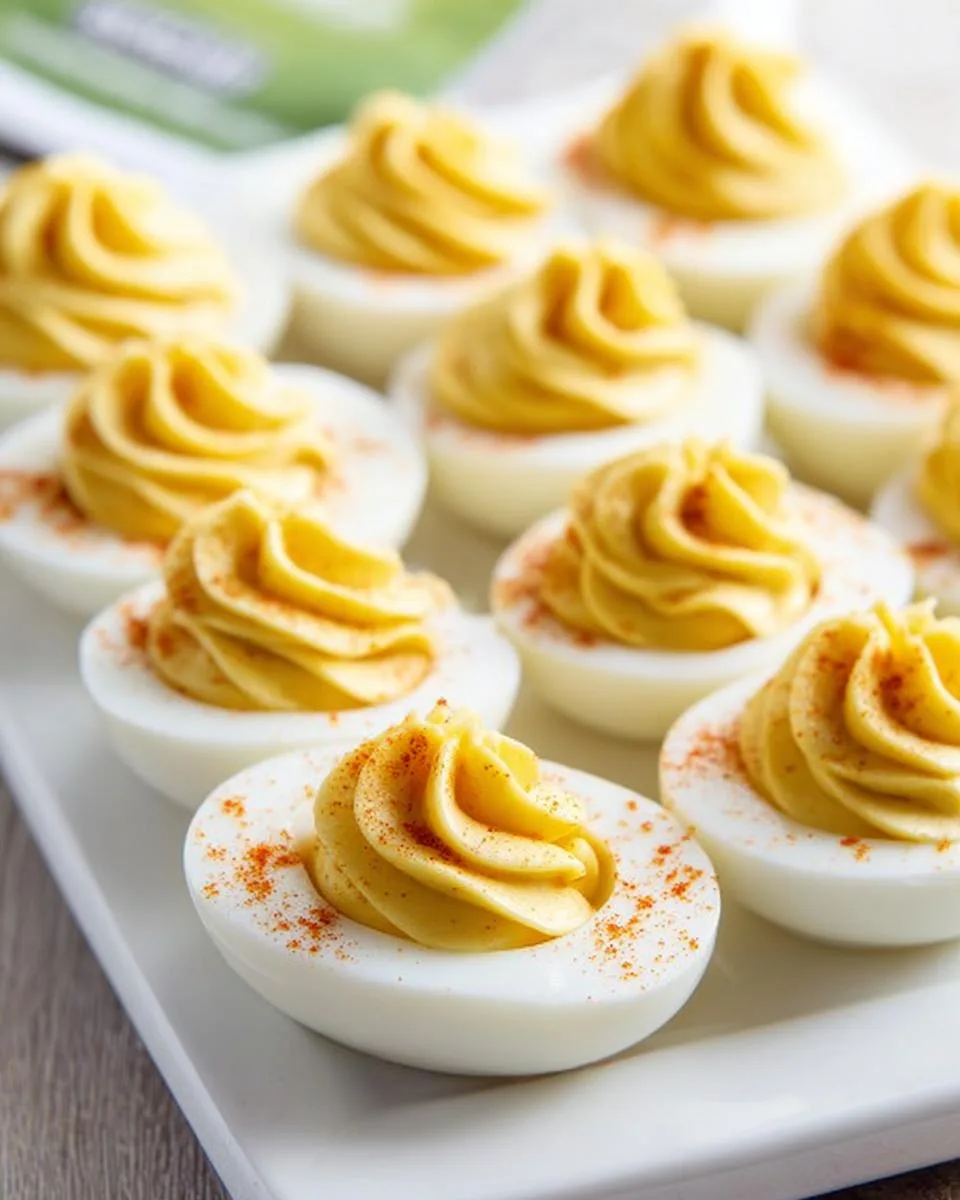
Tips for the Best Deviled Eggs
After making these for years, I’ve picked up a few tricks that really make a difference. First up, use older eggs for easier peeling. Seriously, eggs that have been in the fridge for a week or so peel like a dream—fresh ones are a nightmare. Next, don’t rush the mashing. You want those yolks absolutely silky smooth before you add the mayo and mustard. Lumpy filling is a total buzzkill.
Also, here’s a big one: chill the filled eggs for at least 30 minutes before serving. It firms up the filling and makes the flavor really come together. And whatever you do, don’t overmix the filling once you add the mayo—just stir until it’s combined. Overmixing can make it a little greasy. Follow these little tips, and you’ll be the deviled egg hero of every party!
Deviled Eggs Variations
Once you’ve mastered the classic, it’s so fun to play around! I love how this simple base is basically a blank canvas for whatever flavors you’re craving. Here are a few of my favorite twists that don’t stray too far from the original magic.
For a warm, earthy kick, just stir a pinch of curry powder into the yolk mixture. It adds this gorgeous golden hue and a subtle, aromatic flavor that’s absolutely addictive. If you’re after something fresh and bright, mix in a tablespoon of finely chopped fresh chives or dill—the herbiness cuts right through the richness. And for those who like a little heat, top each filled egg with a small piece of pickled jalapeño. The tangy, spicy pop is a total game-changer!
Frequently Asked Questions About Deviled Eggs
I get asked about these little guys all the time, so let me clear up a few of the most common questions. It’s always the same ones, and honestly, they’re good ones to know!
Can I make deviled eggs ahead of time?
Absolutely! This is my favorite party trick. You can prep the hard-boiled egg whites and the yolk filling separately up to 2 days in advance. Just store the whites in a covered container and the filling in a piping bag or a zip-top bag in the fridge. Then, when you’re ready to serve, just snip the corner of the bag and pipe it in. It takes two minutes and looks like you slaved all day!
How do I store leftover deviled eggs?
If you somehow have any left (which, let’s be honest, is rare!), pop them in an airtight container and stick them in the fridge. They’re best eaten within 2 days, but I find the texture is nicest the day you make them. The whites can get a little weepy if they sit too long.
Why are my deviled eggs runny?
Oh, I’ve been there! A runny filling is usually a sign of one of two things. First, overcooked eggs—when the yolks get that greenish-gray ring, they release excess moisture. Second, you might have added too much mayonnaise. Next time, start with a little less mayo, and make sure your eggs are cooked just right—that 10-minute rest is key!
Can I freeze deviled eggs?
Please don’t! I know it’s tempting to want to prep everything way ahead, but freezing is a no-go. The egg whites turn into a rubbery, watery mess, and the mayonnaise-based filling separates and gets grainy. Trust me on this one—just stick to making them fresh or prepping the parts separately in the fridge.
Serving Suggestions for Deviled Eggs
Honestly, these deviled eggs are the ultimate party food. I love setting them out on a big platter at everything from casual backyard barbecues to fancy holiday dinners. They just fit right in. They’re also perfect for potlucks—just arrange them on a pretty plate and watch them disappear. They pair beautifully with other finger foods like crunchy veggie sticks, cheese cubes, or even some salty potato chips. Basically, any time you need a crowd-pleasing appetizer, this is your recipe.
Nutritional Information
Just a quick note before you dig in! The nutritional info I’ve shared here is just an estimate, based on the exact ingredients I listed. It’ll change a bit depending on the specific brands you use or if you make any swaps. So, take it as a helpful guideline, not a strict rule!
PrintCreamy Deviled Eggs Recipe in 4 Easy Steps
Classic deviled eggs with a creamy, tangy filling. A simple appetizer for any gathering.
- Prep Time: 15 minutes
- Cook Time: 10 minutes
- Total Time: 25 minutes
- Yield: 12 deviled eggs (6 servings) 1x
- Category: Appetizer
- Method: Boiled
- Cuisine: American
- Diet: Vegetarian
Ingredients
- 6 large eggs
- 3 tablespoons mayonnaise
- 1 teaspoon yellow mustard
- 1/4 teaspoon salt
- 1/8 teaspoon black pepper
- Paprika for garnish
Instructions
- Place eggs in a saucepan and cover with cold water. Bring to a boil, then cover and remove from heat. Let stand 10 minutes.
- Drain and cool eggs under cold running water. Peel and cut in half lengthwise.
- Scoop out yolks into a bowl. Mash yolks with a fork.
- Add mayonnaise, mustard, salt, and pepper to yolks. Mix until smooth.
- Spoon or pipe yolk mixture into egg white halves.
- Sprinkle with paprika. Refrigerate until serving.
Notes
- For easier peeling, use older eggs or add a pinch of baking soda to the boiling water.
- You can adjust mustard and mayo to taste.
Nutrition
- Serving Size: 2 deviled eggs (1/2 egg each)
- Calories: 140
- Sugar: 1g
- Sodium: 220mg
- Fat: 11g
- Saturated Fat: 3g
- Unsaturated Fat: 7g
- Trans Fat: 0g
- Carbohydrates: 1g
- Fiber: 0g
- Protein: 7g
- Cholesterol: 190mg
