
Every fall, I get this irresistible urge to bake something that captures the cozy, spicy-sweet magic of the season. And these Maple-Glazed Pumpkin Poptarts? They’ve become my absolute go-to. I’m talking a flaky, buttery crust wrapped around a silky pumpkin filling spiced just right, all topped with a dreamy maple glaze that’s frankly dangerous to have around. I’ve tested this recipe at least six times (my family was happy to be taste testers, trust me), and I’m so excited to share the final version with you.
I first made them for our annual fall gathering, and honestly, they disappeared faster than the apple cider. There’s something about pulling a batch of homemade poptarts out of the oven that feels like a hug. They’re miles better than the store-bought kind, and the smell of pumpkin and cinnamon filling your kitchen is pure happiness. Trust me, once you try these, you’ll never go back.
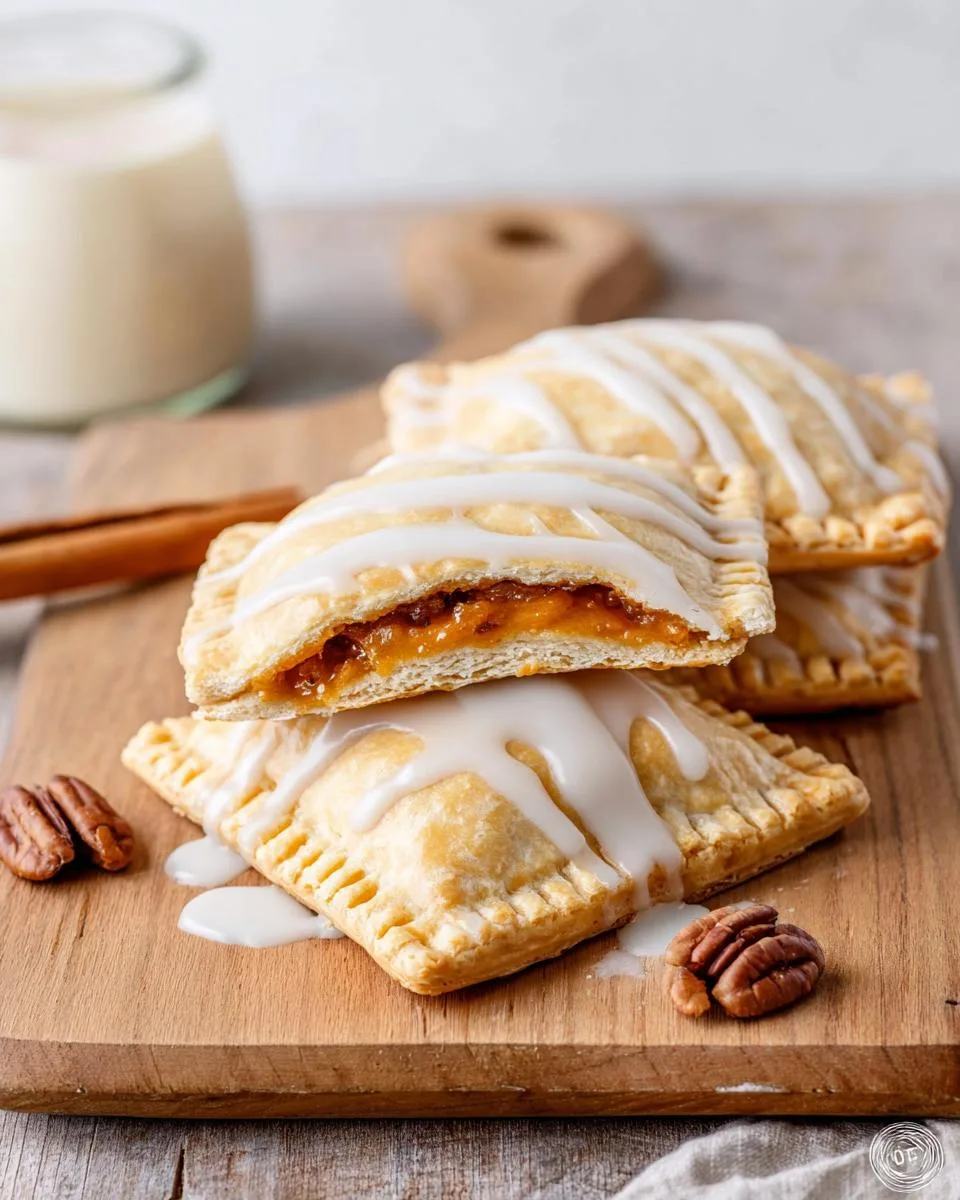
Why You’ll Love These Maple-Glazed Pumpkin Poptarts
Let me tell you, these little guys are everything. I mean, seriously, what’s not to love?
- They’re a million times better than store-bought. Once you taste that flaky, buttery crust, those cardboard packets just won’t cut it anymore.
- They scream fall. Pumpkin and maple are a perfect pair, and the smell alone makes you feel like you’re living in a pumpkin spice candle.
- They’re secretly easy to make ahead. The dough chills in the fridge, and you can freeze the assembled poptarts so you can bake them fresh whenever you want.
- They’re totally yours. Not a fan of nuts? Leave ’em out. Want a chocolate drizzle? Go for it! This recipe is super flexible.
Ingredients for Maple-Glazed Pumpkin Poptarts
Alright, let’s talk about what you’ll need. I like to measure everything out before I start—it makes the whole process so much smoother. For the dough, you’ll want 2 cups all-purpose flour (standard stuff works great), 1/2 teaspoon salt, and 1 cup unsalted butter, cold and cubed—that cold butter is non-negotiable for flaky layers. You’ll also need 1/2 cup cold water (I use ice water to keep it extra chilly). For the filling: 1 cup pure pumpkin puree (not pie filling, promise), 1/4 cup packed brown sugar, and 1 teaspoon pumpkin pie spice. And for that gorgeous glaze: 1 cup powdered sugar, 2 tablespoons pure maple syrup (the real stuff, please), and 1 tablespoon milk. If you’ve got a kitchen scale, you can weigh the flour for extra precision—I do it all the time.
Ingredient Notes and Substitutions for Maple-Glazed Pumpkin Poptarts
Let me walk you through the key players here, because a few little details really make a difference. First up, the butter. I cannot stress this enough—it has to be cold. Like, straight-from-the-fridge cold. That’s what gives you those flaky, shattery layers. If it softens, pop it back in the freezer for a few minutes.
For the pumpkin, you can use canned puree or homemade—just make sure it’s pure pumpkin, not pie filling. And the maple syrup? Please, use the real stuff. Imitation syrup is just corn syrup with flavoring, and it won’t give you that deep, rich taste. For more information on maple syrup grades and uses, check out this guide.
Need to swap things up? A 1:1 gluten-free flour blend works great (I’ve done it). Dairy-free butter is fine too, just keep it cold. For the brown sugar, coconut sugar is a solid substitute. And if you don’t have pumpkin pie spice, just add a pinch of cinnamon and nutmeg. You can even use a store-bought pie crust to save time, but honestly, the homemade dough is so worth it.
How to Prepare Maple-Glazed Pumpkin Poptarts
Alright, let’s get baking! I promise, this is way easier than it sounds. Just take it step by step, and you’ll have a batch of these beauties in no time.
First things first, preheat your oven to 375°F and line a baking sheet with parchment paper. Trust me, the parchment makes cleanup a breeze.
For the dough: In a big bowl, whisk together the flour and salt. Drop in those cold, cubed butter pieces and use a pastry cutter or your fingertips to work them into the flour until it looks like coarse meal with some pea-sized bits. That’s where the flakiness comes from. Gradually add the cold water, stirring with a fork until the dough just comes together. Don’t overwork it. Shape it into a disc, wrap it in plastic, and chill for at least 30 minutes. I like to let it rest overnight for even flakier results—it’s worth the wait.
For the filling: While the dough chills, mix the pumpkin puree, brown sugar, and pumpkin pie spice in a bowl. Give it a good stir until it’s smooth and smells like heaven. You can toss in some chopped pecans here if you want a little crunch.
Assembly time: On a lightly floured surface, roll the dough out to about 1/8 inch thick. Cut it into 3×4 inch rectangles. Place a spoonful of filling in the center of half of the rectangles, leaving a little border around the edges. Top with the remaining rectangles, then seal the edges with a fork. Don’t forget to prick the tops with a fork too—those little vents let steam escape and keep your poptarts from bursting.
Bake for 20 minutes until they’re golden and gorgeous. Let them cool completely on a wire rack before you even think about glazing. For the glaze, just whisk together the powdered sugar, maple syrup, and milk until smooth and drizzle it all over. Let it set, and then dive in!
Tips for Perfect Maple-Glazed Pumpkin Poptarts
Alright, let me share a few things I’ve learned the hard way so you don’t have to. First up, keep that dough cold. It’s the secret to those flaky, shattery layers. If it gets soft while you’re rolling, just pop it back in the fridge for a few minutes. Don’t skip this—it’s non-negotiable.
Also, don’t overwork the dough. Mix it just until it comes together. Overmixing means tough poptarts, and nobody wants that. When you’re sealing the edges, press down firmly with a fork. I’m a little obsessive about this—I want those edges tight so no filling leaks out during baking.
And here’s a big one: let them cool completely before glazing. I know, I know, it’s torture. But if you glaze them while they’re warm, the glaze will just melt into a puddle. For the glaze consistency, add a splash more milk if it’s too thick, or a little extra powdered sugar if it’s too thin. You want it thick enough to drizzle but not runny.
For storage, keep them in an airtight container at room temperature for up to 3 days. If you want to keep them longer, the fridge works for up to 5 days. To reheat? Just pop them in the toaster or the oven at 300°F for about 5 minutes—they’ll taste fresh out of the oven.
Freezing is my favorite trick. Assemble the poptarts, but don’t bake them. Freeze them on a baking sheet, then transfer to a freezer bag. When you’re ready, bake from frozen, just add 5 minutes to the time. It’s perfect for a last-minute treat.
Variations for Maple-Glazed Pumpkin Poptarts
Once you get the hang of the basic recipe, the possibilities are endless. I’ve had way too much fun playing around with different versions in my kitchen.
Want a little kick? Add a pinch of cayenne to the pumpkin filling. It’s a total game-changer. Or, swap the pumpkin for a rich chocolate filling if that’s your thing. A cream cheese glaze is another amazing twist, and adding a layer of cream cheese right in the middle of the poptart is next level.
Make them mini! Just cut the rectangles smaller and adjust the bake time. Play with spices like cardamom or ginger. For crunch, top them with crushed graham crackers or toasted coconut.
Frequently Asked Questions About Maple-Glazed Pumpkin Poptarts
I get asked about these poptarts all the time, so I figured I’d answer the most common questions right here. Hope this helps!
Can I use fresh pumpkin puree?
Absolutely! I’ve done it plenty of times. Just make sure you roast the pumpkin first, then drain it really well to get rid of any extra moisture. You don’t want a soggy poptart. You’ll need about 1 cup of the drained puree, same as the recipe calls for.
Can I make these gluten-free?
Yes, you can! I’ve tested it with a 1:1 gluten-free flour blend that has xanthan gum, and it works great. Just be warned—the dough will be a little more delicate to handle. Don’t stress if it tears a bit; you can always patch it up. And keep it cold, that’s even more important with gluten-free dough.
How do I store leftovers?
Store them in an airtight container at room temperature for up to 3 days. If you want them to last a bit longer, pop them in the fridge for up to 5 days. To reheat, just throw one in the toaster or the oven at 300°F for about 5 minutes. They’ll taste almost fresh out of the oven!
Can I freeze Maple-Glazed Pumpkin Poptarts?
Yes, and this is my favorite trick! Assemble the poptarts completely, but don’t bake them. Freeze them on a baking sheet until solid, then transfer to a freezer bag. When you’re ready, bake them straight from frozen, just add 5 minutes to the baking time. And remember to glaze them after they bake and cool—don’t freeze the glaze on. That way you get that perfect maple drizzle every time.
Nutritional Information for Maple-Glazed Pumpkin Poptarts
Here’s the breakdown for one poptart, if you’re curious. Keep in mind these are just estimates—they’ll shift a bit depending on the exact brands or swaps you make.
- Calories: 320
- Fat: 18g (11g saturated)
- Carbs: 38g (2g fiber, 18g sugar)
- Protein: 4g
- Sodium: 180mg
Not too shabby for a homemade treat, right? I always figure if I’m going to indulge, I’d rather it be something I made myself with real butter and real maple syrup.
Okay, now it’s your turn! I absolutely love hearing about your baking adventures, so please don’t be shy. Did you make these? Let me know how they turned out in the comments below—I read every single one and I get so excited when you tell me about your tweaks and triumphs. And if you snapped a photo, tag me on Instagram @yourhandle. I can’t wait to see your beautiful poptarts! There’s nothing better than knowing this recipe is bringing a little fall magic into your kitchen too.
PrintMaple-Glazed Pumpkin Poptarts: 20-Minute Flaky
Homemade poptarts with a pumpkin filling and maple glaze.
- Prep Time: 30 minutes
- Cook Time: 20 minutes
- Total Time: 50 minutes
- Yield: 8 poptarts 1x
- Category: Dessert
- Method: Baking
- Cuisine: American
- Diet: Vegetarian
Ingredients
- 2 cups all-purpose flour
- 1/2 teaspoon salt
- 1 cup unsalted butter, cold and cubed
- 1/2 cup cold water
- 1 cup pumpkin puree
- 1/4 cup brown sugar
- 1 teaspoon pumpkin pie spice
- 1 cup powdered sugar
- 2 tablespoons maple syrup
- 1 tablespoon milk
Instructions
- Mix flour and salt. Cut in butter until crumbly. Add water and form dough. Chill for 30 minutes.
- Combine pumpkin puree, brown sugar, and pumpkin pie spice for filling.
- Roll dough into a rectangle. Cut into 3×4 inch rectangles.
- Place a spoonful of filling on half the rectangles. Top with remaining rectangles. Seal edges with a fork.
- Bake at 375°F for 20 minutes until golden.
- Whisk powdered sugar, maple syrup, and milk. Drizzle over cooled poptarts.
Notes
- You can add chopped pecans to the filling for crunch.
- Store in an airtight container for up to 3 days.
Nutrition
- Serving Size: 1 poptart
- Calories: 320
- Sugar: 18g
- Sodium: 180mg
- Fat: 18g
- Saturated Fat: 11g
- Unsaturated Fat: 6g
- Trans Fat: 0g
- Carbohydrates: 38g
- Fiber: 2g
- Protein: 4g
- Cholesterol: 45mg
