
I still remember the first time I stumbled across the idea for a No-Bake Blackberry Oreo Tart. It was one of those sweltering July afternoons when turning on the oven felt absolutely criminal. I had a houseful of guests coming for a casual backyard barbecue, and I needed something that looked fancy but wouldn’t take hours or heat up the kitchen. The tart came together in about thirty minutes, and when I pulled it out of the fridge later that evening, everyone just stopped and stared. The dark, crunchy Oreo crust, the silky cream cheese filling, and that gorgeous purple-black berry swirl on top—it was the prettiest thing on the table. My sister-in-law actually asked for the recipe before she’d even finished her slice, and that’s when I knew I’d stumbled onto something truly special. This dessert is proof that you don’t need an oven, a pastry degree, or a ton of time to create something that tastes and looks like it came from a fancy bakery.
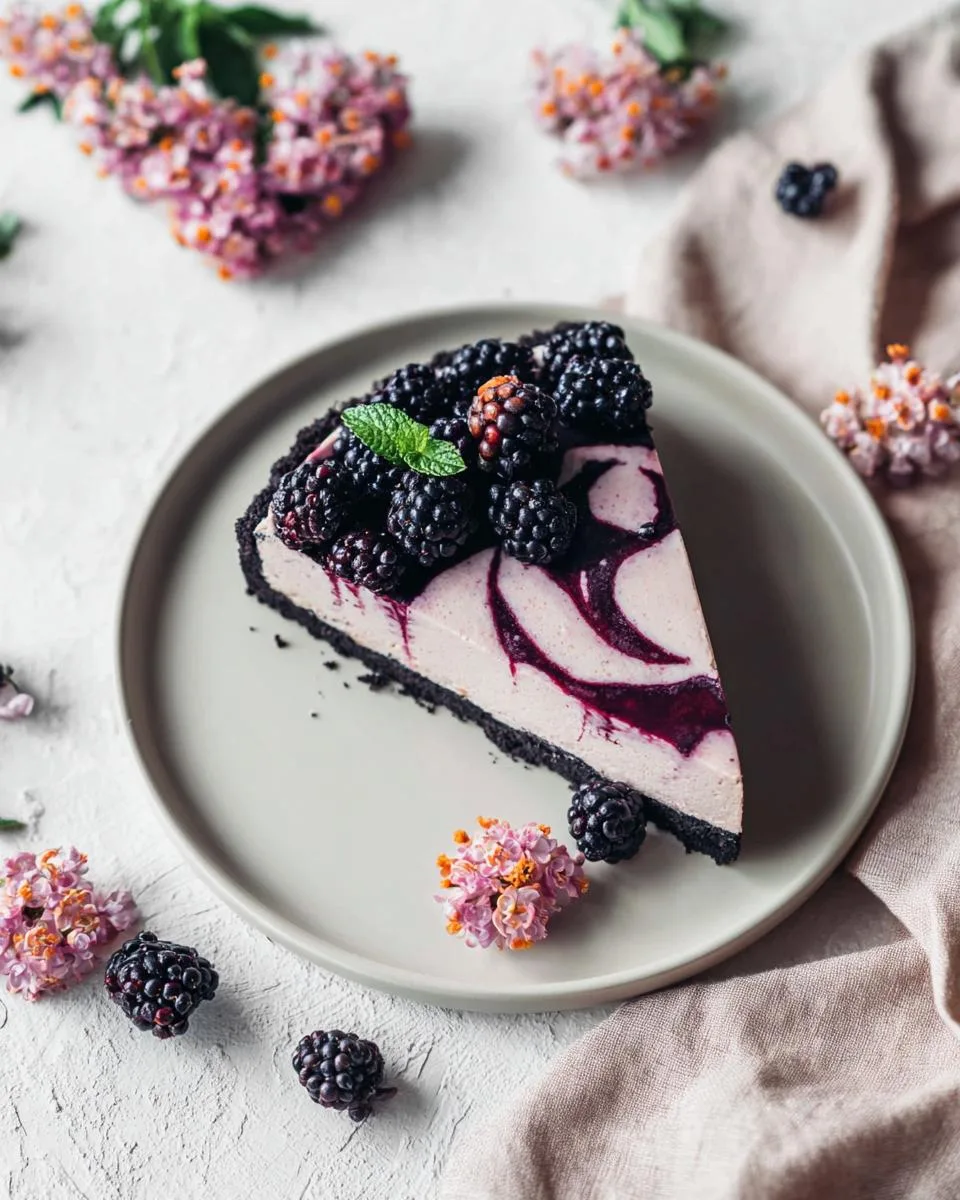
Why This No-Bake Blackberry Oreo Tart Works
Honestly, this tart is pretty much magic in a pie pan. Let me break down why it’s become my go-to for summer parties and lazy weekends alike:
- Zero oven time. On a hot day, that alone is a lifesaver. Your kitchen stays cool, and you don’t have to worry about a thing burning.
- You don’t need to be a baker. If you can crush cookies and stir a bowl, you can make this. No fussy pastry skills required.
- Simple ingredients, showstopper results. Oreos, cream cheese, blackberries, cream—stuff you probably already have. But when you layer them up? It looks like a bakery case.
- That texture combo. The crunchy Oreo crust, the silky, creamy filling, and the bright, juicy blackberry swirl on top? It’s a party in your mouth, and everyone’s invited.
Ingredients for the No-Bake Blackberry Oreo Tart
Okay, let’s talk ingredients! I love that this tart uses a short, straightforward list—you probably have most of it in your kitchen right now. But let me walk you through exactly what you’ll need and why a couple of details really matter. I’ve broken it down into three groups so it’s easy to follow. Trust me, taking a second to get the right stuff—like making sure your cream cheese is truly soft and your heavy cream is the real deal—makes all the difference between a good tart and a “can I get the recipe?” tart. Here’s your shopping list!
For the Oreo Crust
You’ll need 24 Oreo cookies (yes, filling and all—don’t even think about scraping it out, that’s part of the magic) and 5 tablespoons of melted unsalted butter. That’s it! Simple, but so good.
For the Blackberry Sauce
For that gorgeous purple swirl, grab 2 cups of fresh blackberries (or frozen, just check the notes below), 1/2 cup of granulated sugar, and a tablespoon of lemon juice. The lemon juice brightens everything up and keeps the berries from tasting flat.
For the Cream Cheese Filling
This is where the creamy magic happens. You’ll need 8 ounces of cream cheese (make sure it’s fully softened to room temperature!), 1/2 cup of powdered sugar, 1 teaspoon of vanilla extract, and 1 cup of heavy cream. Look for whipping cream with at least 36% fat so it whips up nice and stiff.
How to Prepare the No-Bake Blackberry Oreo Tart
Alright, let’s get to the fun part—actually putting this tart together! I promise, it’s way easier than you think. The key is just following the steps in order and giving each layer the time it needs. Trust me, that patience pays off big time when you get that first clean slice. Let’s break it down step by step.
Making the Oreo Crust
First things first, crush those 24 Oreo cookies—filling and all—into fine crumbs. You can use a food processor or just pop them in a zip-top bag and go to town with a rolling pin. I like the bag method because it’s oddly satisfying. Mix the crumbs with the melted butter until it looks like wet sand, then press that mixture firmly into your tart pan. Use the bottom of a flat glass to really pack it down. Pop it in the fridge for at least 30 minutes to set up nice and firm.
Cooking the Blackberry Sauce
While your crust is chilling, let’s make that gorgeous sauce. Toss the blackberries, sugar, and lemon juice into a saucepan over medium heat. Stir it around and let it cook until the berries start breaking down and the mixture thickens up—about 10 minutes. You’ll see it go from a chunky mess to a beautiful, syrupy sauce. Here’s the most important part: let it cool completely. I usually transfer it to a bowl and stick it in the fridge to speed things up. Warm sauce will mess up your creamy filling, so don’t rush this step.
Whipping the Cream Cheese Filling
Now for the creamy layer. In a large bowl, beat the softened cream cheese with the powdered sugar and vanilla until it’s smooth and silky—no lumps allowed. In a separate bowl, whip the heavy cream to stiff peaks. Stiff peaks mean when you lift the whisk, the cream stands up tall and doesn’t droop over. Be careful not to over-whip, or you’ll end up with butter! Gently fold the whipped cream into the cream cheese mixture. Use a rubber spatula and fold from the bottom up, turning the bowl as you go, until it’s all combined. Take your time here—you want it light and fluffy, not deflated.
Assembling the Tart
Okay, this is where it all comes together. Spread that beautiful cream cheese filling evenly over your chilled Oreo crust. Smooth it out with a spatula. Then, spoon the cooled blackberry sauce over the top. Don’t just dump it all in one spot—dollop it around so you get nice swirls. Take a butter knife or a skewer and gently swirl it through the filling to create a marble effect. Don’t overdo it, or you’ll lose the contrast. Now, here’s the hard part: refrigerate the whole thing for at least 4 hours. I know, it’s torture, but it needs that time to set up properly so you can slice it cleanly. Overnight is even better if you can wait.
Ingredient Notes and Substitutions for Your Tart
Let me walk you through a few ingredient swaps that work beautifully here. If you need a gluten-free version, just grab a bag of gluten-free chocolate sandwich cookies—they crush up exactly the same way and taste just as amazing. The Oreo filling is part of the magic, so don’t skip it.
For the heavy cream, one cup equals about 240 ml. Make sure it’s at least 36% fat or it won’t whip up stiff enough to hold that beautiful filling. And yes, frozen blackberries are totally fine. Just thaw them first, then drain off any excess liquid before cooking—otherwise your sauce will be a little watery. That’s really all there is to it. Simple ingredients, simple swaps.
Tips for a Perfect No-Bake Blackberry Oreo Tart
Let me share a few things I’ve learned the hard way so you don’t have to. First, when you’re pressing that Oreo crust into the pan, use the bottom of a flat glass to really pack it down. Loose crumbs mean a crumbly mess later, and nobody wants that. Take your time, press firmly, and get into those edges.
Make sure your cream cheese is truly softened—leave it out on the counter for at least an hour. Cold cream cheese leads to lumpy filling, and you can’t fix that once it’s in the bowl. While you’re at it, don’t over-whip the heavy cream. Stop as soon as it holds stiff peaks. Whip it too long and you’ll end up with sweet butter, which is a disaster for this tart.
Finally, for the cleanest slices, run a dry knife under hot water, wipe it dry, then cut. Wipe the blade between each slice. That little trick makes all the difference between a messy wedge and a picture-perfect piece.
Variations to Change This No-Bake Blackberry Oreo Tart
Once you’ve mastered the original, it’s so fun to play around. Swap the blackberries for raspberries or sliced strawberries—both work beautifully and give you a totally different vibe. If you’re feeling citrusy, grate a little lemon zest right into the cream cheese filling before you fold in the whipped cream. It adds this bright, fresh pop that’s just lovely.
For a little crunch and sweetness, sprinkle some chopped white chocolate over the top right after you swirl the sauce. It looks pretty and tastes amazing against the tart berries. Really, the possibilities are endless, and that’s what makes this recipe such a keeper.
How to Store and Reheat Leftover Tart
If you somehow have leftovers—which honestly doesn’t happen often in my house—just pop the whole tart in the fridge. Cover it loosely with plastic wrap or store slices in an airtight container. It’ll stay fresh and delicious for up to 3 days. As for reheating, don’t even think about it. This is a cold dessert through and through, and that creamy filling wants to stay chilled. Trust me, it’s perfect straight from the fridge.
Frequently Asked Questions About the No-Bake Blackberry Oreo Tart
I get asked a ton of questions about this easy summer dessert, so let me clear up a few of the most common ones. First up: Can I make this dairy-free? You can try using dairy-free cream cheese and coconut cream in place of the heavy cream, but the texture won’t be quite as silky. It’s doable, just don’t expect the exact same fluffy filling.
Why is my filling runny? That usually happens for one of three reasons: your cream cheese wasn’t fully softened (so it didn’t incorporate smoothly), your heavy cream wasn’t whipped to stiff peaks, or you added the blackberry sauce while it was still warm. Make sure the sauce is completely cool, and whip that cream until it holds its shape firmly.
Can I freeze this tart? Honestly, I don’t love the texture after freezing. The cream filling gets a little icy, and the Oreo crust can soften. If you absolutely must, freeze it without the blackberry swirl, then add the sauce after it thaws in the fridge. But for the best experience, just make it fresh and keep it in the fridge for up to three days.
Can I use a different fruit? Absolutely! Raspberries or sliced strawberries work beautifully in place of the blackberries. This Oreo crust is surprisingly versatile, so feel free to swap in whatever berries look best at the market.
Nutritional Information
Just a heads up—these numbers are rough estimates. Per slice, you’re looking at about 420 calories, 28 grams of fat, 40 grams of carbs, and 5 grams of protein. Of course, it all depends on the exact brands you use and whether you sneak an extra swirl of sauce (I won’t judge). If you’re keeping track, just plug your specific ingredients into a calculator. Otherwise, enjoy every bite without overthinking it!
Your Turn to Make This Tart
Alright, now it’s your turn to get in the kitchen and make this happen. I’d absolutely love to hear how it goes for you. Drop a comment below and tell me if you tried any fun swaps or if your family devoured it as fast as mine does. And if you’re feeling proud of your beautiful creation (you should be), snap a photo and share it on social media—I’d love to see those gorgeous blackberry swirls. Oh, and while you’re at it, give the recipe a rating too. It helps other folks find this little gem and know it’s worth making. Happy baking, friend!
PrintNo-Bake Blackberry Oreo Tart: 20-Minute Wonder
A no-bake tart with an Oreo cookie crust and a creamy blackberry filling. This dessert is quick to prepare and requires no oven time.
- Prep Time: 20 minutes
- Cook Time: 10 minutes
- Total Time: 4 hours 30 minutes
- Yield: 8 servings 1x
- Category: Dessert
- Method: No-Bake
- Cuisine: American
- Diet: Vegetarian
Ingredients
- 24 Oreo cookies
- 5 tablespoons unsalted butter, melted
- 2 cups fresh blackberries
- 1/2 cup granulated sugar
- 1 tablespoon lemon juice
- 1 cup heavy cream
- 8 ounces cream cheese, softened
- 1/2 cup powdered sugar
- 1 teaspoon vanilla extract
Instructions
- Crush the Oreo cookies into fine crumbs. Mix with melted butter until combined. Press into a 9-inch tart pan. Refrigerate for 30 minutes.
- In a saucepan, combine blackberries, granulated sugar, and lemon juice. Cook over medium heat until berries break down and mixture thickens, about 10 minutes. Let cool completely.
- In a large bowl, beat cream cheese, powdered sugar, and vanilla extract until smooth.
- In a separate bowl, whip heavy cream to stiff peaks. Fold into cream cheese mixture.
- Spread the cream cheese mixture over the chilled crust. Spoon the cooled blackberry sauce on top. Swirl gently with a knife.
- Refrigerate for at least 4 hours or until set. Slice and serve.
Notes
- Use frozen blackberries if fresh are unavailable. Thaw and drain excess liquid before cooking.
- For a firmer crust, press the crumb mixture firmly and chill longer.
- Store leftovers in the refrigerator for up to 3 days.
Nutrition
- Serving Size: 1 slice (1/8 of tart)
- Calories: 420
- Sugar: 28 g
- Sodium: 280 mg
- Fat: 28 g
- Saturated Fat: 16 g
- Unsaturated Fat: 10 g
- Trans Fat: 0 g
- Carbohydrates: 40 g
- Fiber: 2 g
- Protein: 5 g
- Cholesterol: 75 mg
