
I’ll be honest—I love pumpkin pie, but rolling out pie dough? Not my favorite. That’s why these Pumpkin Pie Bars are my absolute go-to for fall. They give you that same creamy, spiced pumpkin filling and buttery crust, but without the fuss of a pie plate. I still remember the first time I made them for a Thanksgiving potluck; everyone asked for the recipe, and I’ve been making them every year since. Trust me, once you try these, you’ll never look back.
Why You’ll Love These Pumpkin Pie Bars
- They use simple ingredients you probably already have in your pantry.
- No rolling out a pie crust—just press the buttery crust into the pan.
- These Pumpkin Pie Bars are super portable, perfect for potlucks and Thanksgiving.
- Each bar gives you that classic pumpkin pie taste in a neat, no-fuss serving.
- I love how the creamy filling stays perfectly set after chilling—no slices falling apart!
Ingredients for Pumpkin Pie Bars
Here’s the simple list of what you’ll need to make these bars. I’ve kept it straightforward—no fancy stuff, just the good stuff.
- 1 ½ cups all-purpose flour
- ½ cup granulated sugar
- ½ cup cold butter, cubed
- 1 can (15 oz) pumpkin puree (not pumpkin pie filling)
- 1 can (14 oz) sweetened condensed milk (not evaporated)
- 2 large eggs
- 1 teaspoon pumpkin pie spice
- ½ teaspoon salt
Pumpkin Pie Bars Ingredient Notes and Substitutions
Let me walk you through the key ingredients in these Pumpkin Pie Bars. I’ve learned a few tricks over the years, and I want to share what really matters—and what you can swap in a pinch.
Pumpkin Puree for Pumpkin Pie Bars
Make sure you grab 100% pure pumpkin, not the pre-sweetened pumpkin pie mix. If you’re using homemade puree, just drain off any extra liquid so your filling isn’t watery.
Sweetened Condensed Milk in Pumpkin Pie Bars
This is what makes the filling creamy and sweet without any extra sugar. Don’t try substituting evaporated milk plus sugar—it just won’t give you the same silky texture.
Butter for the Crust
Cold butter is key for that flaky, tender crust. If you need a dairy-free option, a good vegan butter works great—just keep it cold and cut it in the same way.
Pumpkin Pie Spice Blend
Store-bought is fine, but I love making my own: mix 1 teaspoon cinnamon, ½ teaspoon ginger, ¼ teaspoon nutmeg, and ¼ teaspoon cloves. That’s enough for this recipe.
How to Make Pumpkin Pie Bars
Here’s how to make these Pumpkin Pie Bars—it’s really as simple as making the crust, whisking the filling, and letting the oven do its thing. Trust me, if you can stir, you can nail this dessert. I’ll walk you through each step so you get that perfect buttery crust and creamy, spiced filling every single time.
Step 1: Prepare the Crust for Pumpkin Pie Bars
Start by preheating your oven to 350°F and lining a 9×9-inch pan with parchment paper. I like to leave a little overhang on the sides—it makes lifting the bars out so much easier. In a bowl, whisk together the flour and sugar, then cut in the cold butter using a pastry blender or your fingers. You want it to look like coarse crumbs. Press the mixture evenly into the bottom of the pan and bake for 15 minutes. Let it cool for just a few minutes before you add the filling.
Step 2: Make the Pumpkin Pie Bars Filling
While the crust is baking, I whisk together the pumpkin puree, sweetened condensed milk, eggs, pumpkin pie spice, and salt. I just use a regular whisk—no need for a mixer. Make sure you scrape the bottom and sides so there are no hidden lumps of spice or pumpkin. It should be smooth, thick, and beautifully orange. Pour the filling right over the warm crust and spread it gently to the edges.
Step 3: Bake and Cool the Pumpkin Pie Bars
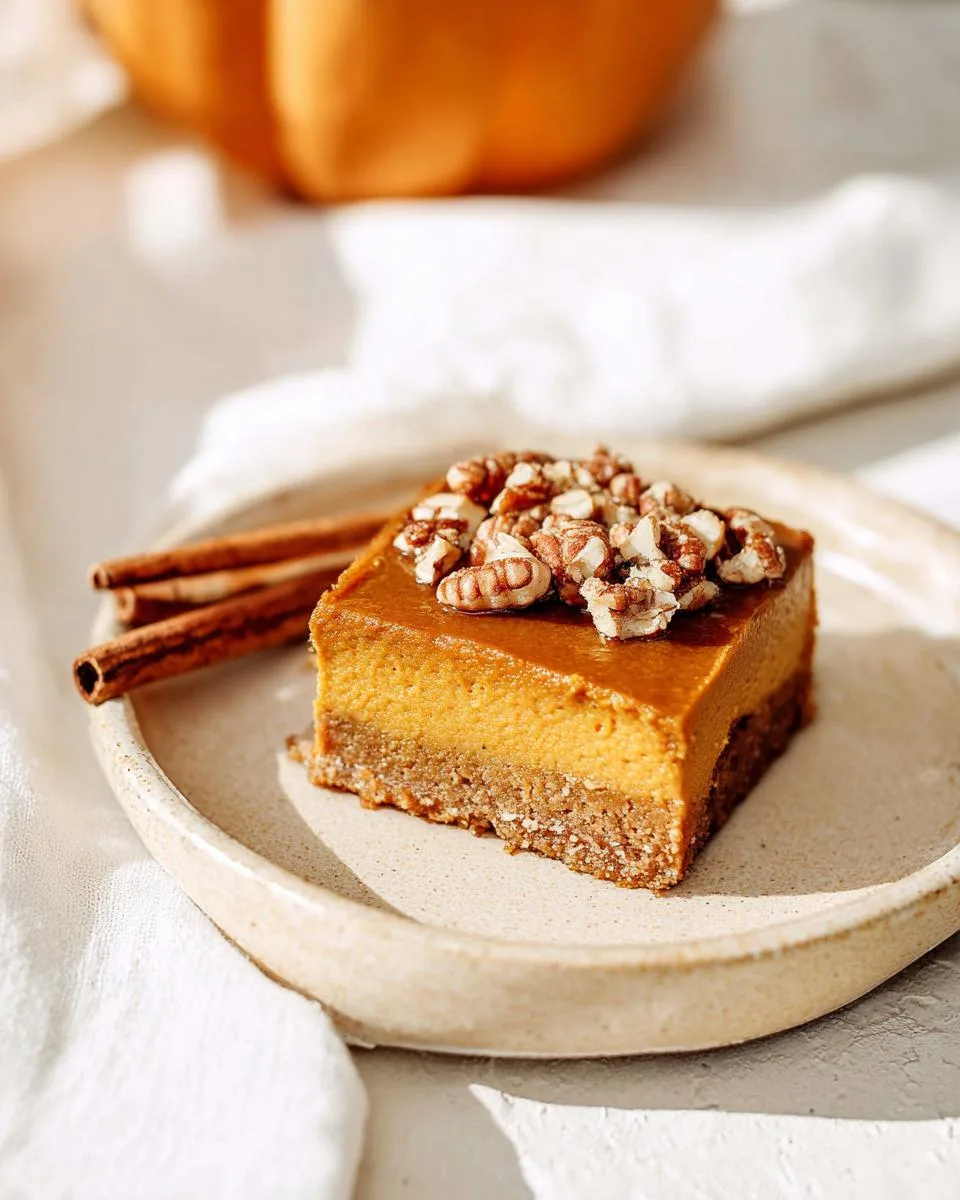
Bake the bars for 30 to 35 minutes, until the center is set. The toothpick test is my favorite way to check—insert it near the center, and it should come out clean. Let the bars cool completely in the pan on a wire rack. This is the important part: refrigerate them for at least 2 hours, or even overnight. I know it’s hard to wait, but it makes the filling perfectly firm, so you get clean, beautiful slices every time.
Tips for Perfect Pumpkin Pie Bars
I’ve made these Pumpkin Pie Bars more times than I can count, and I’ve learned a few tricks along the way. These tips will help you avoid the little mistakes I made in the beginning—so you get perfect bars every single time.
Use Room Temperature Eggs for Pumpkin Pie Bars
Cold eggs can make your filling seize up and turn lumpy. I just let my eggs sit out on the counter for about 30 minutes before I start mixing.
Don’t Overbake the Pumpkin Pie Bars
The center should still have a slight jiggle when you pull them out of the oven. It’ll finish setting as it cools, so you won’t end up with a dry, cracked top.
Chill Before Cutting
I know it’s tempting to dig in right away, but trust me—refrigerating for at least 2 hours gives you those clean, neat bars. Use a sharp knife and wipe it clean between cuts for the prettiest slices.
Pumpkin Pie Bars Variations
I love sticking to the classic, but sometimes you just want to mix things up. Here are a few of my favorite twists on these Pumpkin Pie Bars—each one adds a little something special without complicating things.
Chocolate Chip Pumpkin Pie Bars
Before the bars go into the oven, I sprinkle ½ cup of chocolate chips over the filling. The chocolate melts into little pockets of sweetness—so good.
Pecan Streusel Pumpkin Pie Bars
For a crunchy topping, mix together ½ cup brown sugar, ½ cup chopped pecans, and 2 tablespoons cold butter. Sprinkle over the filling before baking.
Gluten-Free Pumpkin Pie Bars
Just swap the all-purpose flour in the crust with a 1:1 gluten-free blend. If you’re adding oats to the streusel, make sure they’re certified gluten-free.
Storing and Reheating Pumpkin Pie Bars
I always try to make a double batch of these Pumpkin Pie Bars just so I can stash some away for later. They store and reheat beautifully, which is perfect for busy weeks or when surprise guests show up. Here’s my tried-and-true method for keeping them fresh.
How to Store Pumpkin Pie Bars
Keep your Pumpkin Pie Bars in an airtight container in the fridge, and they’ll stay perfect for up to 5 days. I always separate the layers with a piece of parchment paper—it stops them from sticking together and ruining that creamy top.
Freezing Pumpkin Pie Bars
You can absolutely freeze these Pumpkin Pie Bars for up to 3 months. I wrap each one individually in plastic wrap, then a layer of foil. When you’re ready, just thaw them in the fridge overnight. It’s like finding a little piece of fall in your freezer!
Reheating Pumpkin Pie Bars
I’ll be honest—I love eating them cold straight from the fridge. But if you want them warm, it’s super easy. Pop a single Pumpkin Pie Bar in the microwave for 15-20 seconds, or reheat a batch in a 300°F oven for about 5 minutes. That buttery crust gets so nice and crisp again.
Pumpkin Pie Bars Nutritional Information
Here’s the quick nutritional rundown for one Pumpkin Pie Bar: 280 calories, 22g sugar, 12g fat, 38g carbs, and 5g protein. Keep in mind these are estimates—your exact numbers depend on the brands and ingredients you use.
Frequently Asked Questions About Pumpkin Pie Bars
I get asked about these Pumpkin Pie Bars all the time—especially around the holidays. So I figured I’d answer the most common questions right here. If your question isn’t listed, just drop it in the comments below, and I’ll get back to you!
Can I Use Fresh Pumpkin for Pumpkin Pie Bars?
Absolutely, you can! Just roast a small sugar pumpkin until tender, scoop out the flesh, and puree it in a blender or food processor. Here’s the catch—homemade puree has a lot more water than canned. I always drain mine in a fine-mesh sieve lined with cheesecloth for about an hour. Squeeze gently to get rid of excess liquid, or your filling will be too watery.
Can I Make Pumpkin Pie Bars Ahead of Time?
Yes, and honestly, they taste even better the next day! The flavors have time to meld together, and the filling sets up nice and firm. I make mine up to 2 days ahead, keep them covered in the fridge, and just cut them right before serving. It’s my secret weapon for stress-free Thanksgiving hosting.
Why Did My Pumpkin Pie Bars Crack?
That happens when the bars get overbaked or go through a sudden temperature change. The filling expands too much in the oven, then contracts too fast as it cools—and that’s when cracks appear. My trick is to pull them out when the center still has a slight jiggle, then let them cool gradually on the counter before moving them to the fridge. Patience pays off here!
Can I Double the Recipe for Pumpkin Pie Bars?
You bet! I do this all the time when I’m feeding a crowd. Just use a 9×13-inch baking pan instead of the 9×9. The baking time will increase by about 5 to 10 minutes, so start checking with a toothpick a little early. You’ll know they’re done when the edges are set and the center barely jiggles. If you try this recipe, leave a comment below or share your photo on social media—I love seeing your creations!
PrintPumpkin Pie Bars 3-Step Foolproof Delight
These pumpkin pie bars have a buttery crust and creamy pumpkin filling. They are easy to make and perfect for fall.
- Prep Time: 20 minutes
- Cook Time: 45 minutes
- Total Time: 1 hour 5 minutes
- Yield: 12 bars 1x
- Category: Dessert
- Method: Baking
- Cuisine: American
- Diet: Vegetarian
Ingredients
- 1 ½ cups all-purpose flour
- ½ cup granulated sugar
- ½ cup cold butter, cubed
- 1 can (15 oz) pumpkin puree
- 1 can (14 oz) sweetened condensed milk
- 2 large eggs
- 1 teaspoon pumpkin pie spice
- ½ teaspoon salt
Instructions
- Preheat your oven to 350°F (175°C). Line a 9×9-inch baking pan with parchment paper.
- In a bowl, mix flour and sugar. Cut in butter until crumbly. Press mixture into the pan. Bake for 15 minutes.
- In another bowl, whisk pumpkin puree, condensed milk, eggs, pumpkin pie spice, and salt until smooth. Pour over the crust.
- Bake for 30 to 35 minutes, until the center is set. Cool completely in the pan.
- Refrigerate for at least 2 hours before cutting into bars.
Notes
- Use a toothpick to test doneness; it should come out clean.
- Store bars in the refrigerator for up to 5 days.
Nutrition
- Serving Size: 1 bar
- Calories: 280
- Sugar: 22 g
- Sodium: 220 mg
- Fat: 12 g
- Saturated Fat: 7 g
- Unsaturated Fat: 4 g
- Trans Fat: 0 g
- Carbohydrates: 38 g
- Fiber: 2 g
- Protein: 5 g
- Cholesterol: 55 mg
